")
")
")
![]()
IMPORTANT: PerfectPower is an extremely accurate power and performance measurement tool, but like all measurement material, it needs to be correctly configured and used to deliver its results with an optimal accuracy, and it is therefore essential to read this guide before any first use, thank you for your understanding.
I) Configuring the application (Setup)
IV) Measurement of power and performances
Annex) The measure report / Warnings Codes
VIII-A) Using the RaceBox Mini
VIII-B) Use of an external GPS in Bluetooth
0) Introduction
Using PerfectPower properly comes down to following a typical four-point approach:
1) Properly configure the application (chapter I)
2) Properly configure the Car sheet (chapter II)
3) Properly mount the phone in the car (chapter III)
4) Properly measure, using the flattest and smoothest possible measurement road, and averaging TWO measurements performed in BOTH directions of the road (chapter IV)
Note 1 (phones running Androïd 12 or more): When you open the application for the first time, you are asked if you want to allow PerfectPower to access the "Precise" (GPS) or "Approximate" (WIFI or GSM triangulation) position of the device, as well as the frequency of this access (3 choices: "While using the app", "Only this time", or "Deny"). Although it is obvious, please select the following two choices:
- Precise
- While using the app
For phones before Android 12, you are only asked for location access permission, but same note: please kindly grant it!
Note 2: It is strongly recommended to use an external GPS of at least 10 Hz communicating via Bluetooth with the application for an optimal results accuracy. PerfectPower recommends two:
- The RaceBox Mini (25 Hz, the highest frequency in "all-public" GPS), driven by PerfectPower (PerfectPower - RaceBox partnership)
- The SkyPro XGPS160 (10 Hz): the external GPS used for many years by members of the PerfectPower group. It works very well (it just requires a third-party Bluetooth GPS application to provide its data to PerfectPower), and it also obtained the 1st place in a fairly recent Internet comparison of "all-public" GPS, even if now the RaceBox Mini should become the new reference in the field...
Définition of the five basic screens
PerfectPower has five basic screens, which you can access from the main screen & home screen via the menu bar located in the middle of the screen, which has five icons. These screens are, from left to right:
1) Perfs screen (main screen and home screen): Accessible by pressing the Perfs icon (the 1st, on the left)
2) Track screen: Accessible by pressing the Track icon (the 2nd, in the middle-left)
3) Setup screen: Accessible by pressing the Setup icon (the 3rd, in the middle)
4) Cars screen: Accessible by pressing the Cars icon (the 4th, in the middle-right)
5) Results screen: Accessible by pressing the Results icon (the 5th, on the right)
I) Configuring the application (Setup)
Configuring the application is done in the Setup screen (accessible by pressing the Setup icon -the 3rd, in the middle-).
You must perform all the desired settings (depending on the type of measurement) from top to bottom, i.e.:
- the choice of units / colors (all types of measurement)
- the choice of measurement mode (power & accelerations & braking) (locked in version 6.0)
- the choice of power parameters (correction norm, weather conditions, losses calculation mode)
- the choice of performance simulation parameters (shift time)
- the choice of accelerations parameters (end speed, type of measurement stop)
- the choice of runs flying start parameters (gear engaged, start and end speed)
- the choice of braking parameters (start speed)
- the choice of rev calibration parameters (calibration rev)
- the choice of losses measurement parameters (start speed, measurement duration)
All the necessary explanations are already given in the application, you just have to follow them. If these are sufficient for you, you can move on to chapter II. Otherwise, details are given to you below.
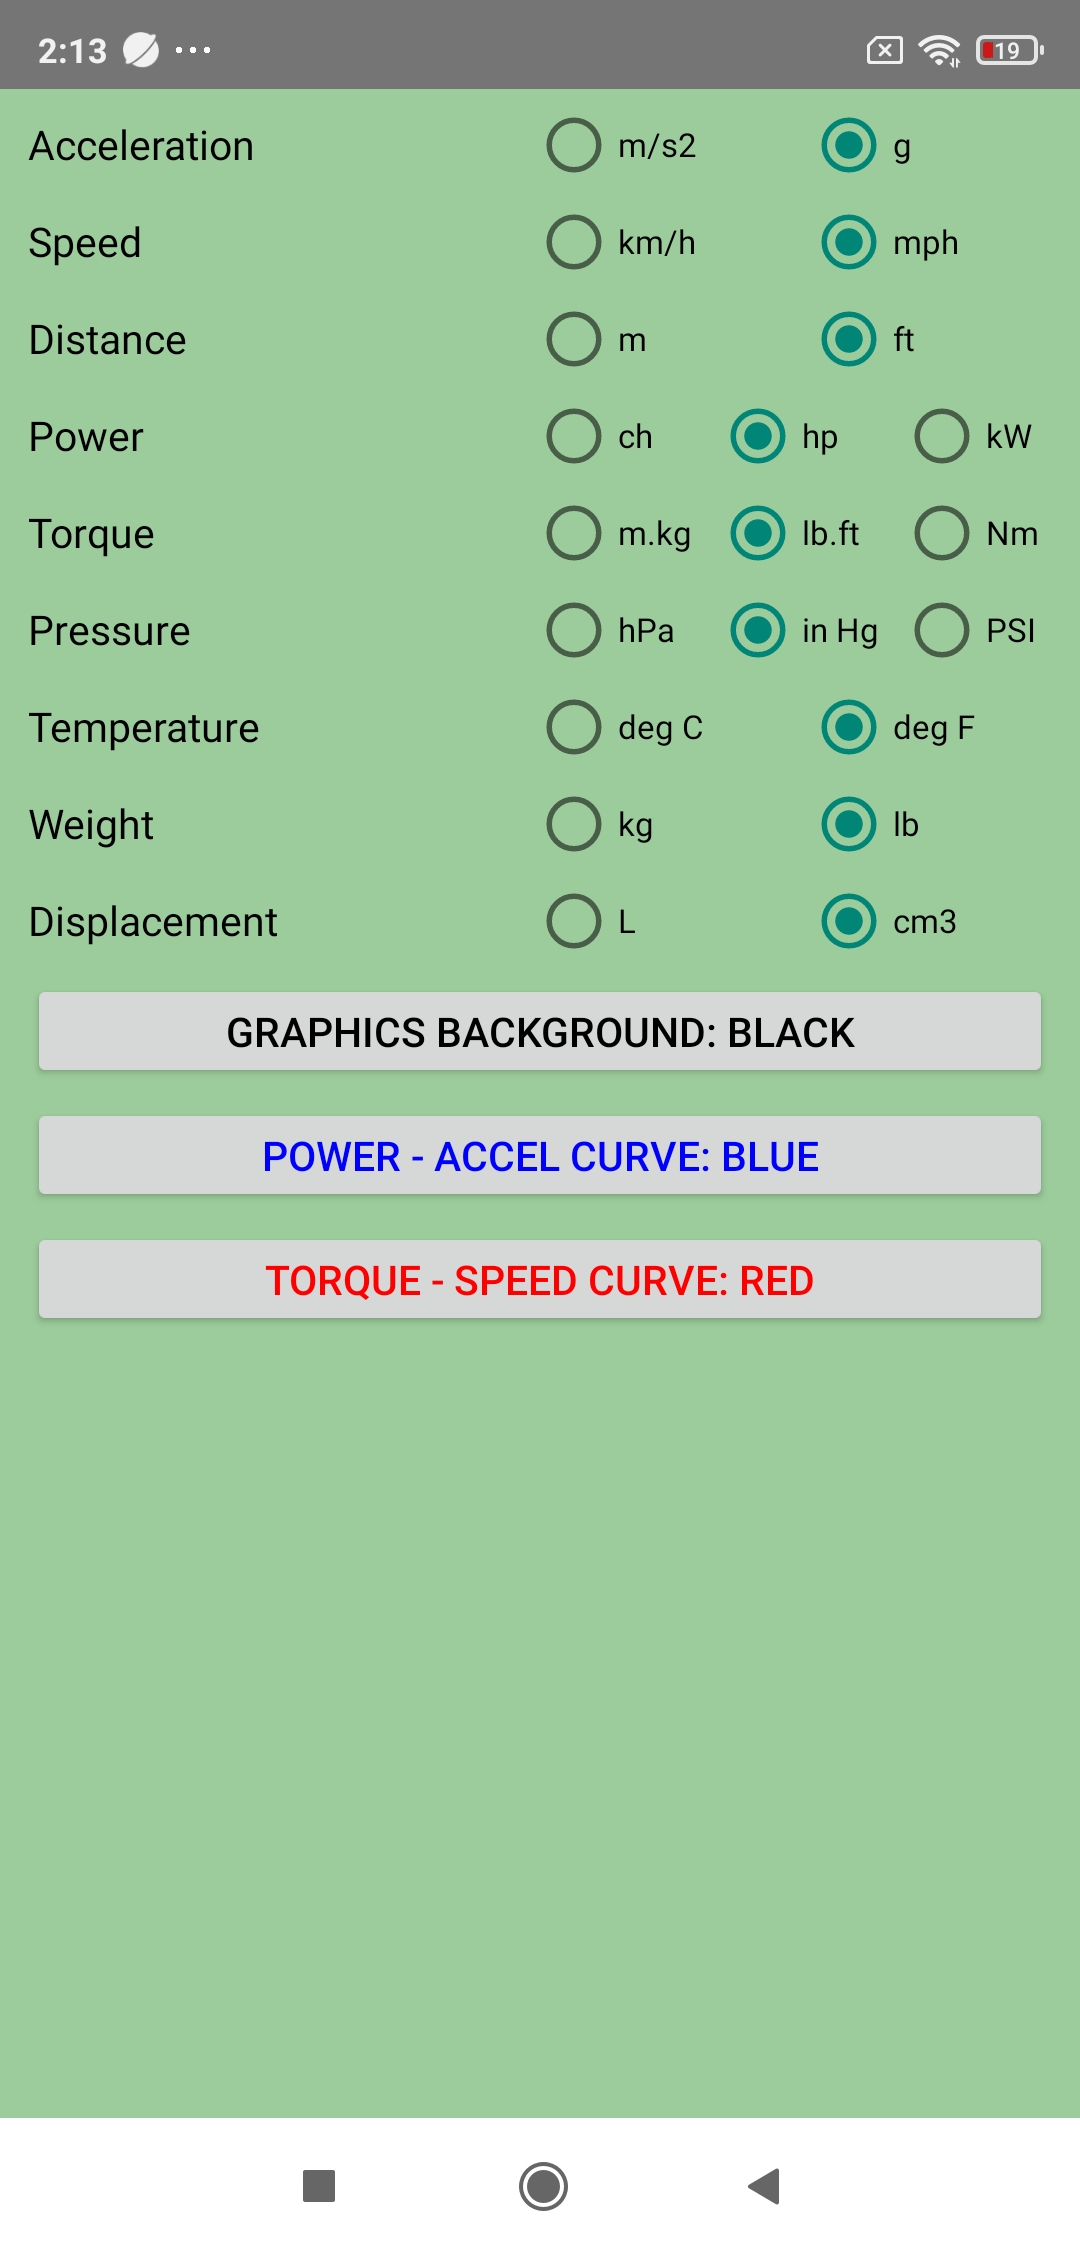
0) Units / Colors
Press Units/Colors. A list of nine physical quantities is displayed, for each of them you must choose its unit (metric or imperial in general), by selecting the desired unit. Below these nine physical quantities, three buttons are available to you to choose the color of the background (black or white) and the power & torque and acceleration & speed curves (white / red / green / blue) of the power and accelerations graphs. Press these buttons until the desired color is selected. Once all units/colors have been chosen, return to the Setup screen by pressing the BACK button.
1) Power
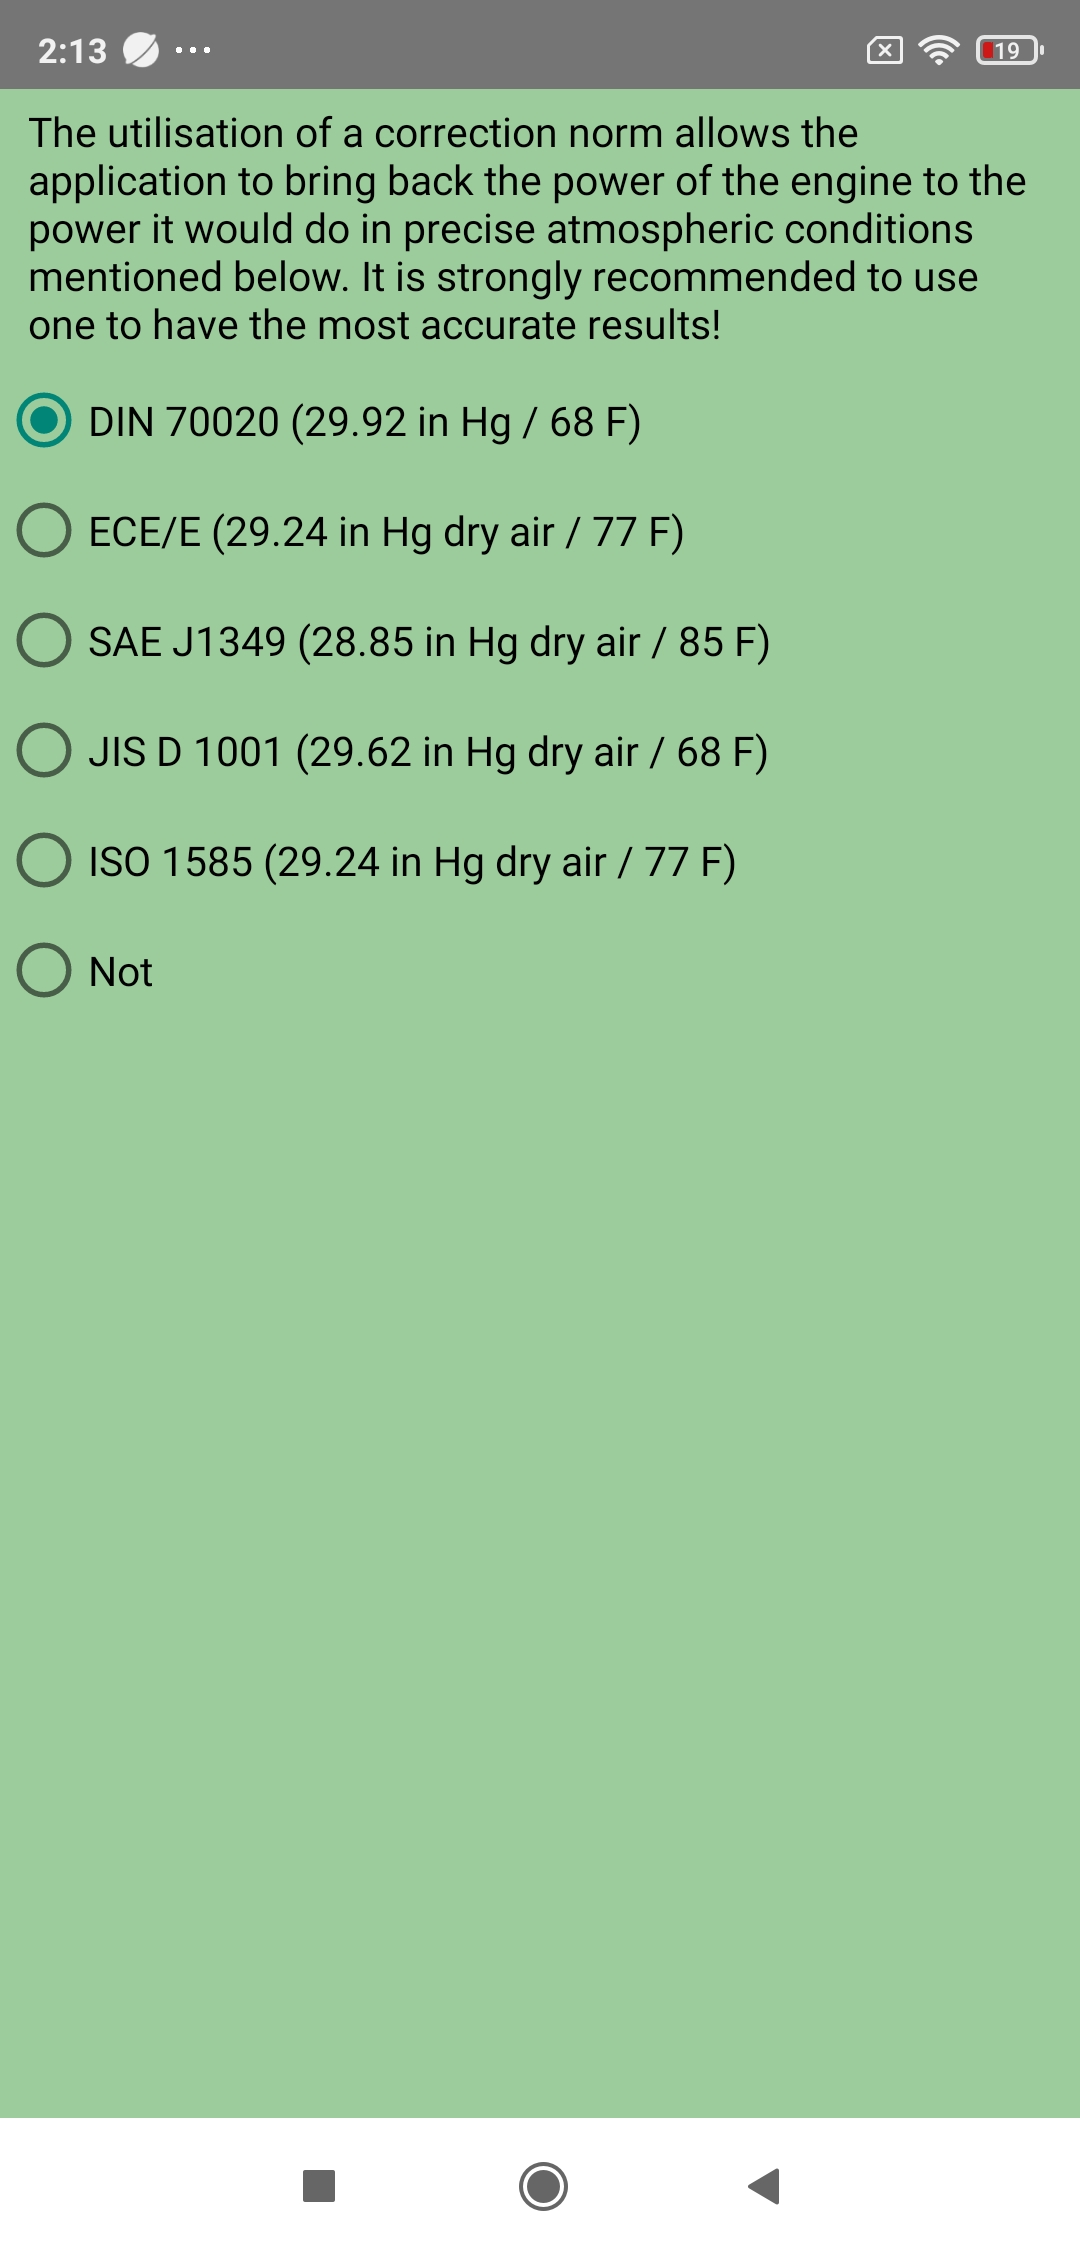
A) Correction norm
Press Correction norm, then choose your correction norm from the five offered (although you can choose not to use one). Indications are displayed on the screen to help you in your choice. Once the correction norm has been chosen, return to the Setup screen by pressing the BACK button.
Note 1: The three major roles of the correction norm are:
- Define a reference weather standard
- "Bring back" the power and torque results measured for a given engine to those that this engine would deliver in this reference weather standard using a correction formula
- Allow equalization of measurement results whatever the weather conditions (and therefore also the location) at the time of measurements!
Note 2: NEVER neglect the influence of weather conditions -and therefore the importance of the correction norm- on the results! This is a typical mistake among beginners or non-specialist amateurs. Conversely, you will NEVER see a professional or a specialist amateur make this mistake!
Note 3: Of course, the efficiency of this correction norm can not be perfect, especially if you make your measurements in extreme climatic conditions, especially since (paradoxically... apparently!) your car is recent! However, and I speak with experience of thousands of measurements on chassis dyno & engine dyno and with PerfectPower of course, a good correction norm can be astonishingly effective, not to say formidable, to the point that with several of my personal cars, I was able to find identical results to the nearest % or even to the nearest horse power in corrected power throughout the year, which I measure by 30° C (= 86° F) or 0° C (= 32° F) outside, even though the power actually measured could vary by more than 5% (example: 315 hp measured in winter & 305 hp DIN corrected, 300 hp measured in summer & 305 hp DIN corrected)!
Note 4: It is therefore strongly recommended to choose one for the most reliable results possible, and PerfectPower recommends the DIN norm which has demonstrated its astonishing efficiency as well during two serious scientific studies (California and Brazil) as (as said) on thousands of measurements performed by myself since 1990...
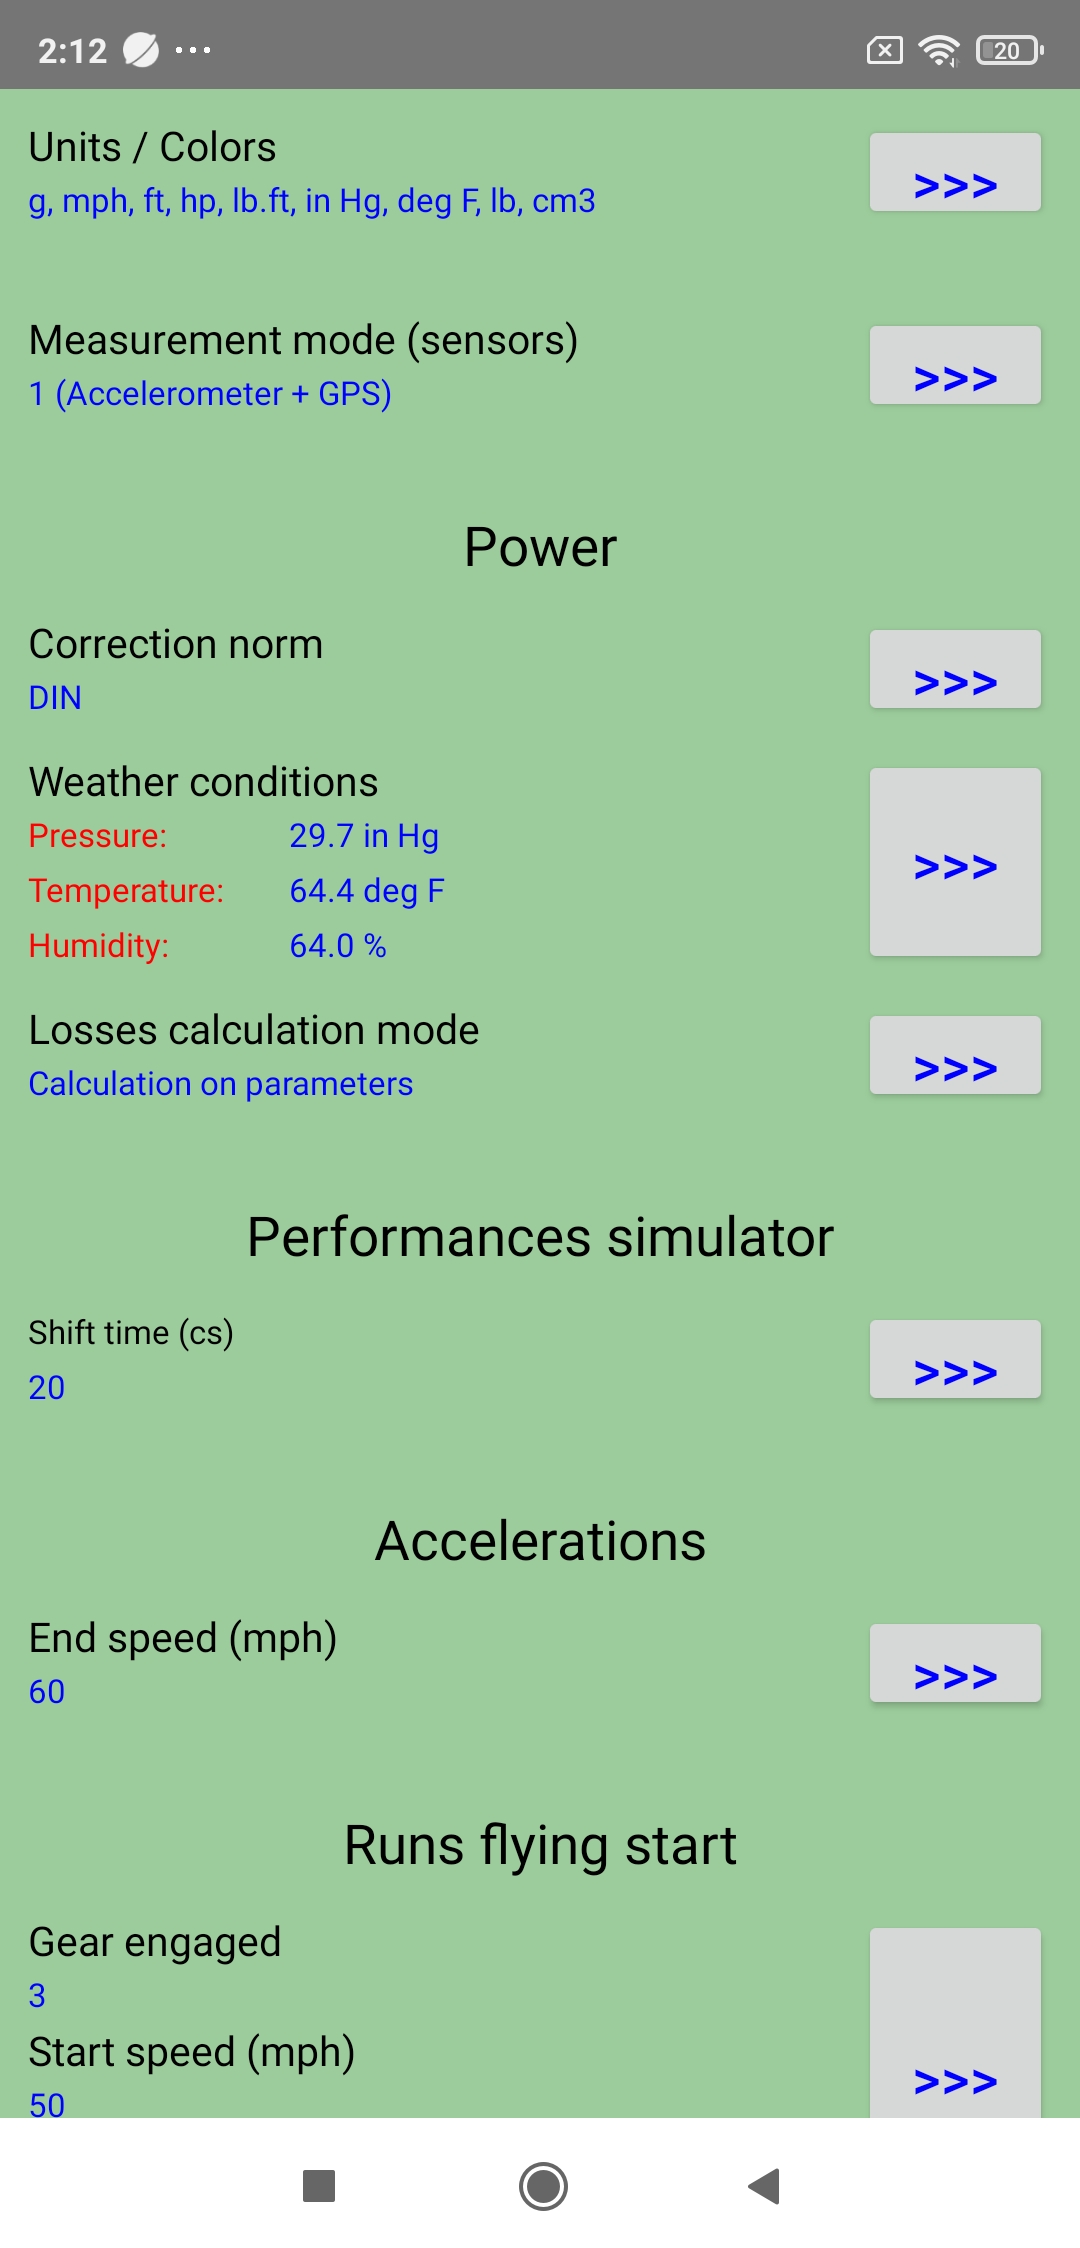
B) Weather conditions
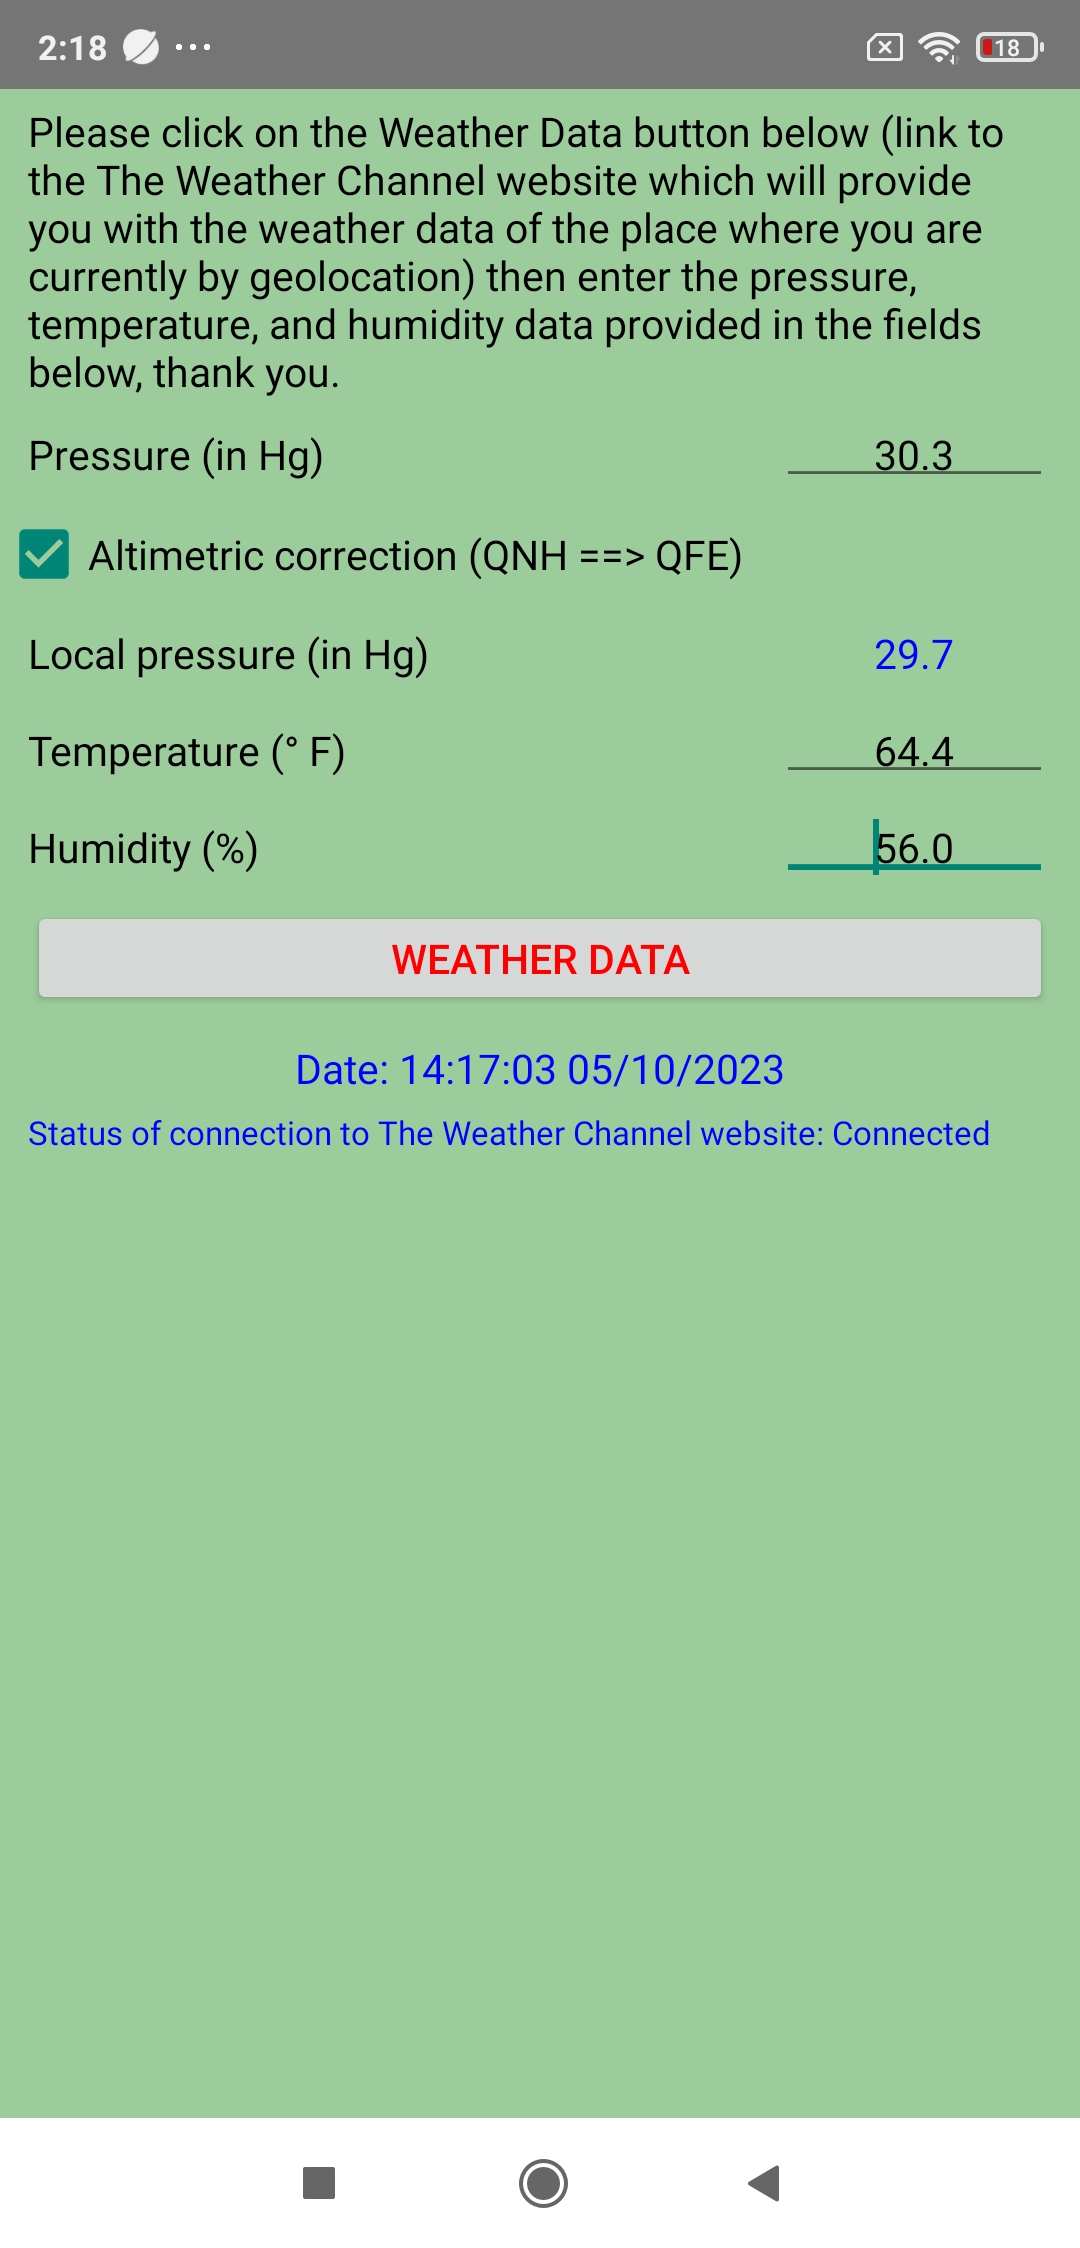
Press Weather conditions, then enter the current weather conditions of your measurement location in the 3 dedicated weather fields: Pressure, Temperature, and Humidity. Once the weather conditions have been entered, return to the Setup screen by pressing the BACK button.
Note 1: Entering the weather conditions is ESSENTIAL: in fact, these are not only necessary for the correction of the engine results made by the correction norm configured just before, but they are also necessary for the dynamic calculation of the air resistance during measurements!
Note 2: PerfectPower provides you with valuable assistance (function of manual recovery of weather data) by providing you with a link to The Weather Channel website which will provide you with weather data for where you are currently by geolocation: you just need to click on the Weather Data button located just below the 3 weather fields, read these 3 weather data (Pressure, Temperature, and Humidity) on The Weather Channel website, and finally enter them in the 3 weather fields after returning to the Weather screen, and that's it!
Well, almost everything, because in this case you must also check the "Altimetric correction (QNH ==> QFE)" box, which will correct the pressure returned by The Weather Channel site and which is a standardized pressure at the sea level (named QNH), into a local pressure at the altitude where you are currently (named QFE), and which is obviously the one that PerfectPower must use for its calculations!
Note 3: For information, the pressure returned by all official weather stations worldwide is always a QNH by default, it is only a QFE when it is explicitly specified in the returned report with also the mention of the altitude of the station. Please remember this if you use a weather station other than that of the reference weather site The Weather Channel used by PerfectPower.
Note 4: Please note, it is necessary to wait approximately 10 s in the Perfs screen after opening the application (time to obtain a sufficiently accurate GPS signal) before going to this Weather screen to manually recover the weather data! Indeed, the GPS being cut off as soon as you exit the Perfs screen to save battery, the GPS information used for manual recovery of weather data is that recorded at the precise moment when you leave the Perfs screen to go to the Weather screen, and they only exist (and are reliable) from around 10 seconds after opening the application.
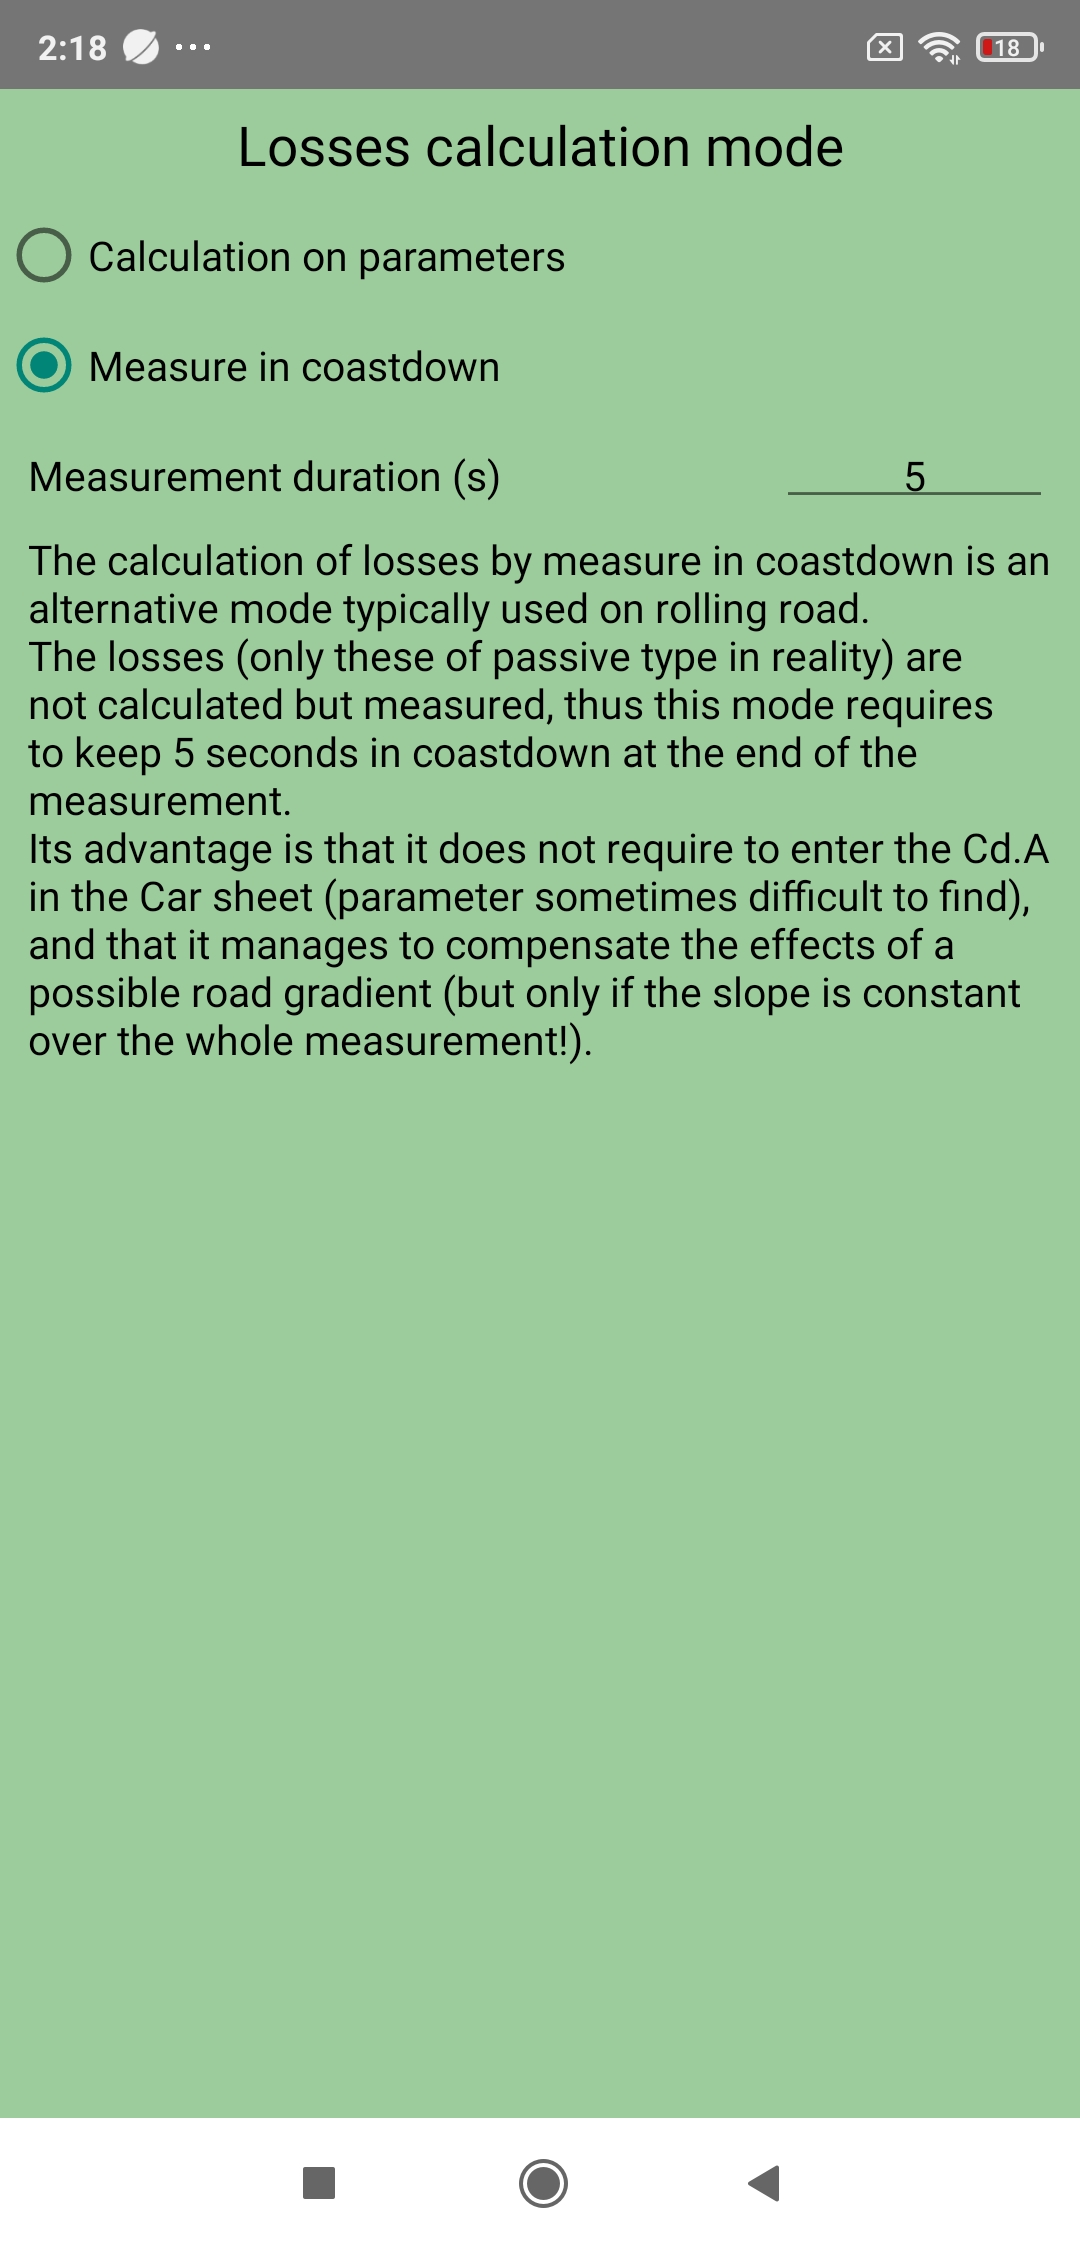
C) Losses calculation mode
Press Losses calculation mode, then choose the losses calculation mode you want to use from the two offered ("Calculation on parameters" and "Measure in coastdown"). Indications are displayed on the screen to help you in your choice. Once the losses calculation mode has been chosen, return to the Setup screen by pressing the BACK button.
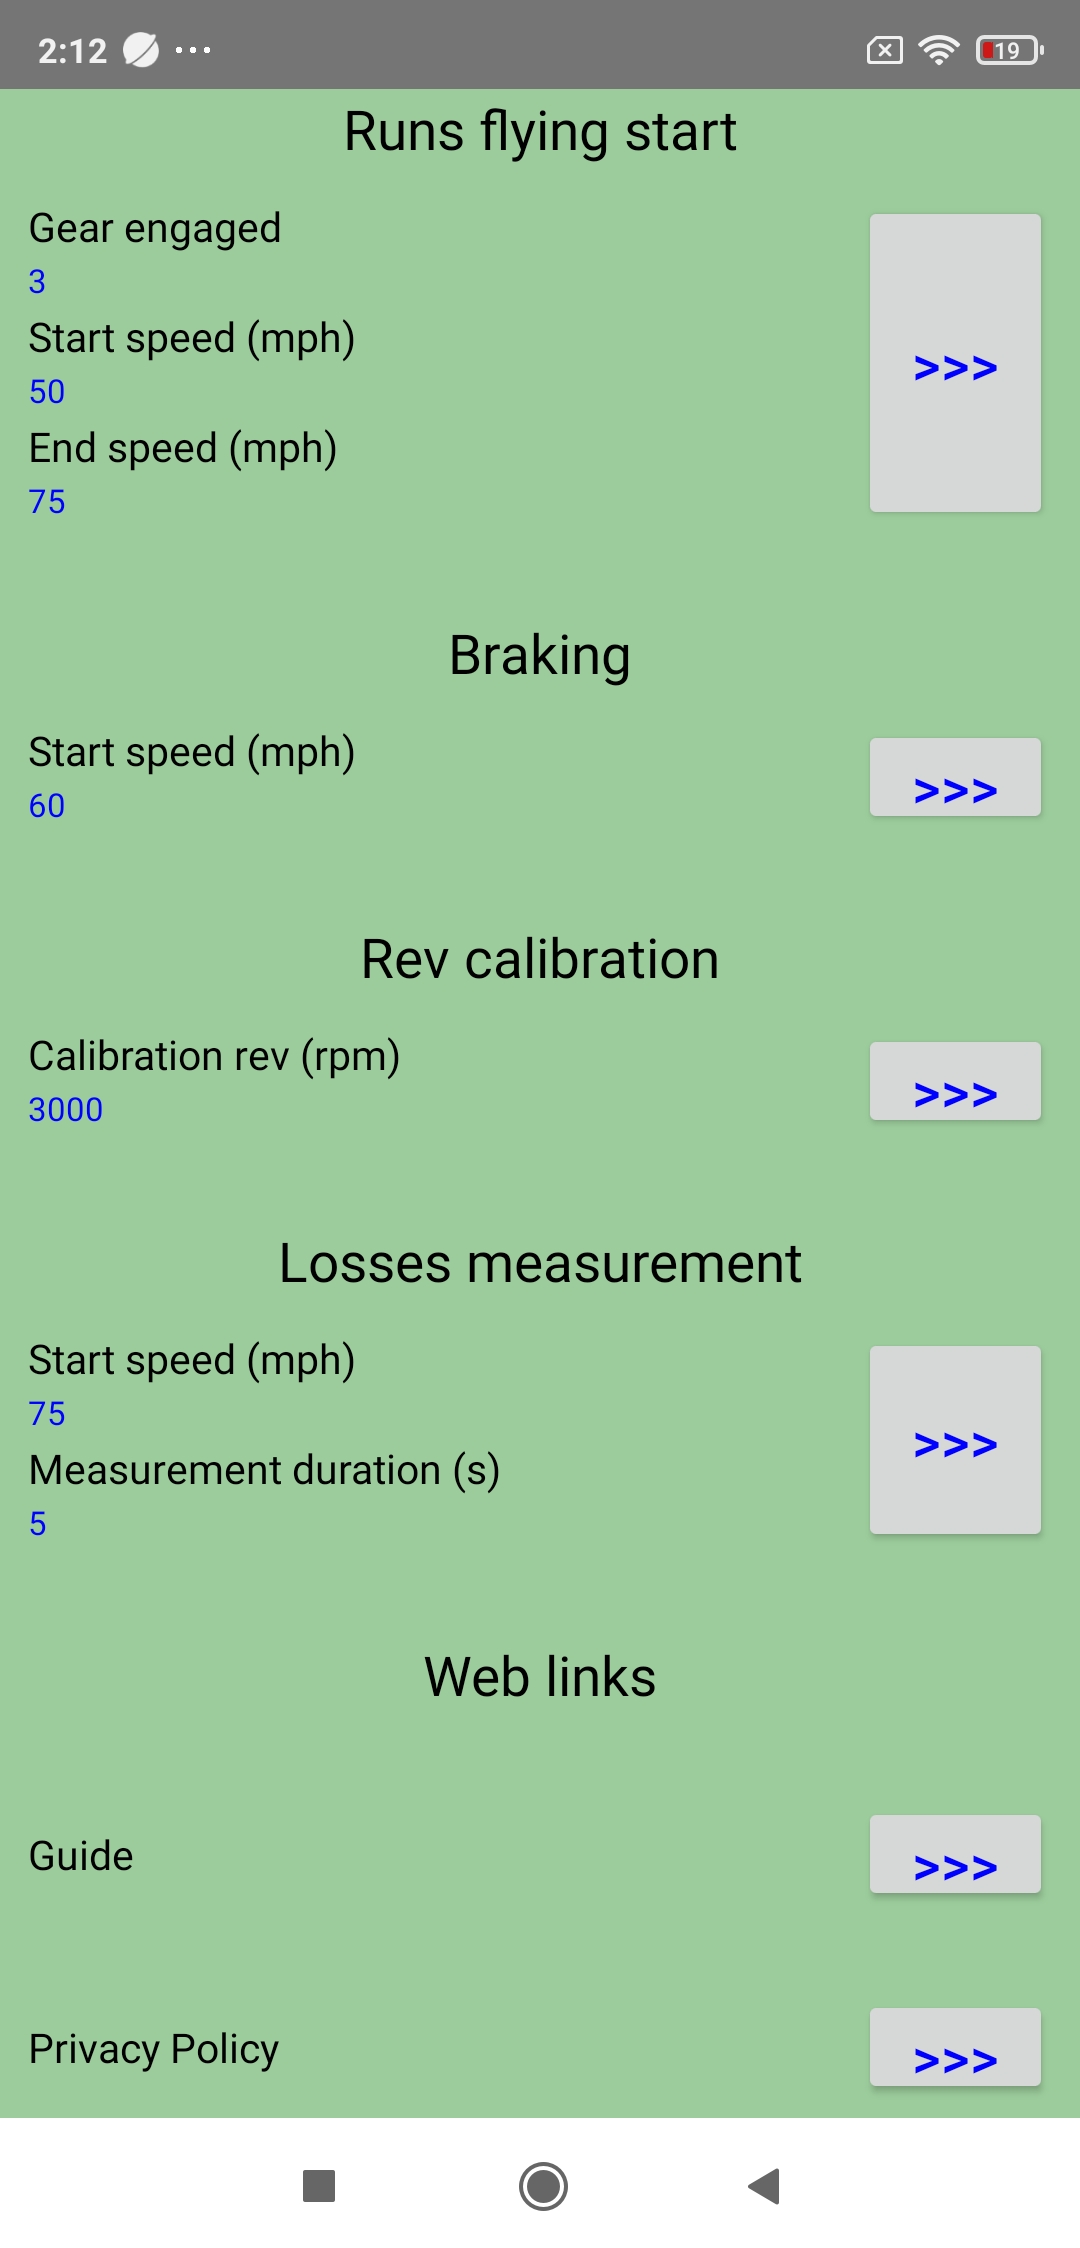
Note 1: If you choose the losses calculation mode by measure in coastdown, you will also need to configure the losses measurement duration (min 5 s and max 15 s).
Note 2: Although the essential indications for choosing the losses calculation mode are displayed on the screen in the application, additional information is given to you in this guide, because this choice has a real importance in the reliability of the engine results...
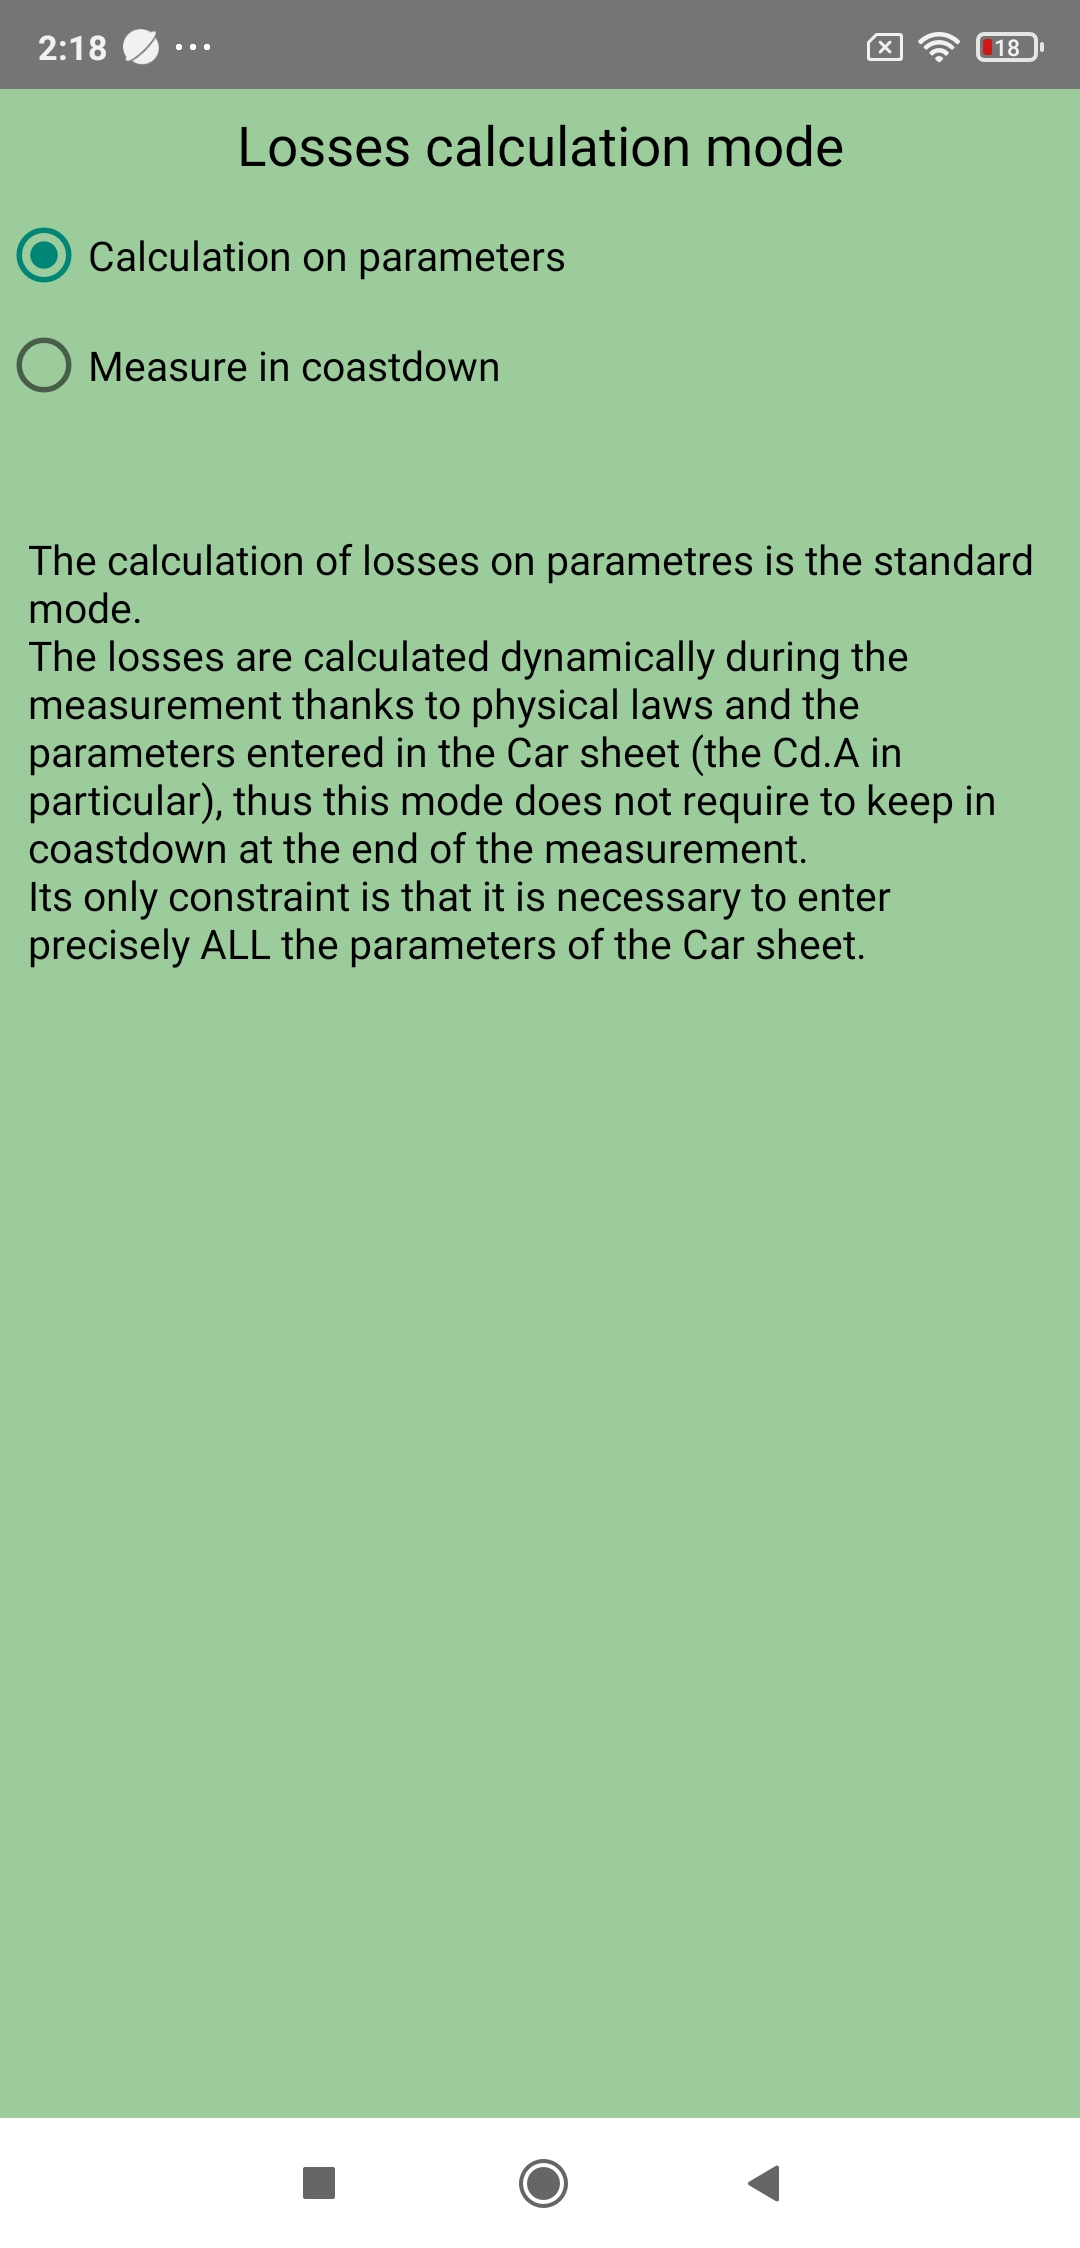
Mode 1: Calculation of losses on parameters
This mode is the standard mode, the one which presents the best compromise reliability of results / ease of use.
In this mode, the calculation of losses is done by dynamic calculation during the measurement based on physical laws and the parameters entered in the Car sheet (in particular the Cd.A and the weight). It comes highly recommended by PerfectPower!
The advantages of this mode are four:
- The reliability of the engine results remains exceptional for the overwhelming majority of cars (unless you have a Formula 1 -and even then-, your results will remain extremely reliable!)
- It does not require freewheeling at the end of the measurement
- It does not require a road with a constant slope
- It allows you to measure 100% of cars (manual gearboxes AND automatic gearboxes)
For two disadvantages:
- It requires the averaging of measurements in both directions of the road if this one is not perfectly flat (almost always the case in practice...)
- It requires that you accurately enter ALL the parameters of the Car sheet (in particular the Cd.A and the weight)
Mode 2: Calculation of losses by measure in coastdown
This mode is an alternative mode typically used on rolling road.
In this mode, the losses (only those of "free" type in reality) are not calculated but measured in a freewheeling phase to be carried out once the measurement itself is completed, by freewheeling (by disengaging) for a time to also configure (“Measurement duration (s)” field, min 5 s and max 15 s).
The advantages of this mode are three:
- The reliability of the engine results is maximum for all cars... measurable in this mode! (automatic gearboxes excluded...)
- It does not require configuring the Cd.A in the Car sheet (parameter sometimes difficult to access)
- It compensates for the effects of a possible road slope... but only if this slope is constant over the entire measurement!
For also three disadvantages:
- If the road is sloping, it requires that this slope be constant over the entire measurement zone + the entire freewheel zone (in other words, NEVER the case in practice...)
- The majority of cars with an automatic gearbox are simply immeasurable in this mode (impossibility of freewheeling...)
- It requires remaining 5 to 15 s (according to configured duration) freewheeling at the end of the measurement, which requires a certain length of road...
Summary: What is the best mode?
Of course, everyone can use the mode that seems best suited to their situation, taking into account the report of the advantages and disadvantages of each of these two modes presented above, but it is still generally more interesting to use mode 1!
Why? Already from a strictly objective point of view: 4 advantages / 2 disadvantages for mode 1, against 3 / 3 for mode 2... But also and above all because mode 1 is more universal and homogeneous than mode 2: indeed, mode 1 allows to measure 100% of the cars produced on the planet while mode 2 immediately excludes cars with automatic gearbox, and also mode 1 is clearly much easier to implement on open roads than mode 2!
But that's not all: even in terms of accuracy of engine results which I remind you is the ABSOLUTE PRIORITY of PerfectPower since its creation and its very reason for being, mode 1 remains exceptionally accurate for the overwhelming majority -if not all- of cars, both thanks to the perfection of the losses calculation in PerfectPower (better than that of any roller or hub dyno in the world...), and thanks to also the moderate speeds practiced with PerfectPower (measurements in 2nd or 3rd gear) allowing the losses calculation to maintain exceptional accuracy (high speeds such as those practiced on a roller dyno -measurements typically in 4th or 5th gear- generate strong pneumatic / road or -especially- rollers friction, which inevitably reduces the accuracy of the losses calculation...).
Once that said, what could seem like the only small advantage of mode 2 over mode 1 in terms of accuracy of engine results disappears, and when we now look at the real advantages of mode 1 over mode 2 in terms of universality and homogeneity, we see very clearly why mode 1 is generally more interesting to use!
2) Performances simulator
Press Performances simulator, then choose the shift time that you consider to be the most realistic when driving your car. Once this time has been chosen, return to the Setup screen by pressing the BACK button.
Note 1: The configuration of the runs flying start in the performances simulator is actually done in the “Runs flying start” menu a little lower.
Note 2: Other settings will be added in future versions (slope angle, presence of wind, dry/wet ground, etc...).

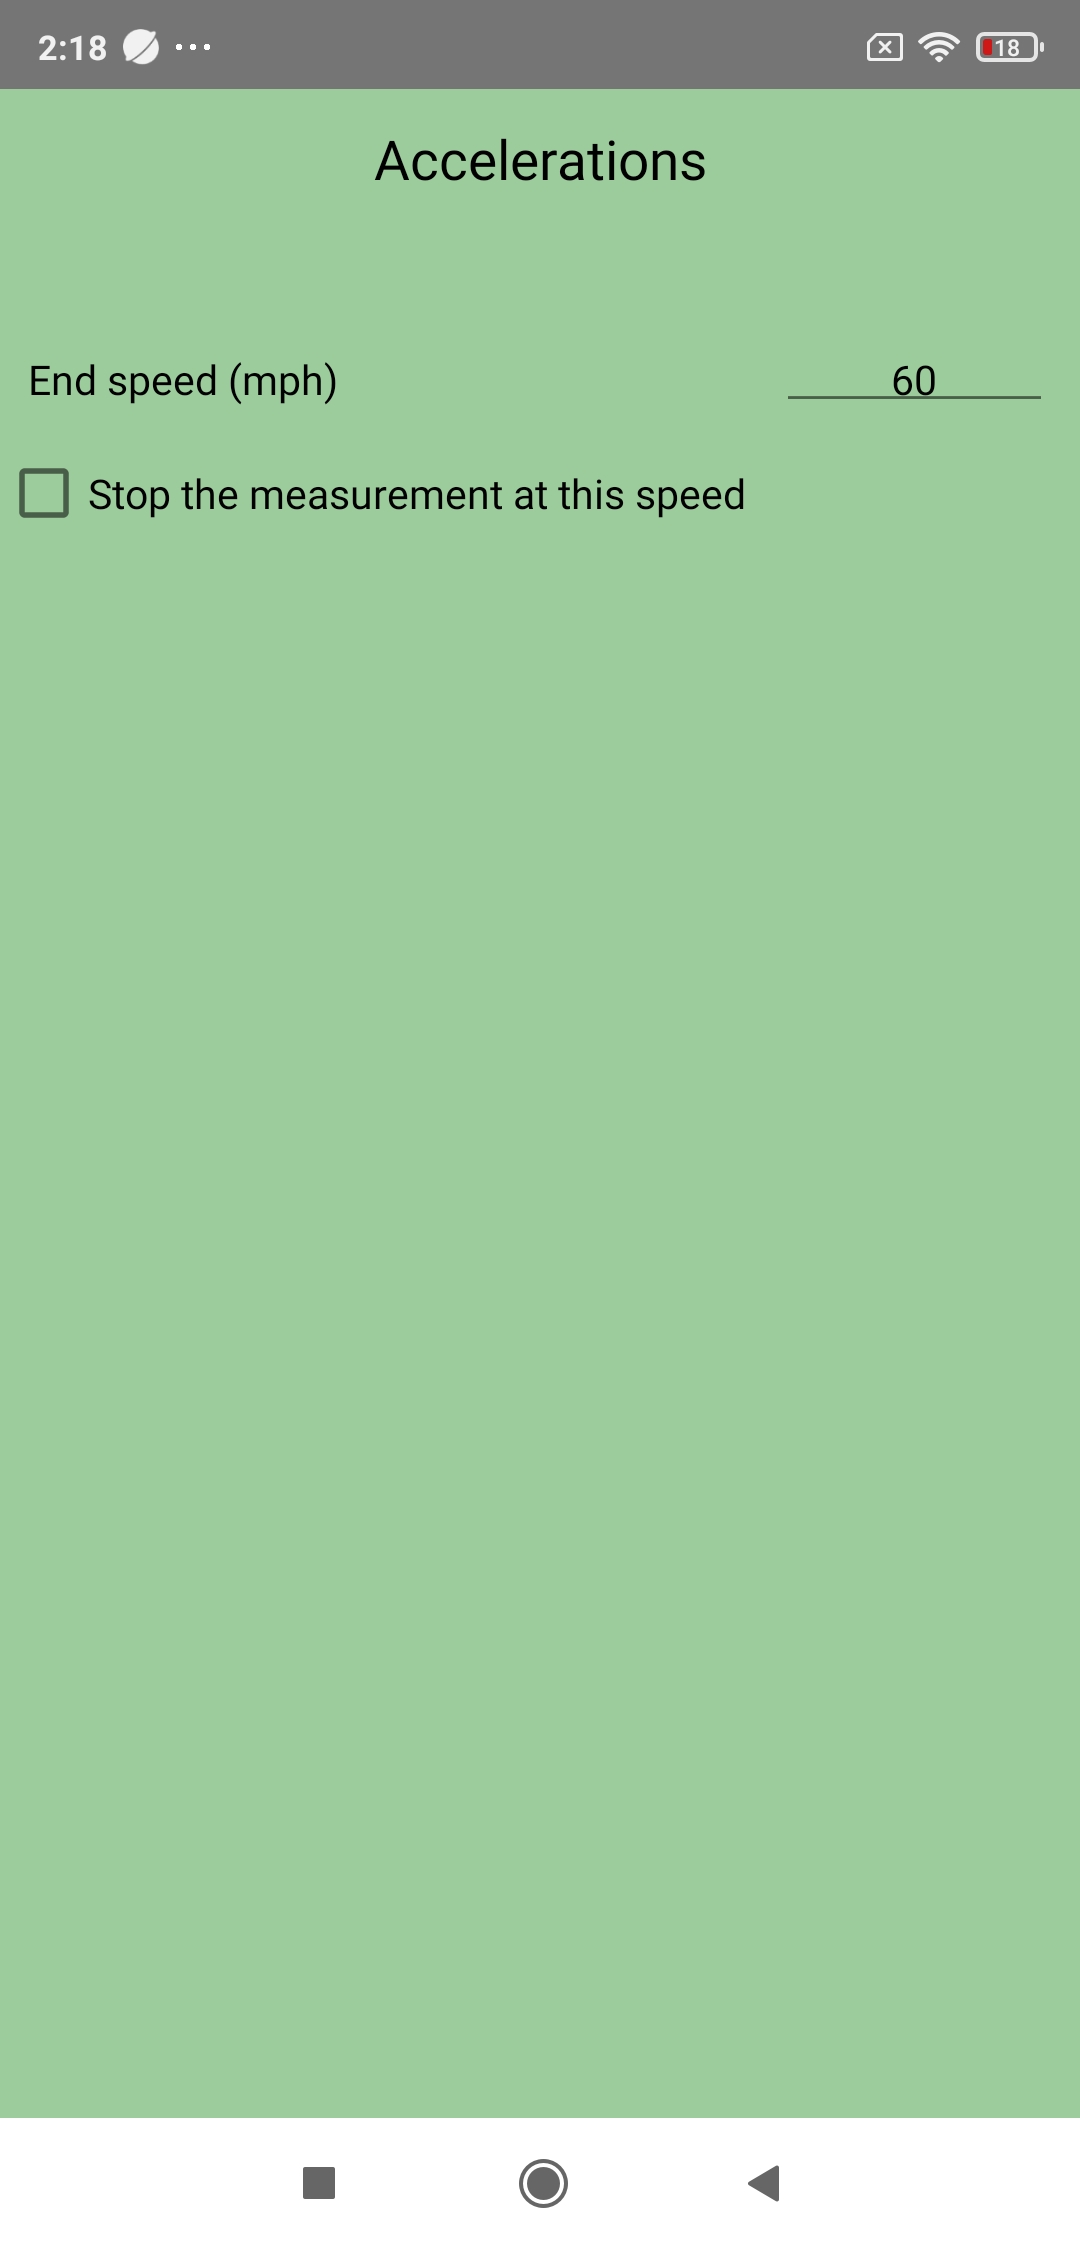
3) Accelerations
Press Accelerations, then choose:
- The end speed of your acceleration measurements
- To activate or not the measurement stop mode at this speed
Once this setting has been made, return to the Setup screen by pressing the BACK button.
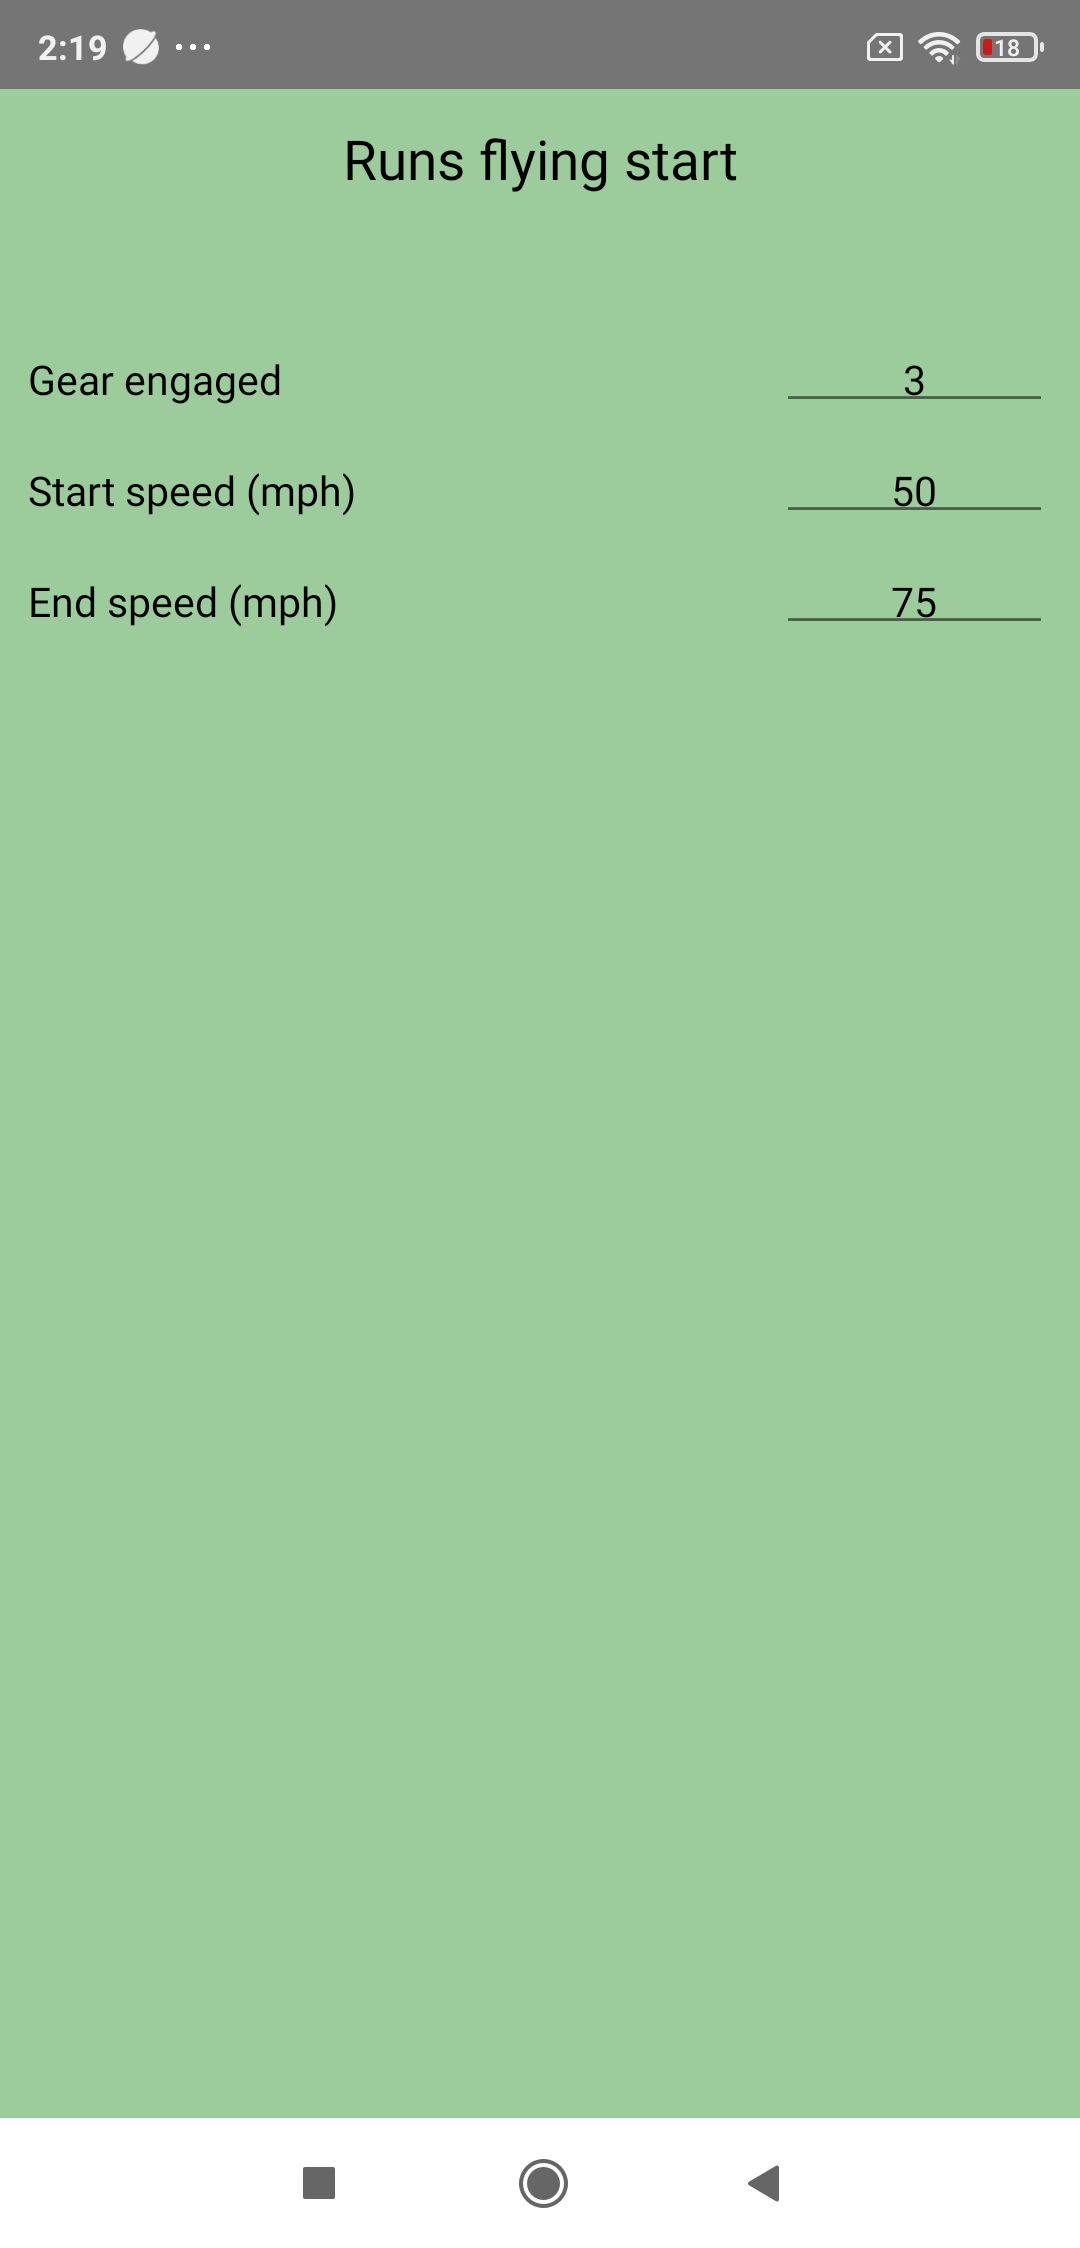
4) Runs flying start
Press Runs flying start, then choose:
- The gear engaged
- The start speed
- The end speed
Once this setting has been made, return to the Setup screen by pressing the BACK button.
Note 1: It is of course the gear engaged at the start of the run which must be selected. For example, if you want to do a 40-100 mph in 2/3/4, you must enter the gear 2.
Note 2: In reality, these three runs flying start parameters are also used by... the performances simulator!
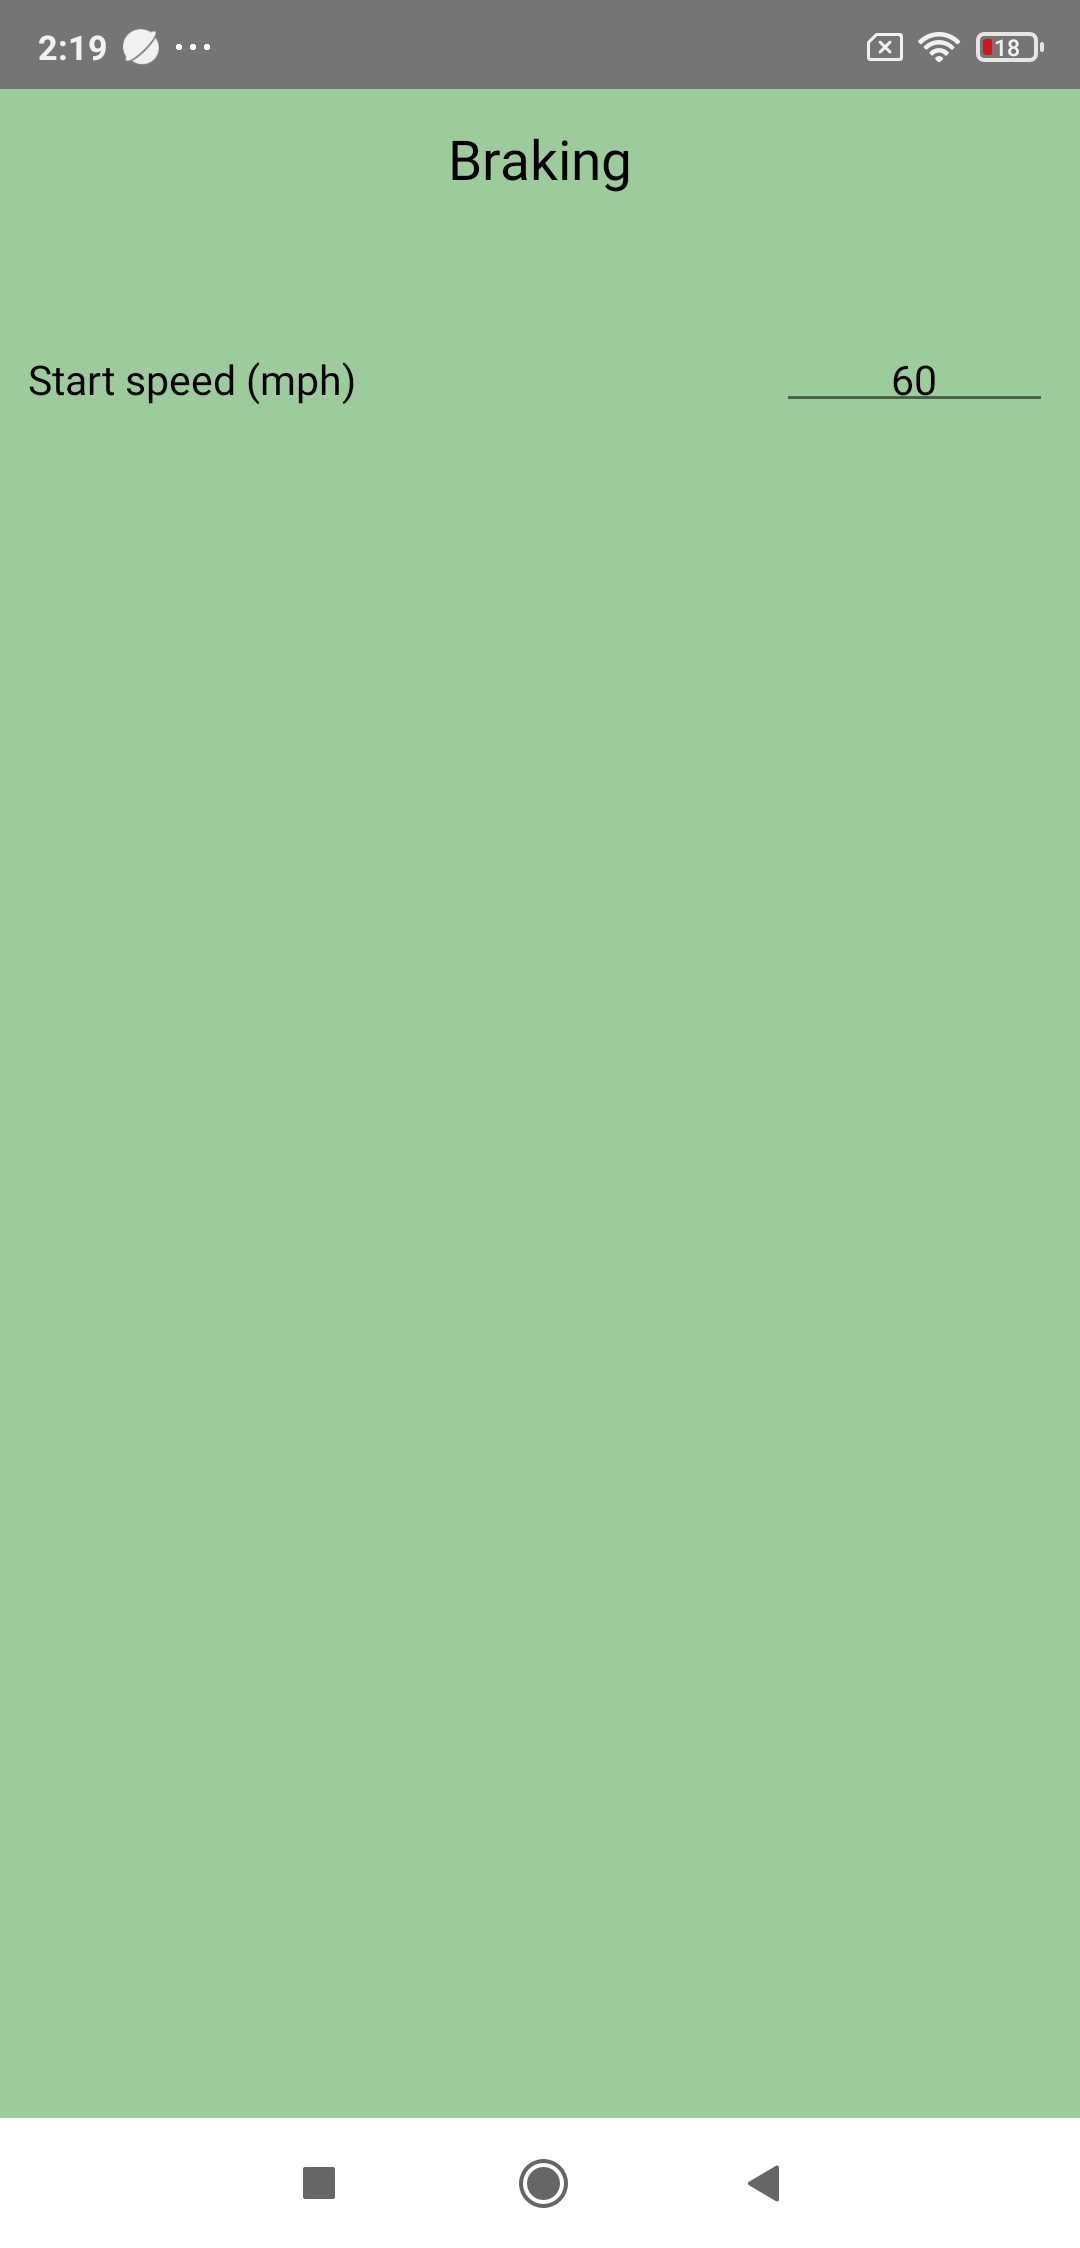
5) Braking
Press Braking, then choose the braking start speed. Once this speed has been chosen, return to the Setup screen by pressing the BACK button.
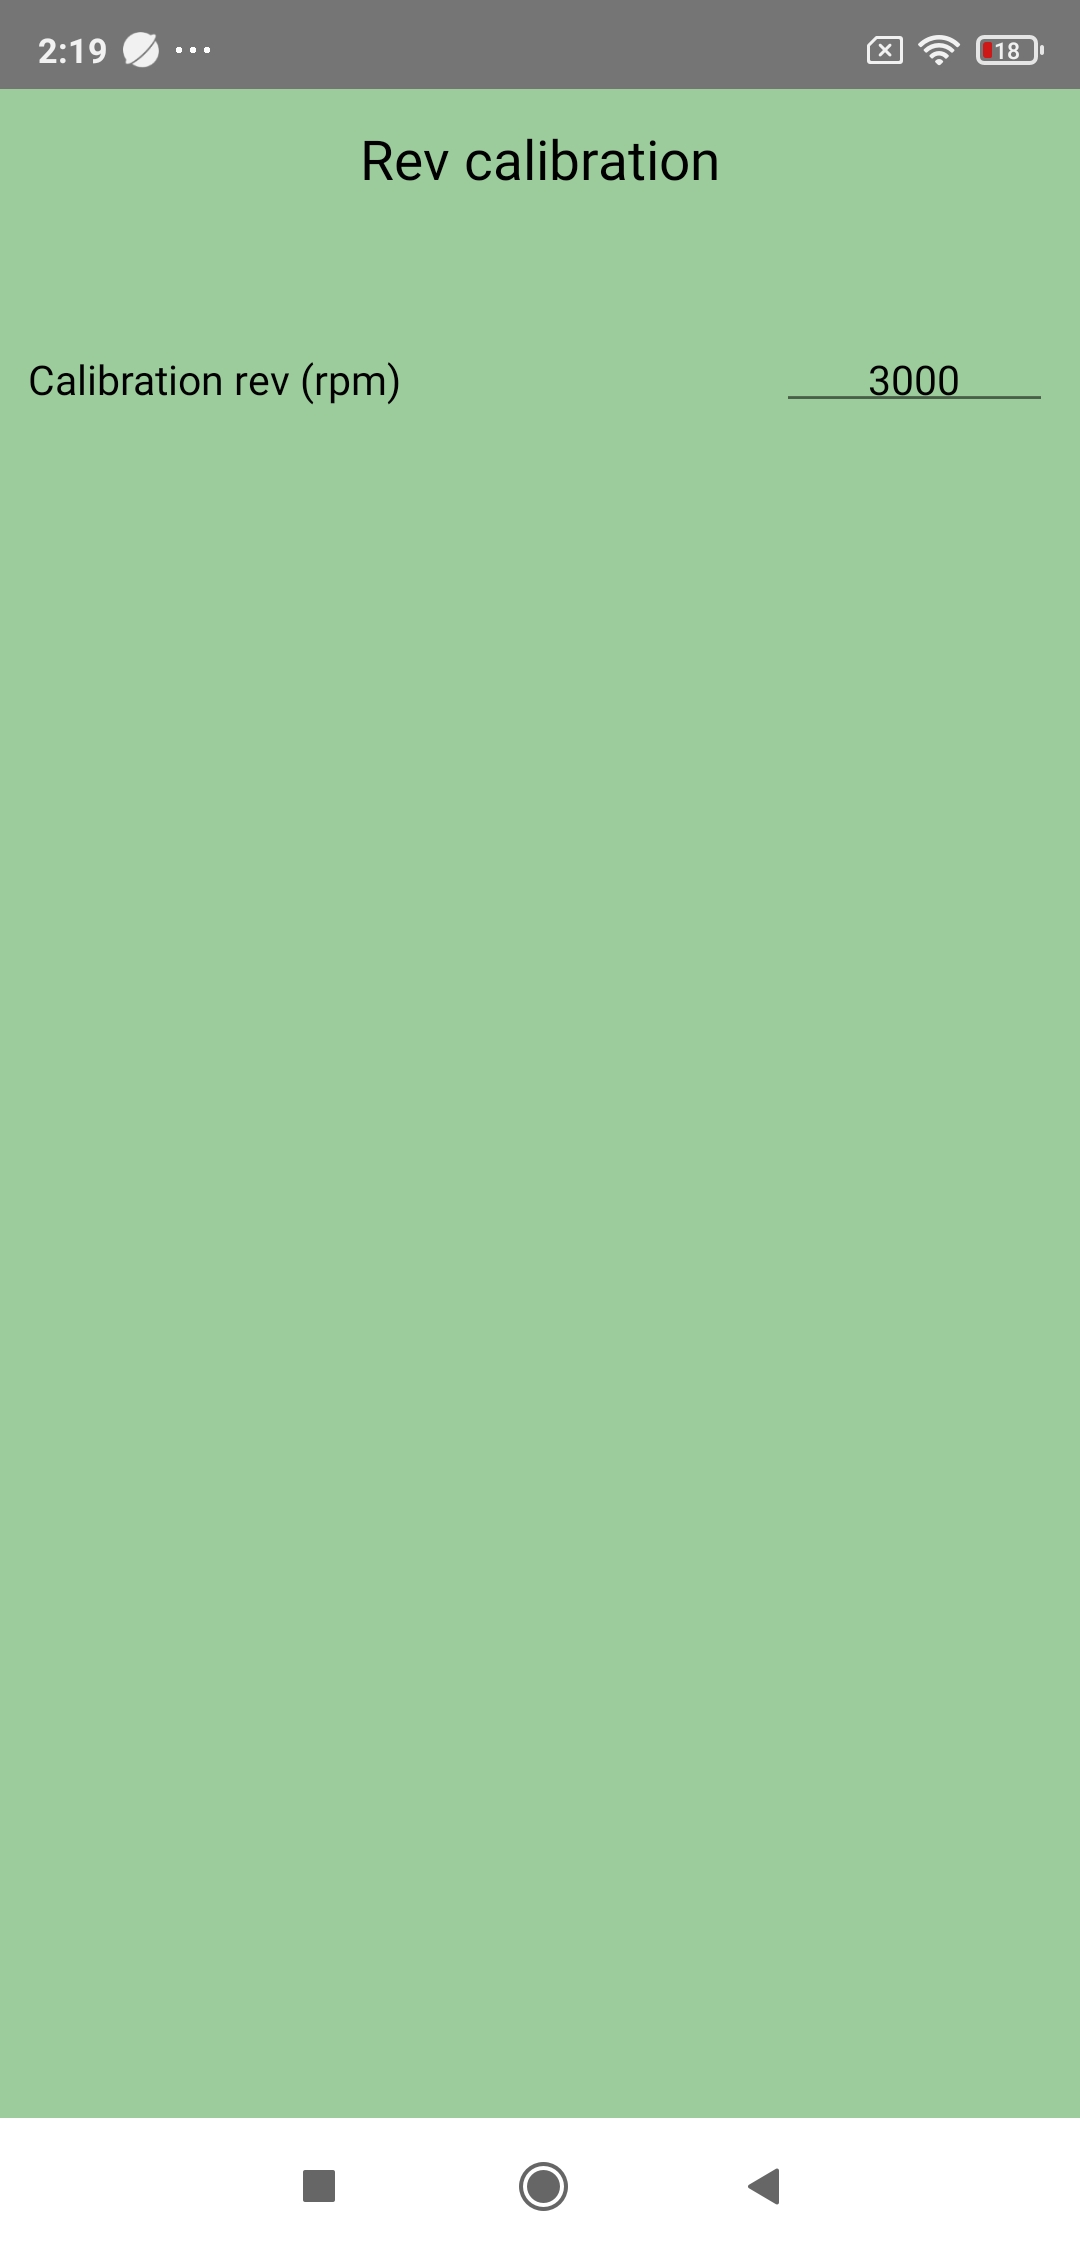
6) Rev calibration
Press Rev calibration, then choose the calibration rev for power measurements. Once this rev has been chosen, return to the Setup screen by pressing the BACK button.
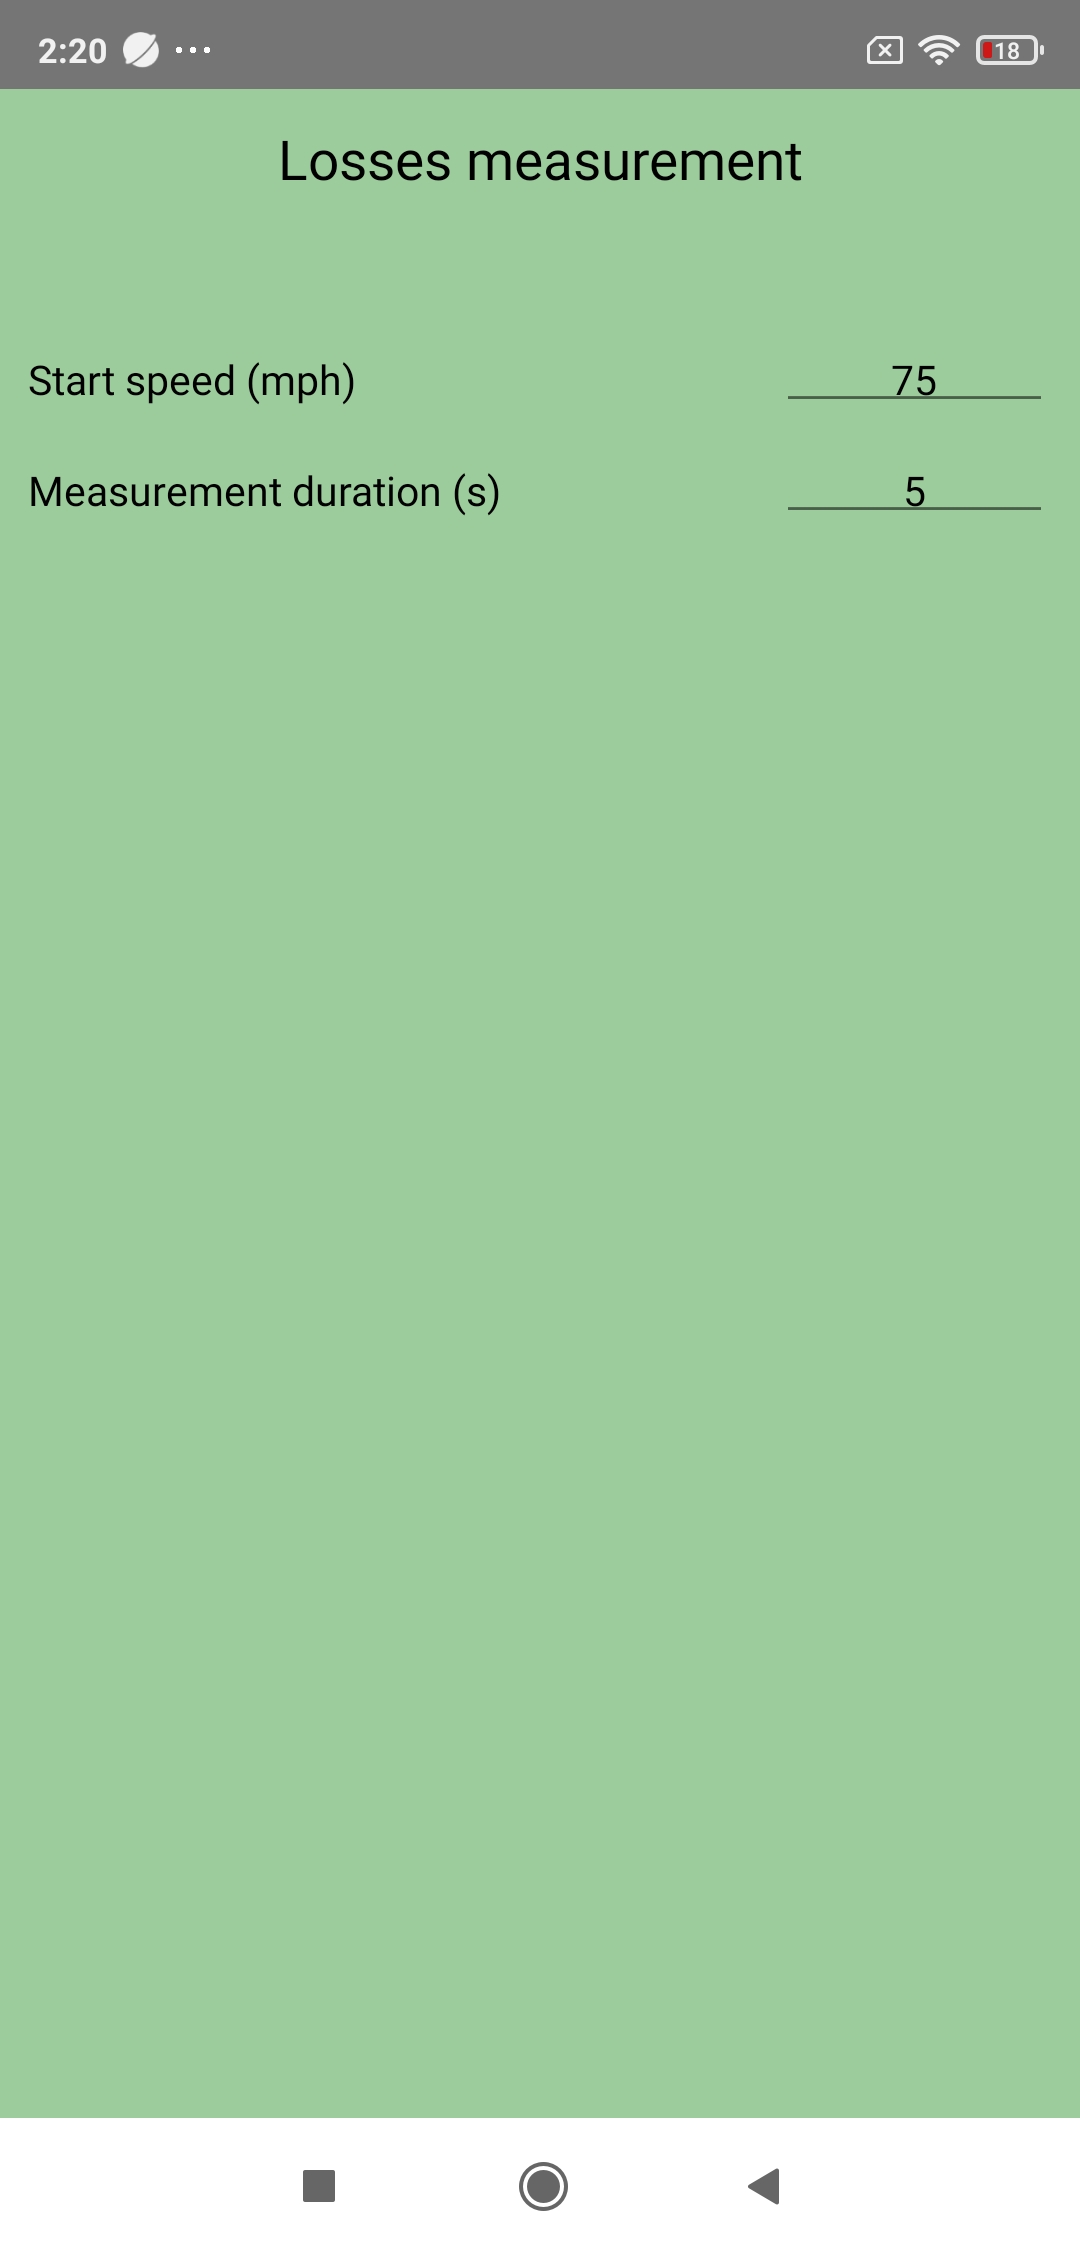
7) Losses measurement
Press Losses measurement, then choose:
- The start speed of losses measurement
- The duration of losses measurement
Once this setting has been made, return to the Setup screen by pressing the BACK button.
II) Configuring the Car sheet
Configuring the Car sheet is done in the Cars screen (accessible by pressing the Cars icon -the 4th, in the middle-right-).
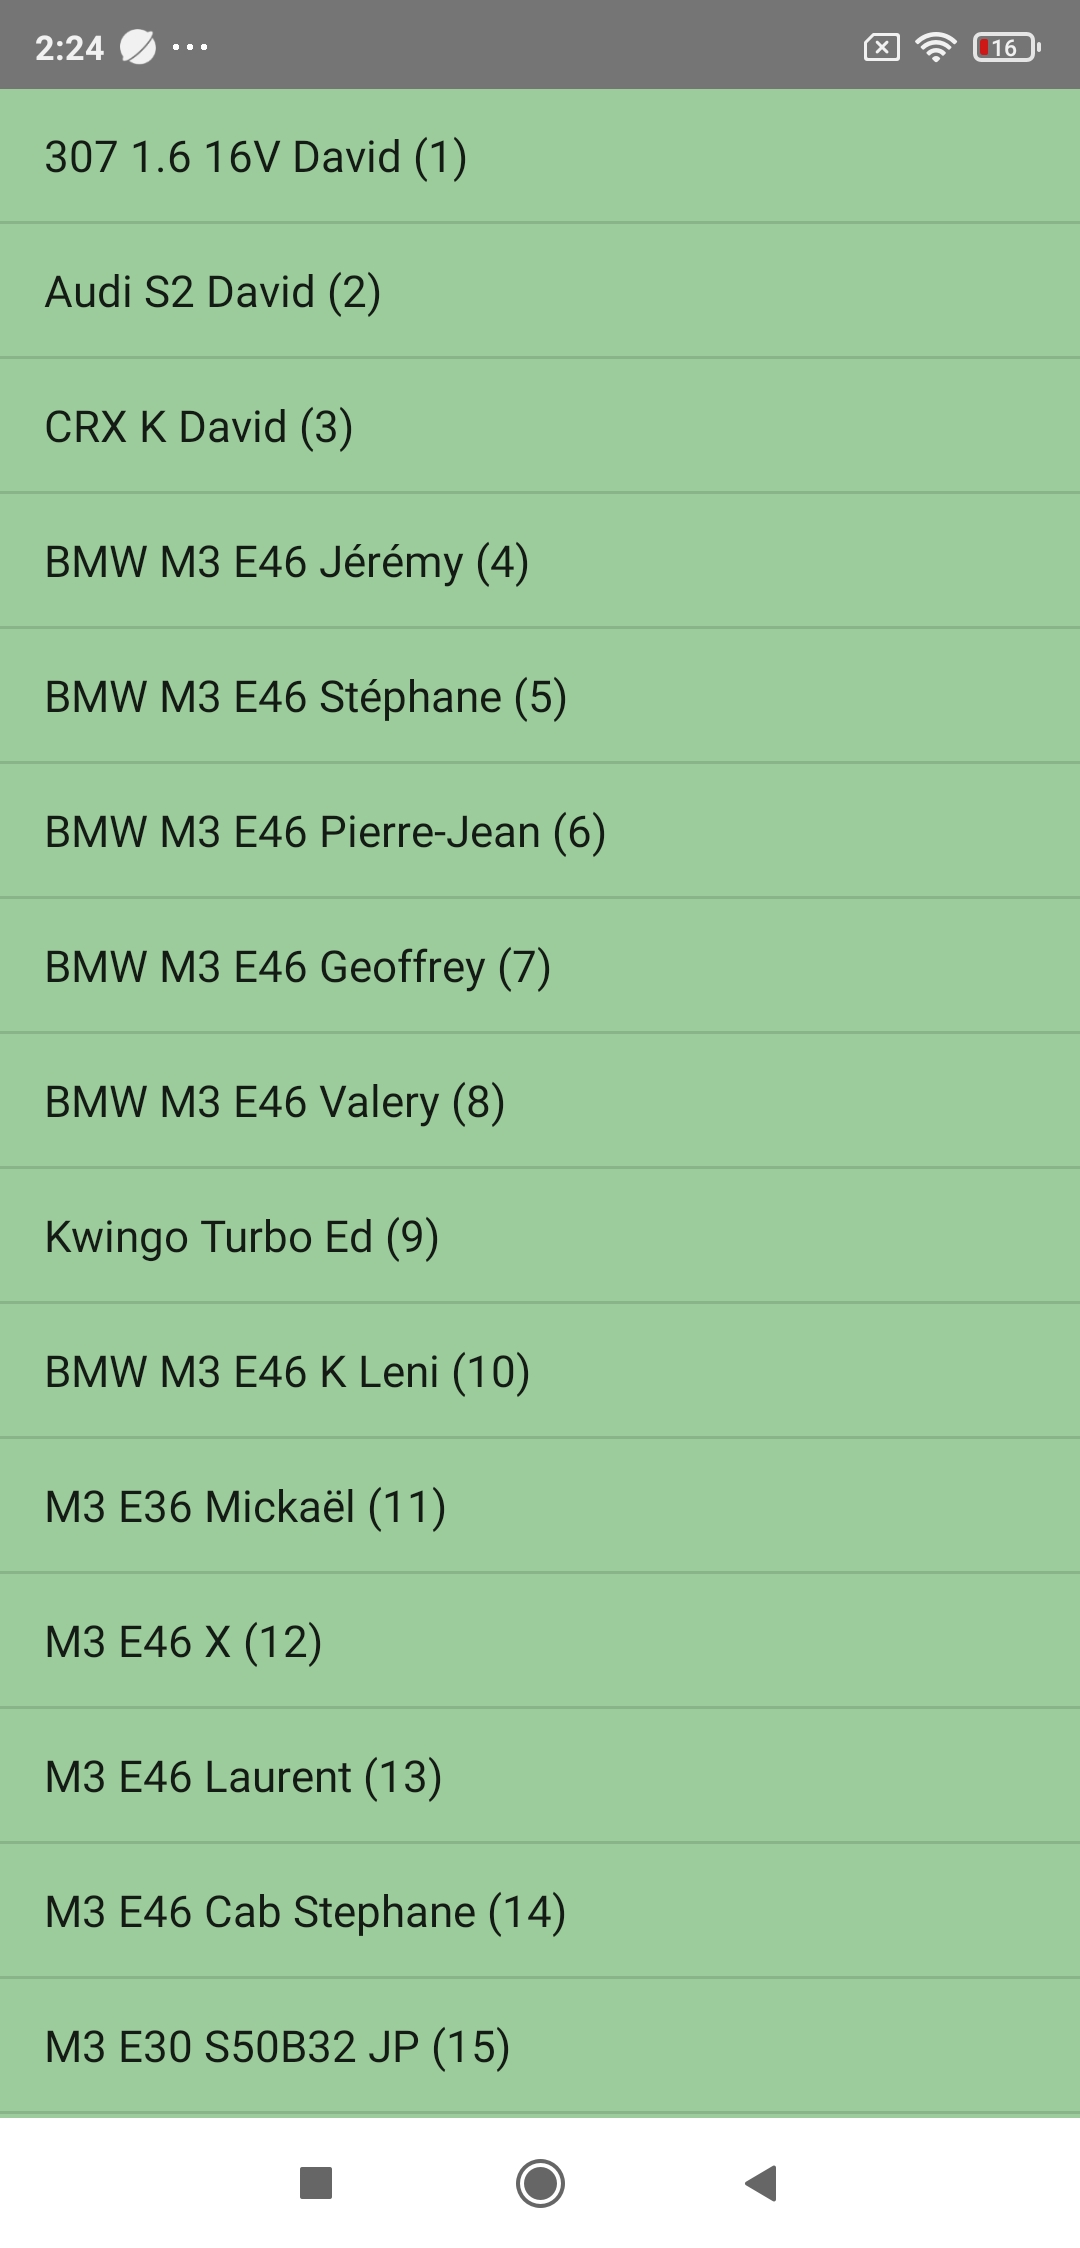
The list of registered cars is displayed on the screen. It contains a default car on first use (Aston Martin DBS).
1) Create & Modify a car
Click on the row corresponding to the desired car, or on the + row if you want to create a new car. You then access its sheet, which you will have to fill in completely. Once completed, don't forget to save the information entered by pressing the "SAVE" button (important!), and return to the Cars screen by pressing the BACK button.

2) Structure of a Car sheet
A) Basic data (8)
You must enter 8 basic data, necessary for power measurements:
- Car weight
- Engine displacement
- Number of cylinders
- Transmission
- Tyres dimension
- Gear ratios
- Final ratio
- Cd.A
Plus a 9th: the additional weight, which corresponds to all the masses other than those of the car: yours of course (or that of all the occupants present in the car at the time of the power measurements if you are several), and that of eventual luggages, belongings, or tools.
All the information necessary to enter these 8 basic data is given in the Database section, which will also provide you with a link to:
- The PerfectPower Database
- The most complete automotive database in the world: The Automobile-Catalog
IMPORTANT: The link to the Database section is also available in the application, in the Car sheet, at the bottom in the "Help completing the Car sheet" chapter.
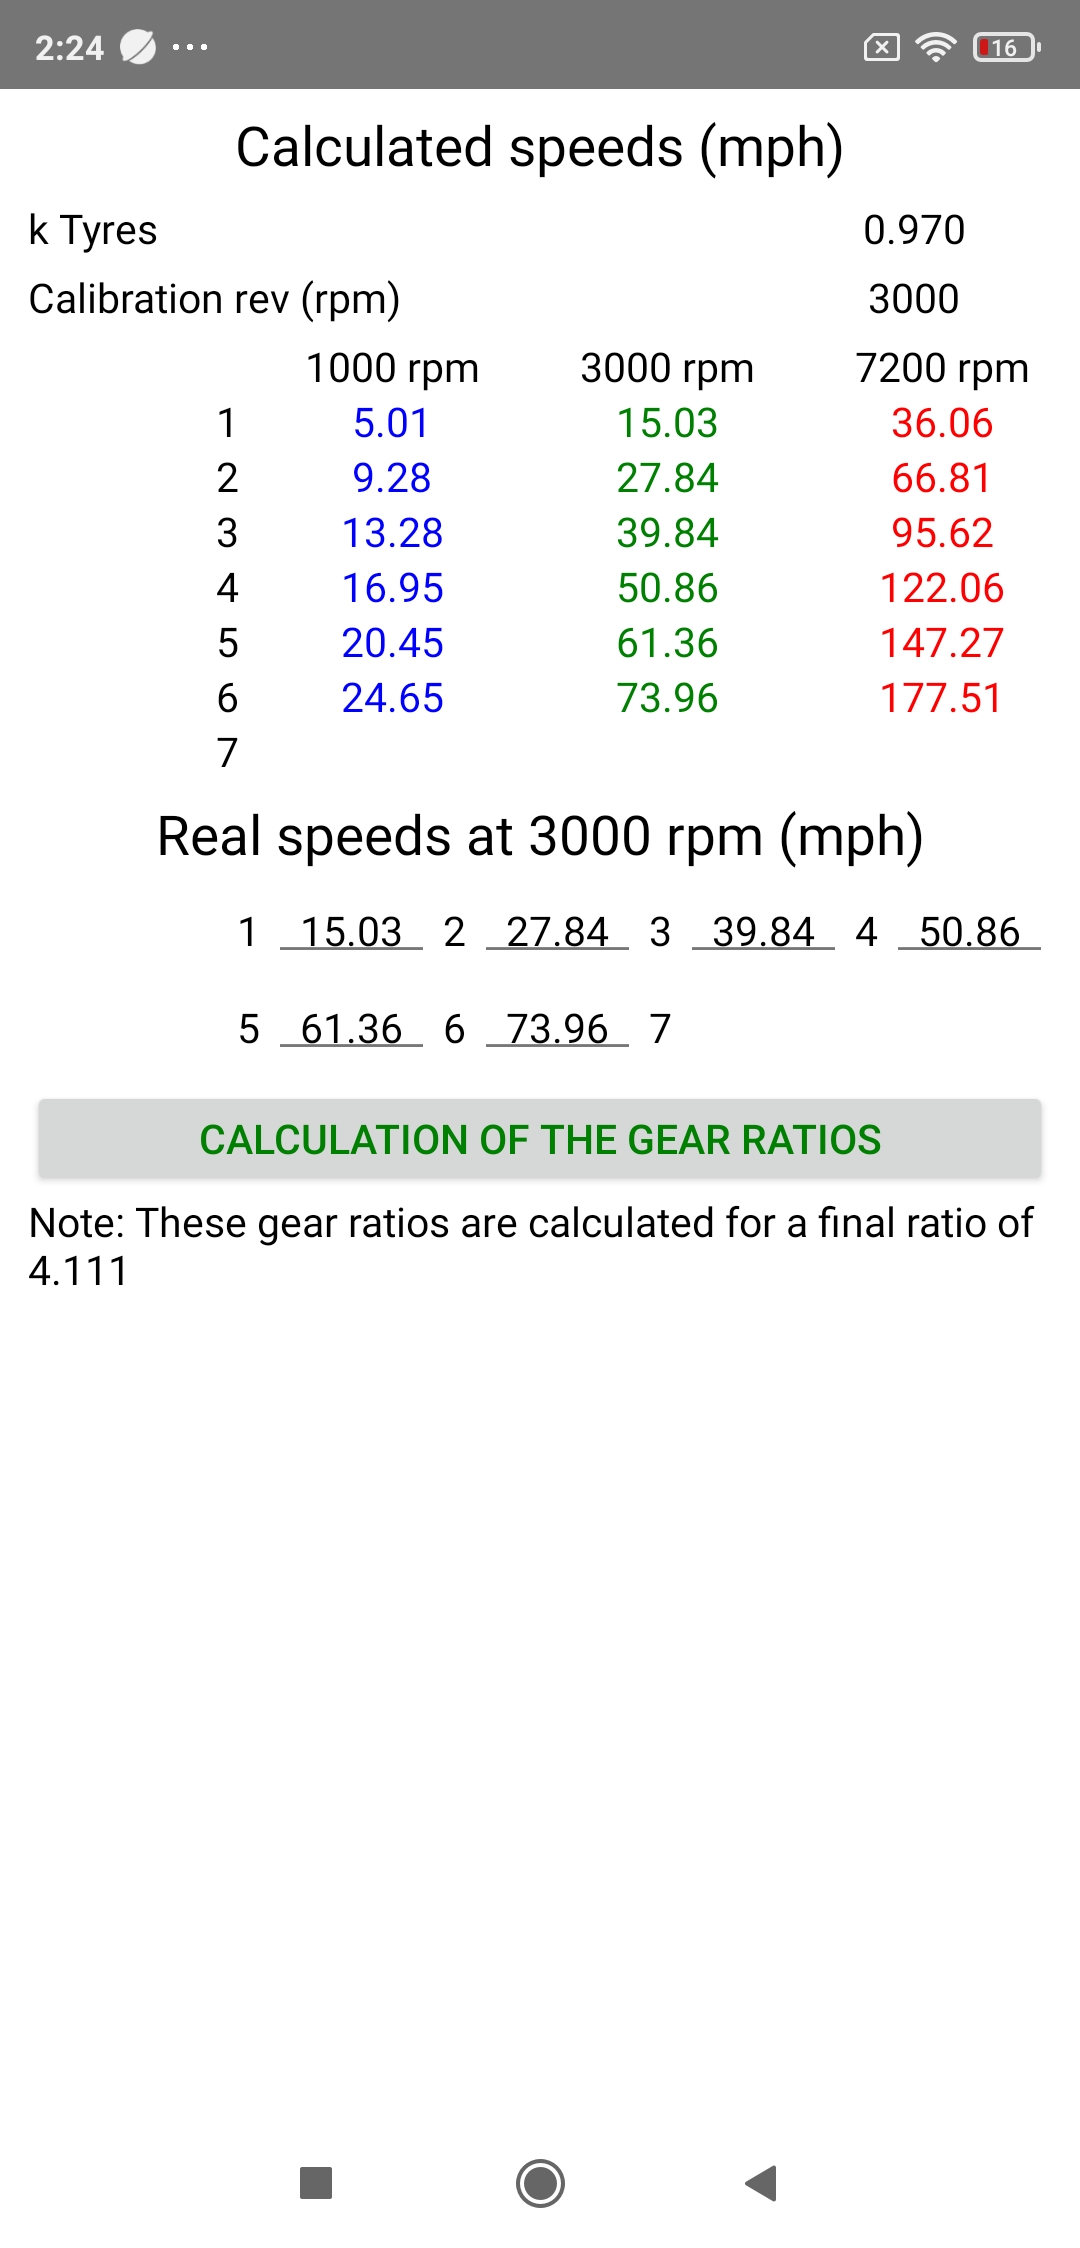
B) Option: Calculation of the gear ratios
If you don't know the gear and final ratios of your car (car present neither in the PerfectPower database nor in that of the Automobile-Catalog), or you want to check them, PerfectPower has an option called "Calculation of the gear ratios" specially created for this purpose! This option is at the bottom of the Car sheet, and it is accessible by pressing the blue button >>>.
To use it, you just need to measure the stabilized speeds on each gear at 3000 rpm with PerfectPower (GPS speed permanently displayed at the top of the Perfs screen), then enter them in the corresponding fields in this option (remember to close the small keyboard after typing), and finally press the "Calculation of the gear ratios" button located just below the fields: PerfectPower will then calculate your new gear ratios, and put them in the corresponding fields "Gear ratios" in the Car sheet!
A few remarks however:
- This calculation of the gear ratios is necessarily done for a given final ratio: it is the one that is entered in the "Final ratio" field when you access the option. Of course, it's possible that this isn't the right final ratio since if you use this option, it is probably because you know neither the gear ratios nor the final ratio of your car, but it does not pose any problem, and you can just as well leave the default value of 3.705 (Aston Martin DBS), or put another one of your choice (4 for example), and all the gear ratios will be calculated for this final ratio. Admittedly, these gear ratios will therefore not be the real ones but equivalent ratios calculated for the final ratio entered, which is therefore not the correct one either, but as said this does not pose any problem, because what counts to calculate the engine speed / wheels speed ratio is only the total ratio (= gear ratio * final ratio), and this total ratio will be perfectly good for all gears! Of course, if you know the real final ratio, fill it in and then PerfectPower will calculate your real gear ratios.
- It is not essential to take this reading for all the gears: the most important is to do it for the gear used for the power measurements, generally the 2nd. All you have to do then is leave all the other fields at their default values. Nevertheless, PerfectPower encourages you to do it for all gears, so that the performance simulator can work properly, if you use it of course.
- This option also works in the opposite direction, to allow you to check if the gear and final ratios that you have entered in the Car sheet are correct: indeed, when you access this option, PerfectPower calculates the real speeds at 3000 rpm on all gears and displays them in the corresponding fields of this option: you just need to compare these speeds with those you measured on the road by stabilizing at 3000 rpm on each gear: they must be equal at +- 1 km/h!
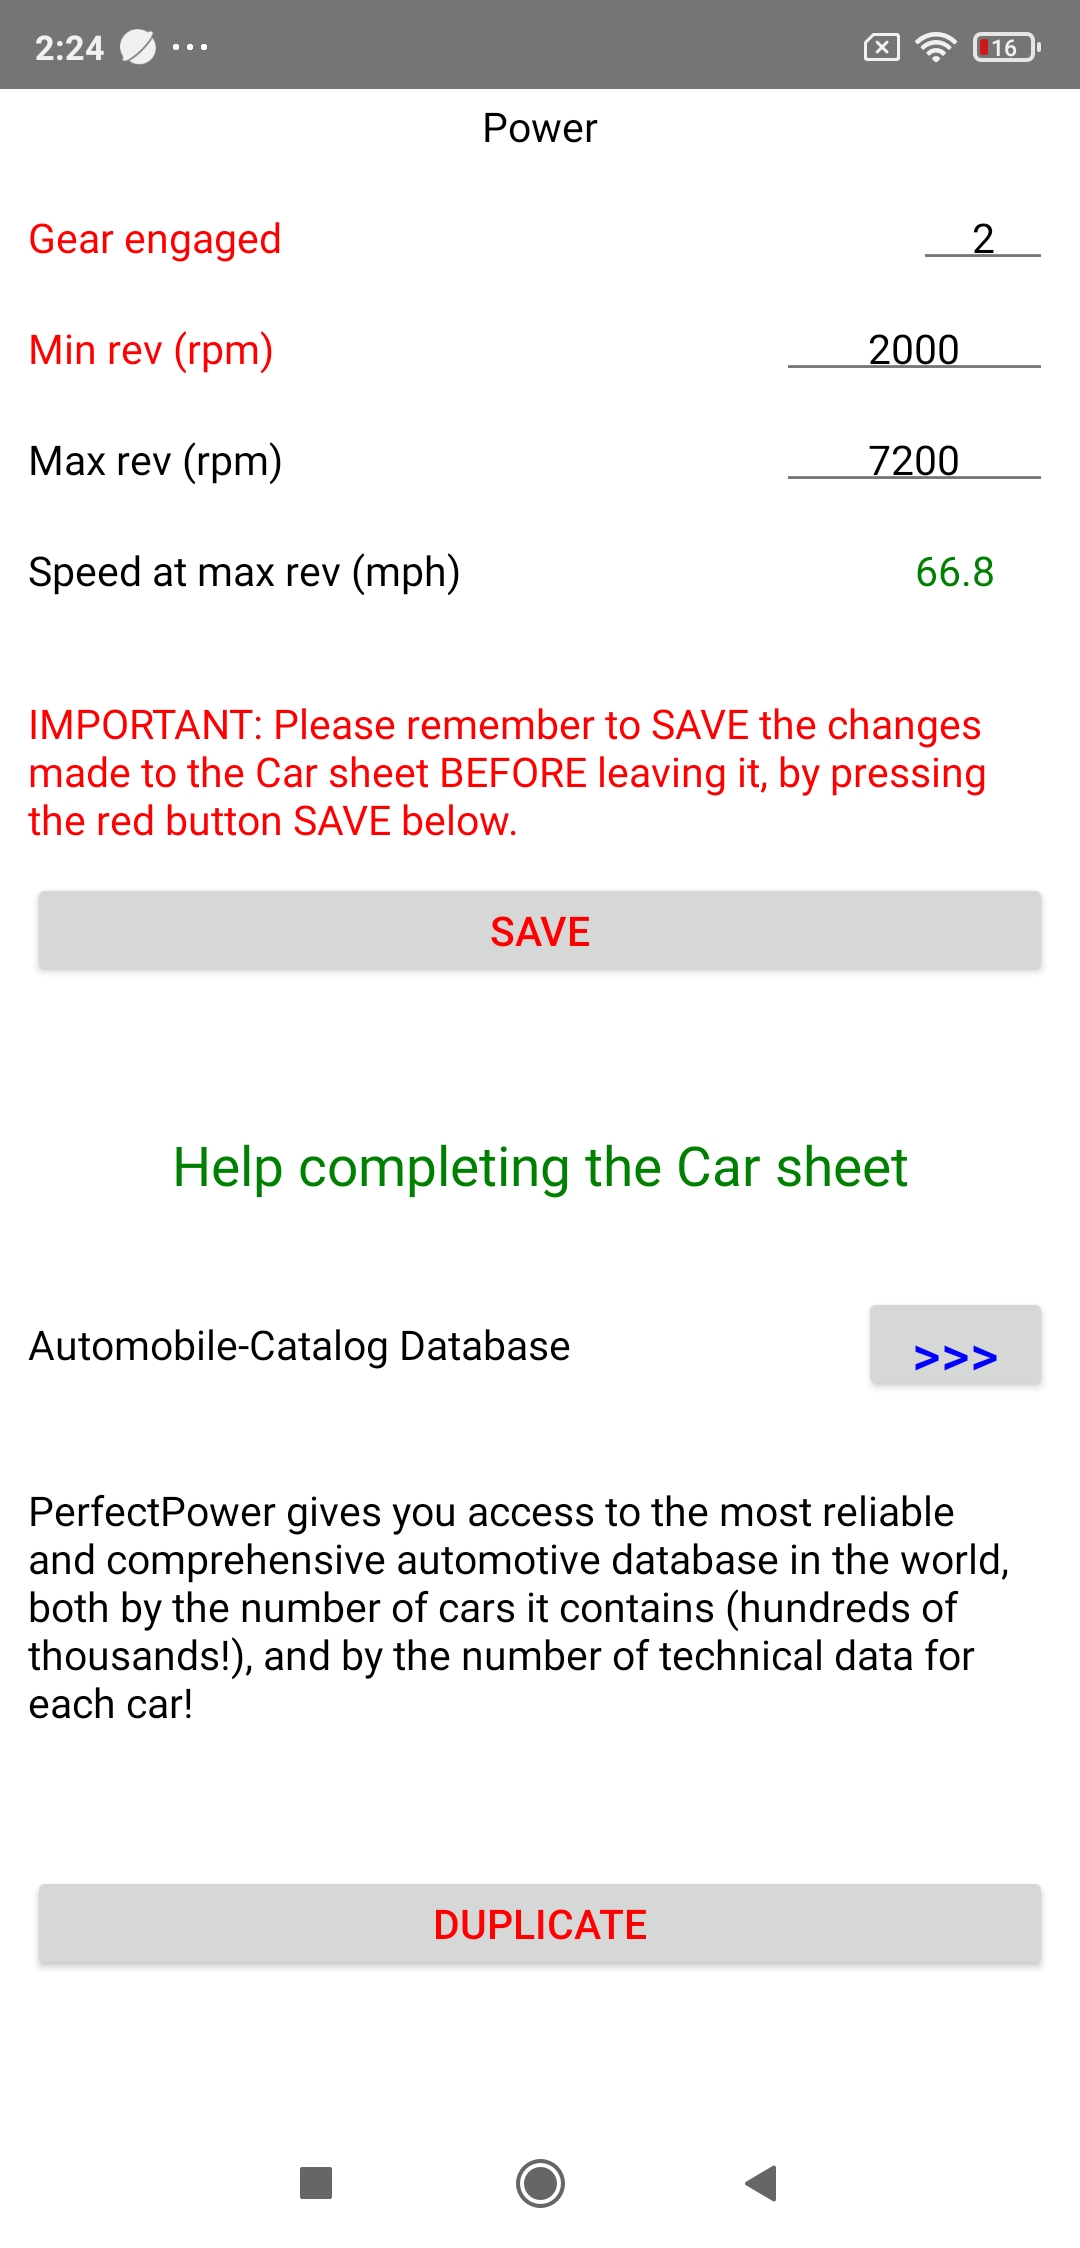
C) Measurement data (3)
You must enter 3 measurement data, defining the conditions of your power measurements:
- Gear selected
- Min rev
- Max rev
The power measurements must always be carried out on a single and well defined gear, from a minimum rev to a maximum rev, both allowing to cover the entire normal engine operating range, so you must obviously specify these three parameters to PerfectPower!
- Gear selected: Use only the 2nd or the 3rd with a serial car, knowing that what determines this parameter in priority is the measurement time, which must be ideally between 5 and 10 s. Which to schematize corresponds to the 2nd for cars under 300 hp, and the 3rd for the (rare!) others.
- Min rev:Use 2000 rpm in gasoline engine and 1500 rpm in Diesel engine, values typically used on chassis dynamometers and perfectly suited to these types of engines
- Max rev:Use the rev limiter in gasoline engine and the red zone in Diesel engine
A remark however: try to always measure in 2nd gear, even with a car over 300 hp, because on open road it can alas be difficult to find a sufficiently long, flat and smooth measurement road to allow correct measurements in 3rd gear, not to mention the obvious risk of... losing your licence! You should measure in 3rd gear ONLY in one of the three following cases:
- Measurement time REALLY well under 5 s (but then you have a real rocket!)
- Insufficient grip (of course, it is preferable to avoid measuring under the rain...)
- Voluntary limitation of the torque in 2nd gear on certain FWD sports cars (and not even really in fact: a Peugeot 2008 1.2 turbo 130 hp is in this case!)
Please note, however, that even in the 3rd case, the measurement in 3rd gear is NOT an obligation: it is ONLY if you wish to compare your engine power and torque results with those given by the manufacturer, which them have been carried out without torque limitation. But if you just wish to get reference results of your car in 2nd gear with the full awareness that they are voluntarily limited in this gear, it obviously doesn't pose any problem!
Note: PerfectPower calculates the theoretical max speed on your measurement gear (theoretical speed on the gear entered at the max rev entered), and displays it in green just below the 3 fields of the 3 measurement data (line "Speed at max rev"). This value is a precious help, as it will allow you to check at a glance during your power measurements if everything is OK (setting of the gear and final ratios and of the tyres dimension, quality of the GPS reception on your measurement road): indeed, the max speed actually measured by PerfectPower must match this theoretical max speed! Please note, however, that a tolerance margin of +- 2% must be granted to this value, corresponding to that on the actual tyres dimension (that on the gear and final ratios is negligible).
3) Delete a car
You can delete a car at any time: from the sheet of the car to be deleted, make a long click on the "DELETE" button located at the very bottom. You can then delete other cars by repeating the same operation.
Warning: This deletion operation is irreversible, and it deletes at the same time all the results associated with this car!
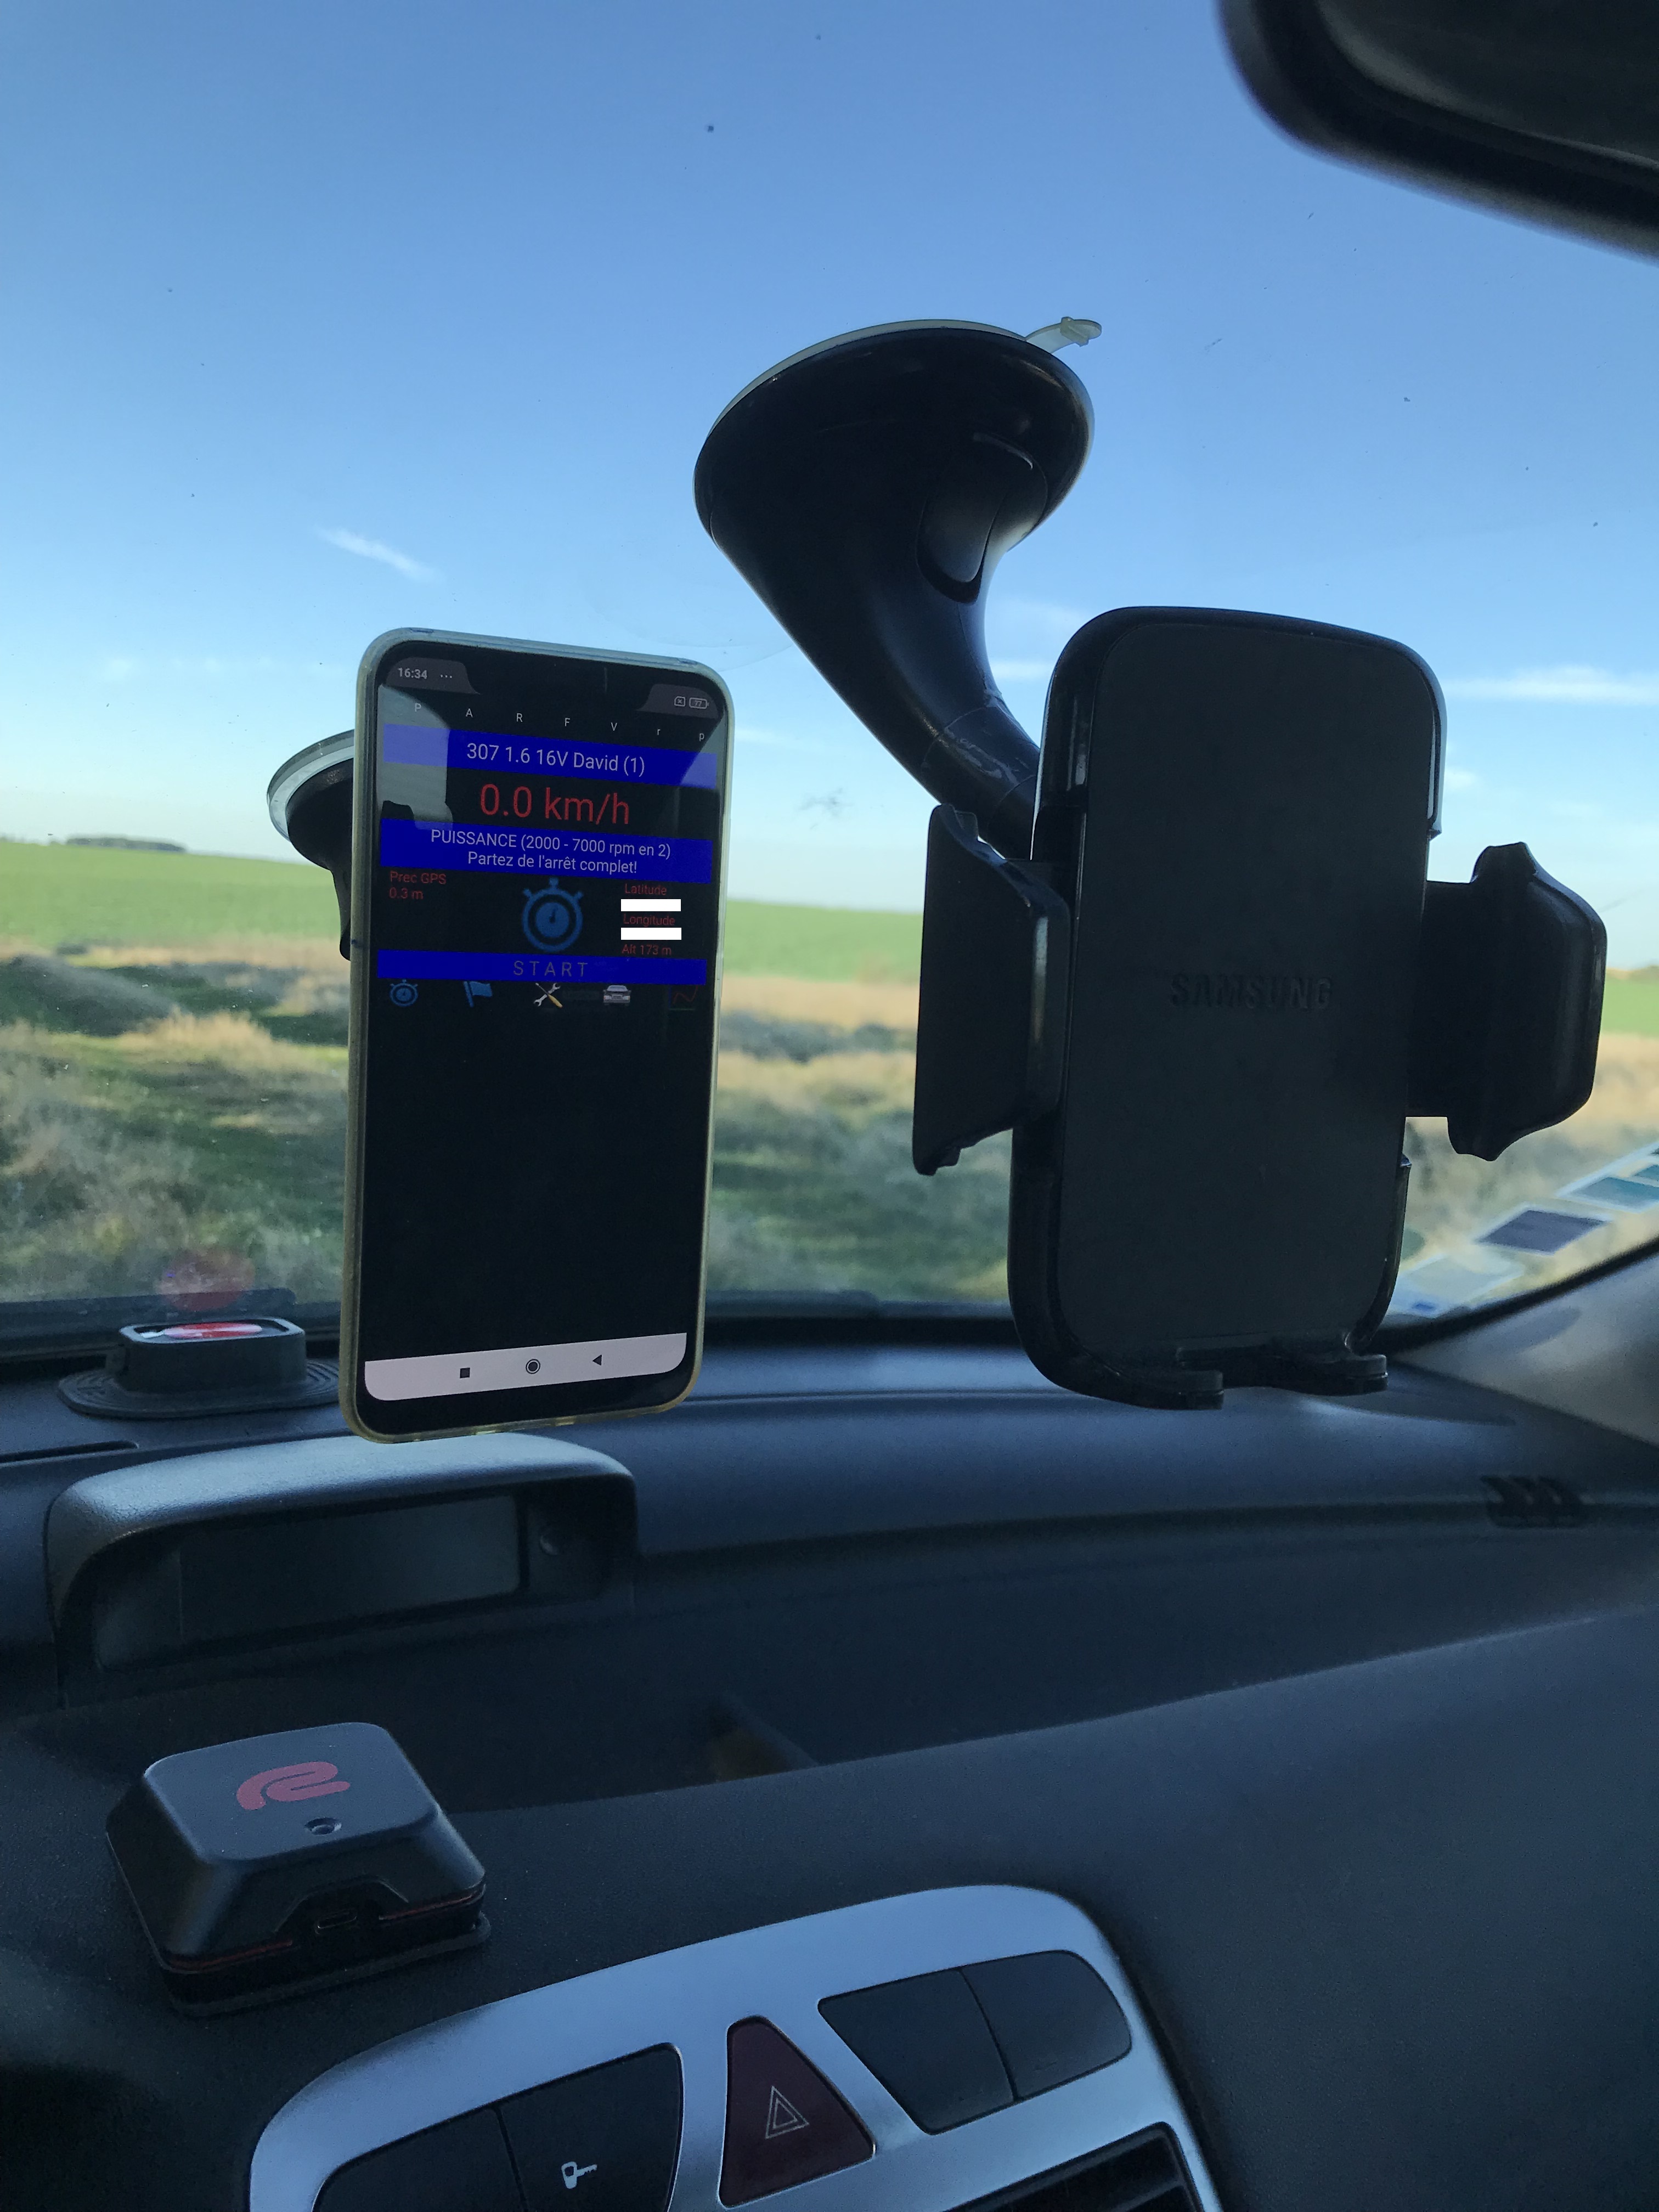
III) Mounting the phone
Mounting your phone is done by using a good windshield mount (i.e. sufficiently rigid, holding the phone correctly and correctly absorbing vibrations), and by positioning it correctly. No other type of mounting should be used!
The three rules that the phone must follow are:
- it must not move during the measurement (as little as possible in reality)
- it must be subjected to as little vibration as possible
- it must be aligned with the direction of movement of the vehicle and not tilted laterally, but can be tilted vertically between 0° and 90° in relation to the horizontal
The diagram below shows you the position the phone must have.

IMPORTANT: PerfectPower strongly recommends the use of one of the following two windshield mounts which perfectly meet all the required criteria:
1) WIXGEAR universal magnetic windshield mount (Amazon US)
2) T'NB universal windshield mount (Amazon France)
The WIXGEAR mount on the left and the T'NB (old version) on the right
IV) Measurement of power and performances
You have to perform your measurements on the flattest and smoothest road possible (this is the most important), in straight line, with as little wind as possible, and with tires warm and well inflated (manufacturer's pressure).
It is also important to perform your measurements in both directions of the road (if possible of course) and ask PerfectPower to average them in order to eliminate the very real influence of the slope of the road and the wind on the results...
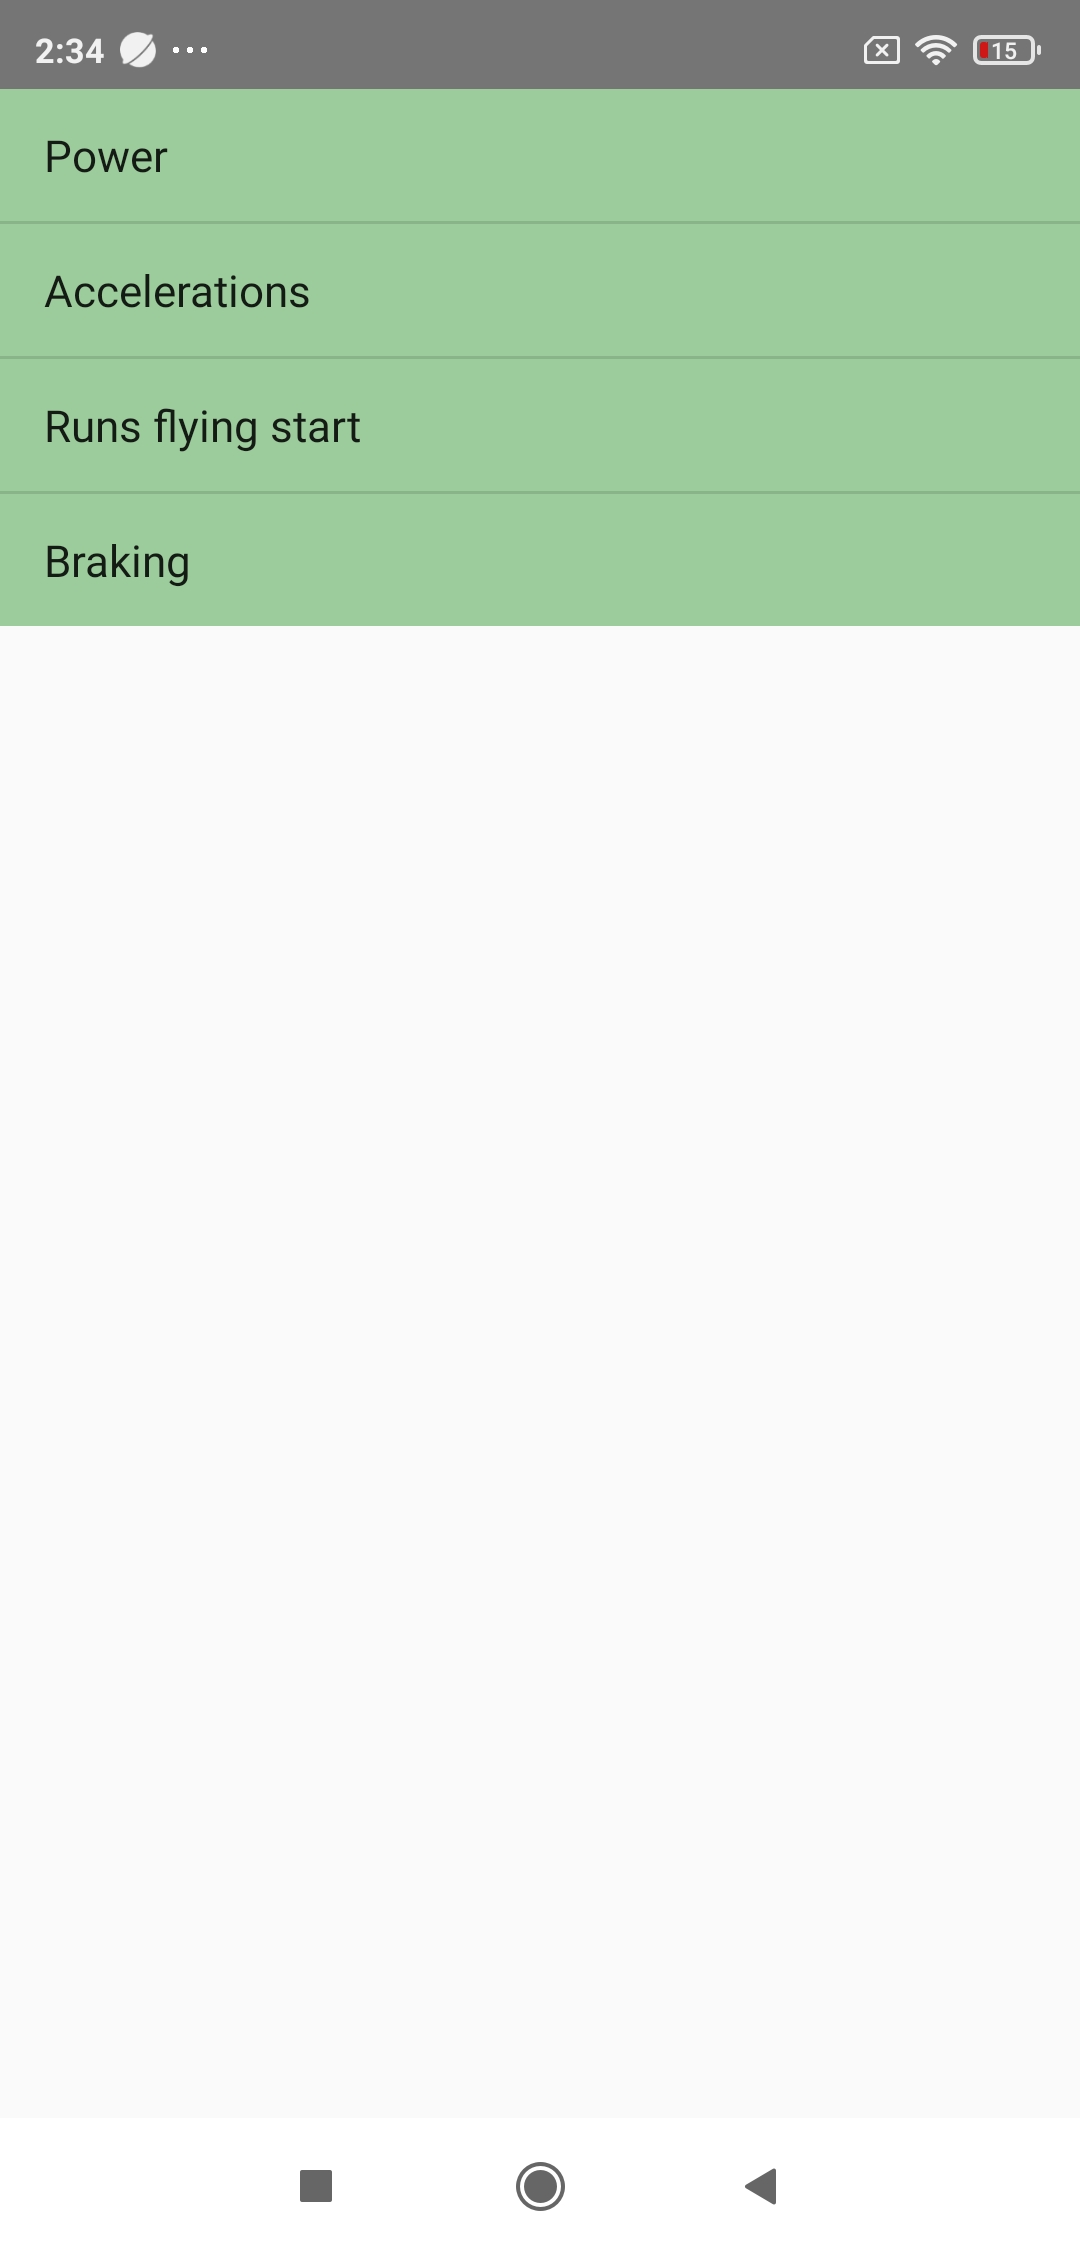
You are now presented in detail the seven types of measurements that can be carried out at PerfectPower:
- 4 main and stored in memory: Power, Accelerations, Runs flying start, and Braking
- 3 secondaries: Speed, Rev calibration, and Losses measurement
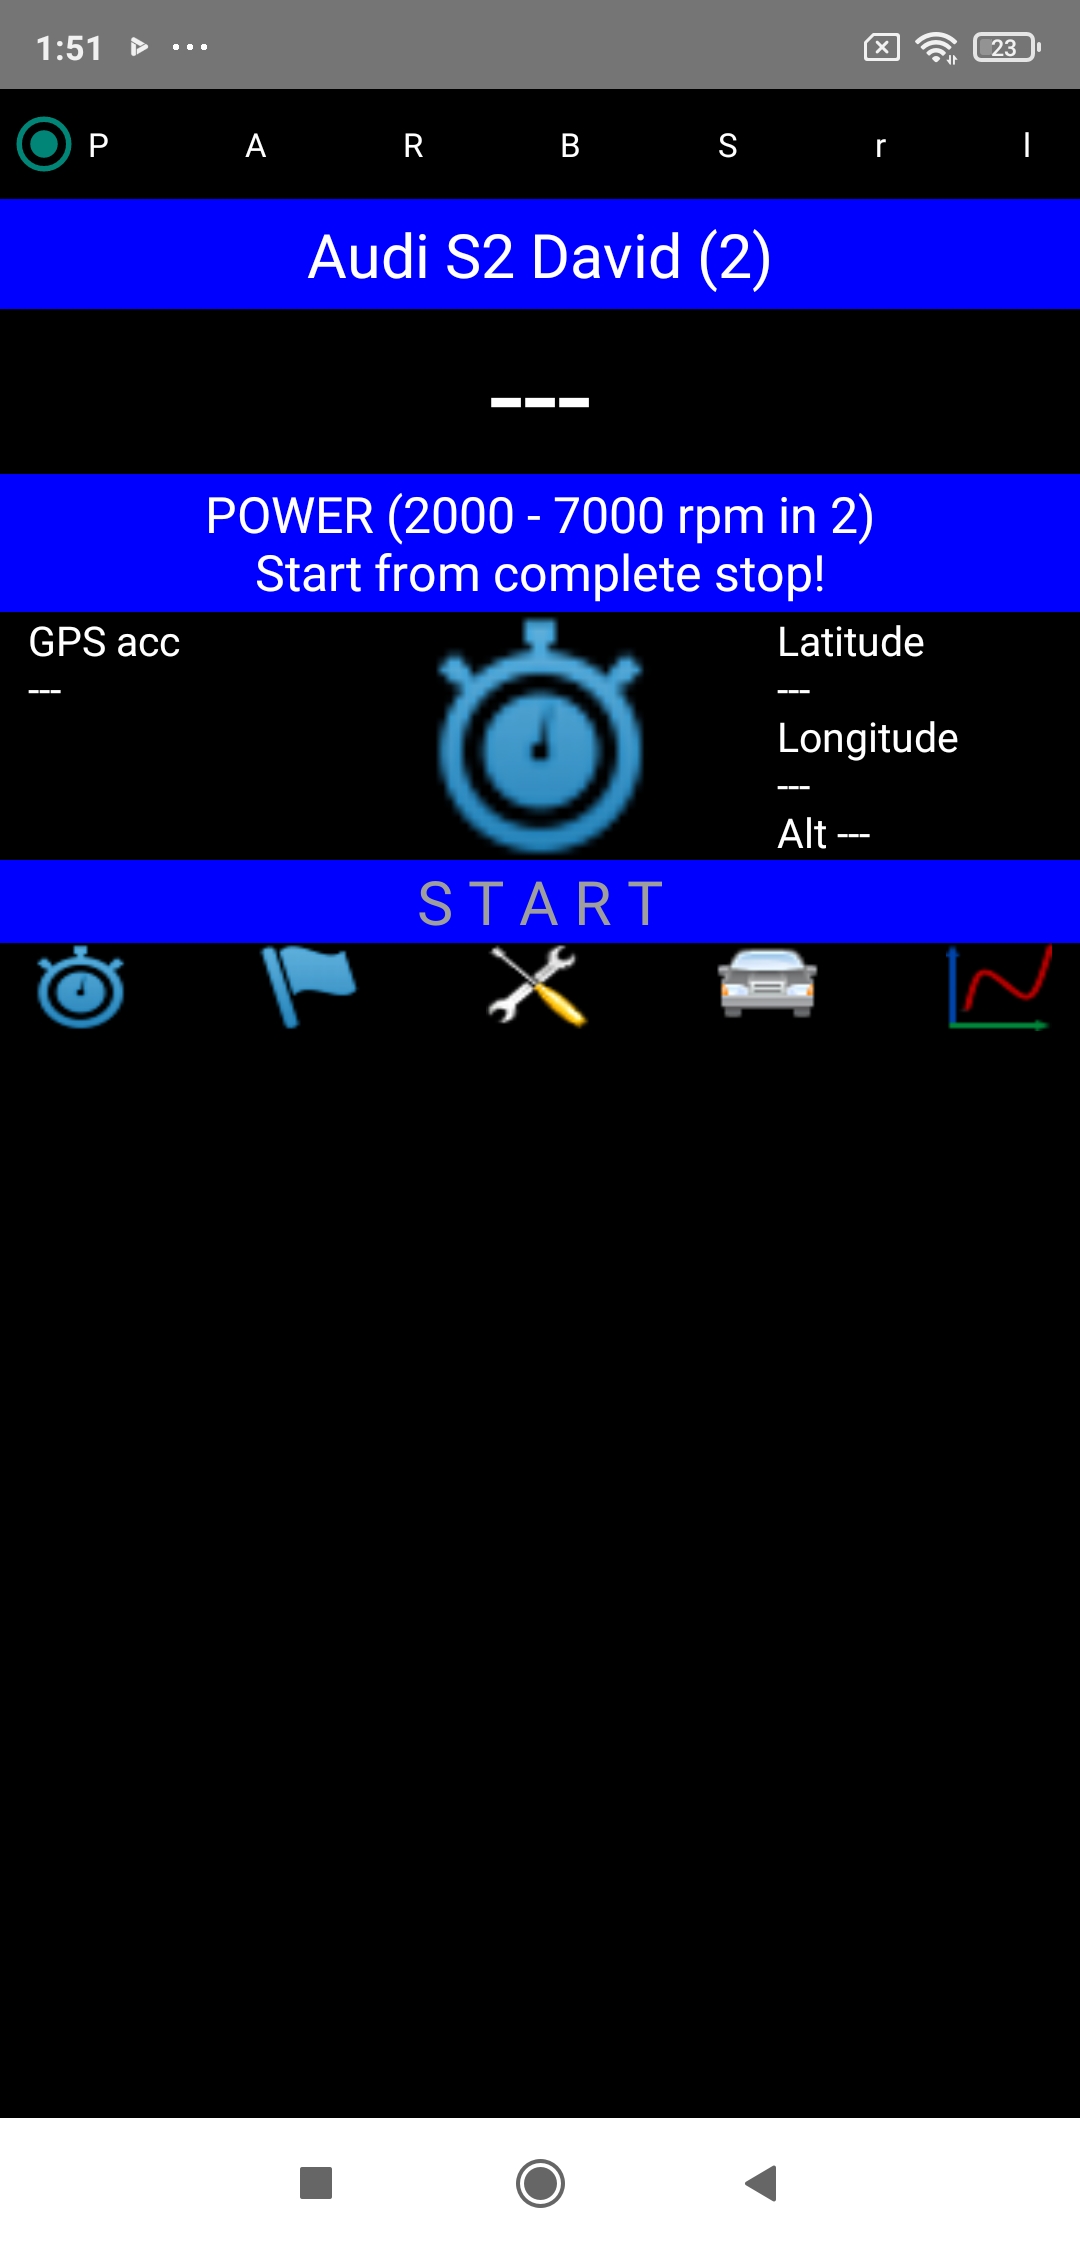
1) Power
Go to the Perfs screen (the main screen), and at the very top of the screen, select:
- the P tab (= Power), the 1st
- the car you want to use (short click to scroll through them, long click to select the one you want)
Note: Selecting the car results in the color of its action bar changing from blue to red.

Car well stabilized at standstill, foot on the brake, disengaged and 1st gear engaged, press the chrono located in the middle of the screen.
The bar below the chrono initially blue ("Start") then turns red ("Wait") for 1 second, time during which you must not move (calibration of the accelerometer).
Then the bar turns green ("Go!"): you can then leave whenever you want, the application will identify the precise moment of the start, and the chrono will start immediately (white bar "Running...").
Normally start in 1st, then quickly put yourself on your measurement gear (the one you entered in the Car sheet for the power measurements, the 2nd or the 3rd), making sure to fall back on this gear below the min rev (also entered in the Car sheet).
Then fully accelerate (wide open throttle) to the max rev (also entered in the Car sheet), no more, no less.
As soon as this max rev is reached, immediately put yourself in freewheel (by disengaging the clutch) for at least three seconds, time after which the chrono will stop automatically. You can also brake a little to force it to stop.
In all cases, the chrono (and therefore the measurement) will stop automatically after the first of the three following conditions encountered: 3 consecutive seconds of deceleration, heavy braking, or 60 seconds of measurement. The end of the measurement is shown by the bar which turns blue again ("Ended").
A measurement report is then displayed in the lower part of the screen, which will give you the essential information about your measurement. Once read, press the chrono, the application will re-initialize for another measurement (blue bar "Start").
IMPORTANT 1: For an optimal curve end, it is preferable not to brake suddenly as soon as the max rev is reached (especially if you are not using an external GPS!), but to put yourself in freewheel (or just raise the foot in automatic gearbox) for at least a little second.
IMPORTANT 2: In the "Calculation of losses by measure in freewheel" mode, it is obviously IMPERATIVE to remain in freewheel for the whole losses measurement duration configured in Setup & Power (minimum 5 s and maximum 15 s)!
IMPORTANT 3: Above all, do not continue accelerating in the higher gear once the max rev has been reached in the measurement gear, otherwise the application will believe that the measurement is not finished and will continue to record it! This reflex is very common among new users!
Demonstration videos
PerfectPower Demo Video - Audi S2 "Track" in "Normal Boost" config - Direction 1 (281 ch & 277 hp)
PerfectPower Demo Video - Audi S2 "Track" in "Normal Boost" config - Direction 2 (281 ch & 277 hp)
Tips & Tricks
Always stop your measurements at the same maximum rev (the one you have entered in the Car sheet) without exception (except in an emergency of course). Not only is this the normal measurement protocol, but it also allows you to detect AND above all correct a weak GPS reception! Indeed:
- When you are not using an external GPS, the maximum speed of all your measurements must be within an amplitude of 1 km/h & 0.6 mph maximum (example: 60 mph real ==> all speeds between 59.7 and 60.3 mph), and the maximum power in a same direction of measurement within an amplitude of 2% maximum (example: 100 hp real ==> all powers between 99 and 101 hp)
- When you use an external GPS of 10 Hz minimum, these amplitudes change to respectively 0.5 km/h & 0.3 mph and 1% maximum (example: 60 mph real ==> all speeds between 59.85 and 60.15 mph & 100 hp real ==> all powers between 99.5 and 100.5 hp)
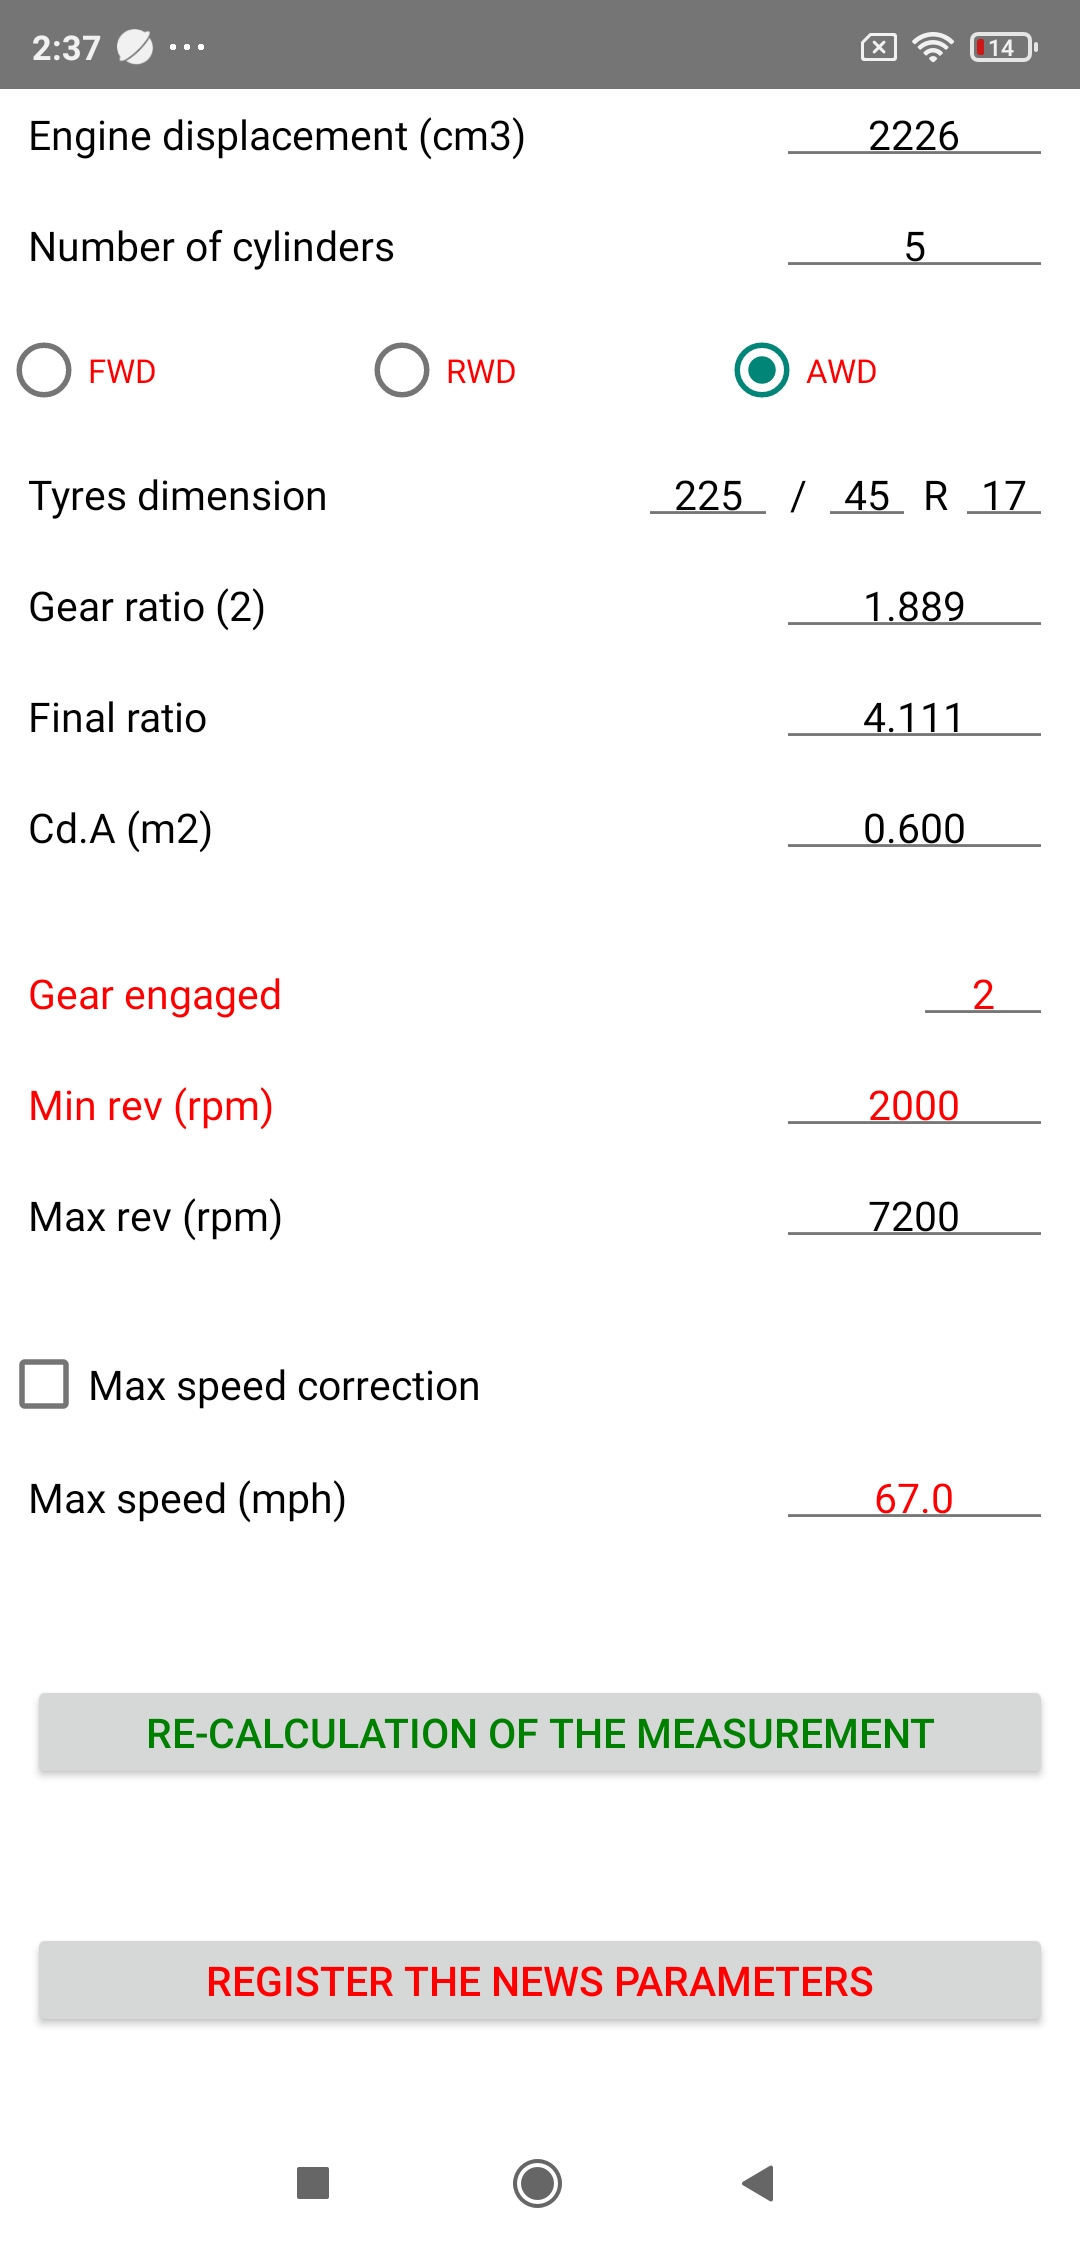
If your measurements do not fall within these speed and power amplitudes, it is the sure sign that your GPS reception is weak, but be aware that PerfectPower has in this case a unique (almost magical!) function of re-calculation of the measurement on the real max speed at the end of the measurement! To use it:
- Go to the results sheet of the erroneous measurement
- Check the "Max speed correction" box
- Enter manually in the "Max speed" field the real max speed at the end of the measurement (which you of course have to try to carefully determine: you can for example use that of a measurement that seems correct to you, or quite simply use the "Speed at max rev" calculated by PerfectPower and available in the Car sheet)
- Press the "RE-CALCULATION OF THE MEASUREMENT" button located just below: all your results (powers, torques, speeds, etc...) will then be instantly recalculated on the whole measurement and should this time be perfectly correct!
- And finally press the "REGISTER THE NEWS PARAMETERS" button also located just below if you wish to definitively save the measurement with its new configuration of real max speed at the end of the measurement. Please note that you can also directly press the "REGISTER THE NEW PARAMETERS" button without pressing the "RE-CALCULATION OF THE MEASUREMENT" button: this simultaneously performs the recalculation of the measurement AND its saving in memory!
You can of course repeat the operation for any other measurement that seems suspicious or erroneous to you!
2) Accelerations
Go to the Perfs screen (the main screen), and at the very top of the screen, select:
- the A tab (= Accelerations), the 2nd
- the car you want to use (short click to scroll through them, long click to select the one you want)
Note: Selecting the car results in the color of its action bar changing from blue to red.

Car well stabilized at standstill, foot on the brake, disengaged and 1st gear engaged, press the chrono located in the middle of the screen.
The bar below the chrono initially blue ("Start") then turns red ("Wait") for 1 second, time during which you must not move (calibration of the accelerometer).
Then the bar turns green ("Go!"): you can then leave whenever you want, the application will identify the precise moment of the start, and the chrono will start immediately (white bar "Running...").
Concerning the measurement itself, only one thing to do: fully accelerate, doing your best to break the clock (but not the application, anyway you would not succeed, even with 1000 hp!).
Once the measurement is finished, immediately put yourself in freewheel (by disengaging the clutch) for at least three seconds, time after which the chrono will stop automatically. You can also brake a little to force it to stop.
In all cases, the chrono (and therefore the measurement) will stop automatically after the first of the three following conditions encountered: 3 consecutive seconds of deceleration, heavy braking, or 60 seconds of measurement. The end of the measurement is shown by the bar which turns blue again ("Ended").
A measurement report is then displayed in the lower part of the screen, which will give you the essential information about your measurement. Once read, press the chrono, the application will re-initialize for another measurement (blue bar "Start").
IMPORTANT: If you have activated the accelerations measurement stop mode on speed in Setup & Accelerations, the measurement will stop automatically as soon as the configured measurement end speed is reached!
3) Runs flying start
Go to the Perfs screen (the main screen), and at the very top of the screen, select:
- the R tab (= Runs flying start), the 3rd
- the car you want to use (short click to scroll through them, long click to select the one you want)
Note: Selecting the car results in the color of its action bar changing from blue to red.
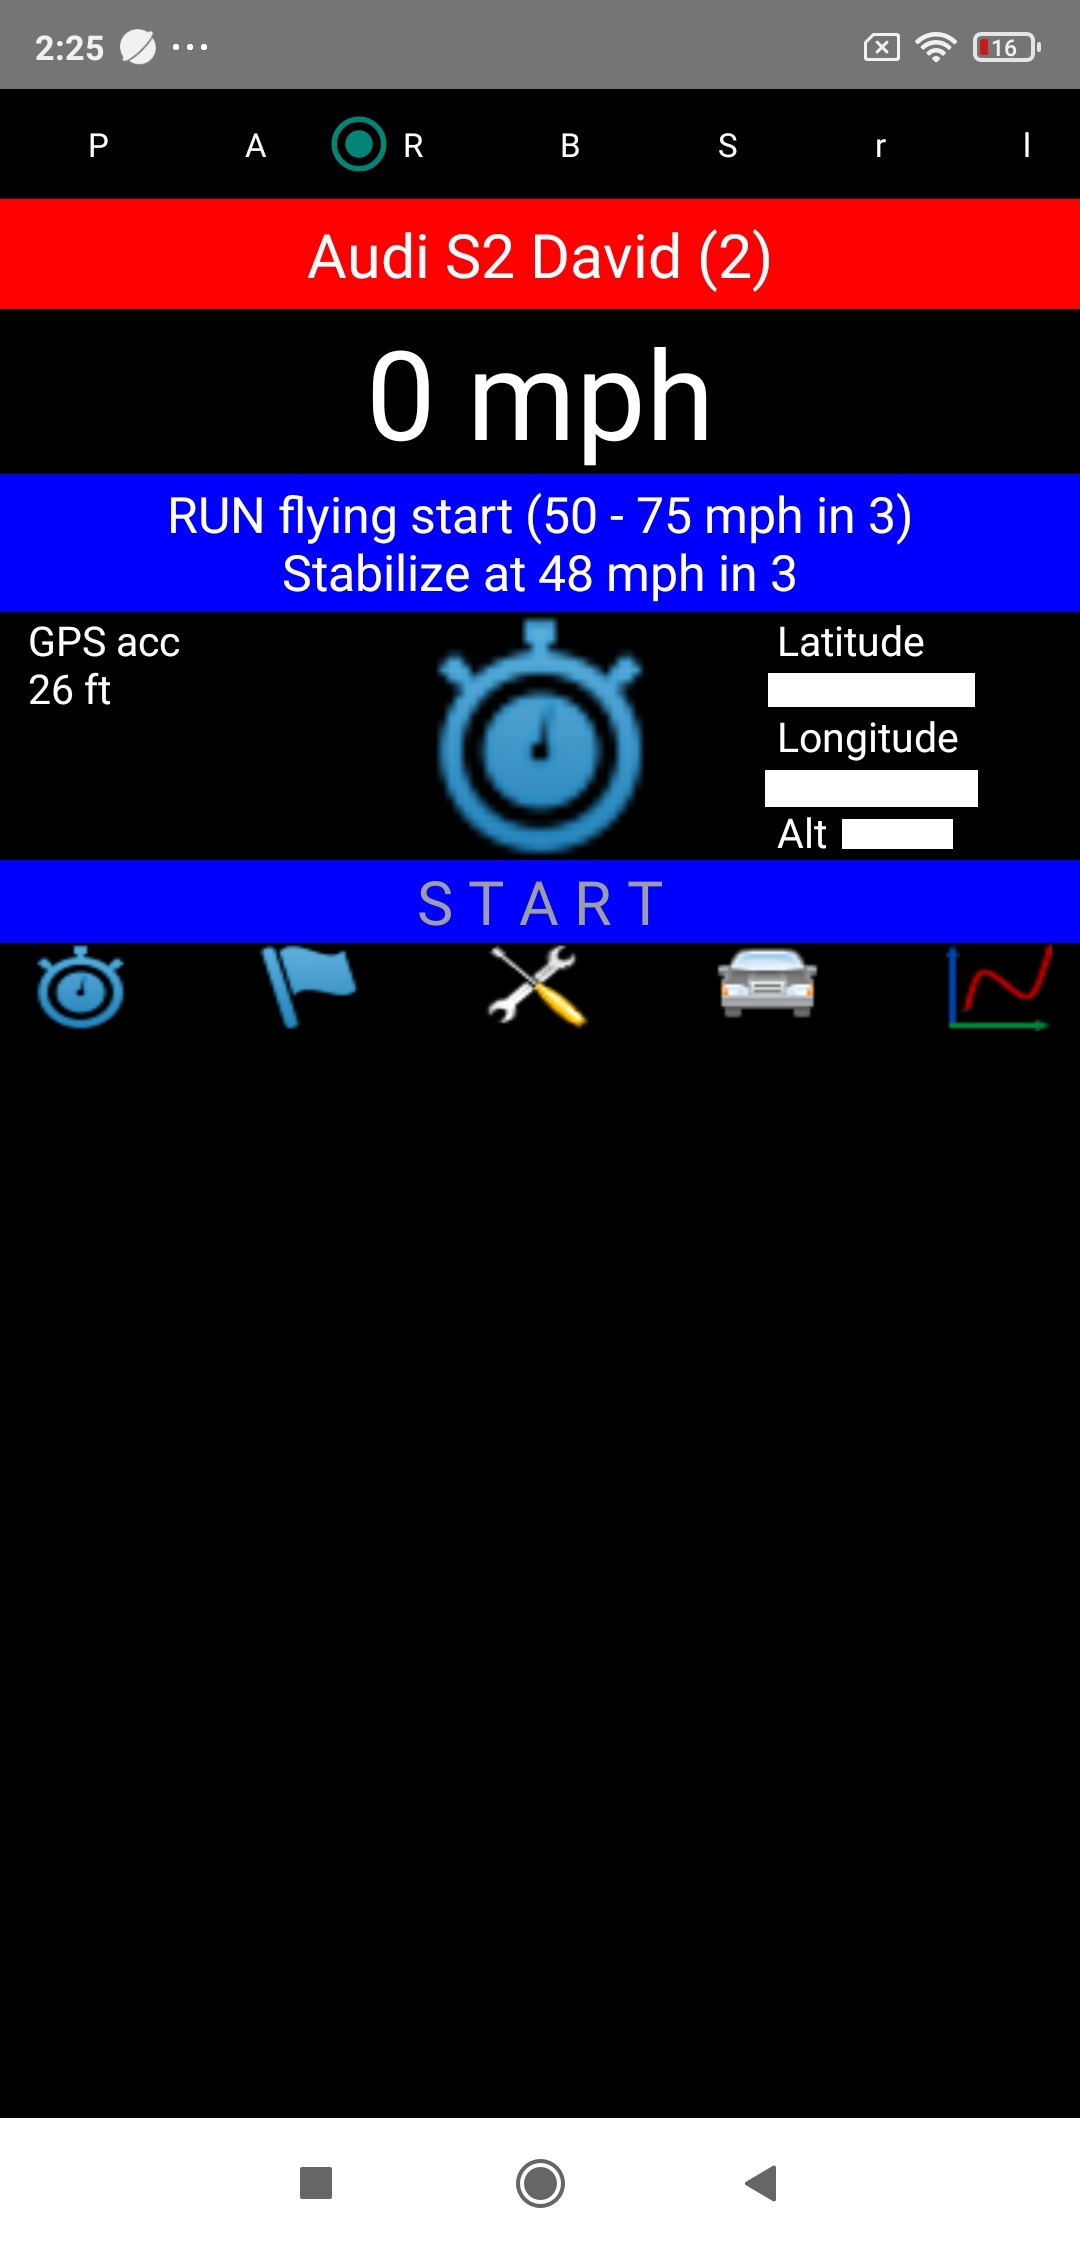
Stabilize at a real speed (GPS speed displayed at the top of the Perfs screen) 2 mph lower than the run start speed you entered in Setup & Runs flying start, by putting yourself in the gear you also filled in there, then press the chrono located in the middle of the screen.
The bar below the chrono initially blue ("Start") then turns green (“Go!”): you can then crush the accelerator whenever you want, the application will identify the precise moment of crossing the run start speed entered in Setup & Runs flying start, and the chrono will start immediately (white bar "Running...").
You must then stop accelerating only when you have exceeded the run end speed entered in Setup & Runs flying start, which will be achieved when the bar turns blue again ("Ended").
A measurement report is then displayed in the lower part of the screen, which will give you the essential information about your measurement. Once read, press the chrono, the application will re-initialize for another measurement (blue bar "Start").
4) Braking
Go to the Perfs screen (the main screen), and at the very top of the screen, select:
- the B tab (= Braking), the 4th
- the car you want to use (short click to scroll through them, long click to select the one you want)
Note: Selecting the car results in the color of its action bar changing from blue to red.
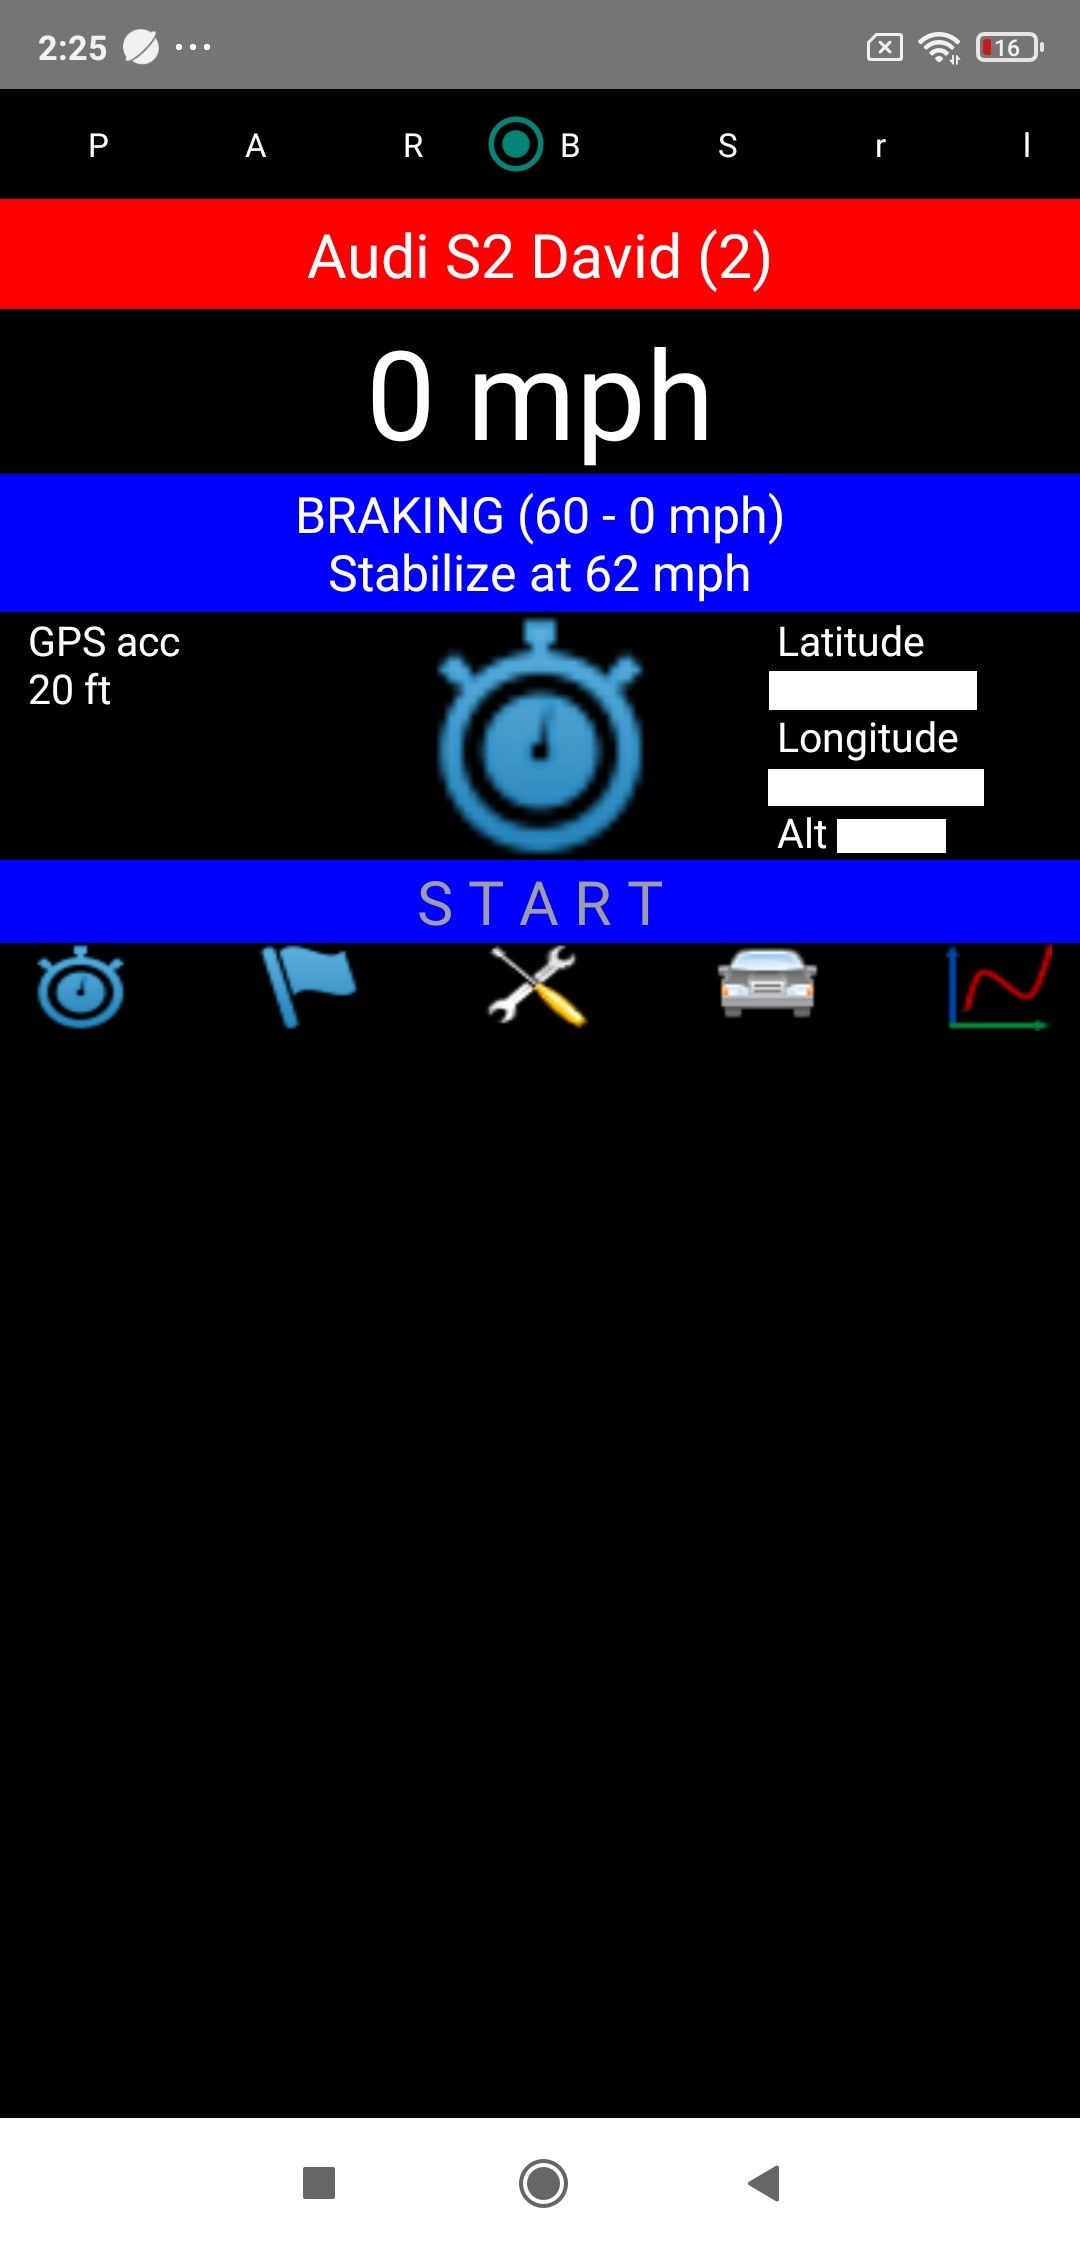
Stabilize at a real speed (GPS speed displayed at the top of the Perfs screen) 2 mph higher than the braking start speed you entered in Setup & Braking, then press the chrono located in the middle of the screen.
The bar below the chrono initially blue ("Start") then turns red ("Wait") for 1 second, time during which you must continue to stabilize your speed (calibration of the accelerometer: you must not start to brake!).
Then the bar turns green ("Go!"): you can then brake whenever you want, the application will identify the precise moment of crossing the braking start speed entered in Setup & Braking, and the chrono will start immediately (white bar "Running...").
You must then brake to a COMPLETE stop.
Once this complete stop has been verified by the application, the measurement will be finished, which will result in the bar turning blue again ("Ended").
A measurement report is then displayed in the lower part of the screen, which will give you the essential information about your measurement. Once read, press the chrono, the application will re-initialize for another measurement (blue bar "Start").
5) Speed
Go to the Perfs screen (the main screen), and at the very top of the screen, select:
- the S tab (= Speed), the 5th
- the car you want to use (short click to scroll through them, long click to select the one you want)
Note: Selecting the car results in the color of its action bar changing from blue to red.

Preliminary note: This function actually allows to carry out three types of measurement: the measurement of the max speed, the calibration of the speedometer, or even a manual rev calibration.
Run your car at full speed (for measuring the max speed) or stabilize at the desired speedometer speed (for calibrating the speedometer) or at the desired calibration rev in the desired gear (for the manual rev calibration), then press the chrono located in the middle of the screen.
The bar below the chrono initially blue ("Start") then turns white ("Running..."), indicating the start of the speed measurement!
You must then remain stabilized at the desired speed or at the desired rev for 3 seconds, time after which the measurement will end, the bar then turning blue again ("Ended").
A measurement report is then displayed in the lower part of the screen, which will give you the average real speed (GPS) calculated over the 3 seconds of the measurement. Once read, press the chrono, the application will re-initialize for another measurement (blue bar "Start").
WARNING: This kind of measurement is not saved in memory: it will therefore be necessary to think as soon as the measurement is finished or to memorize the results (you can for example write them down on a sheet), or to take a screenshot.
6) Rev calibration
Go to the Perfs screen (the main screen), and at the very top of the screen, select:
- the r tab (= Rev calibration), the 6th
- the car you want to use (short click to scroll through them, long click to select the one you want)
Note: Selecting the car results in the color of its action bar changing from blue to red.
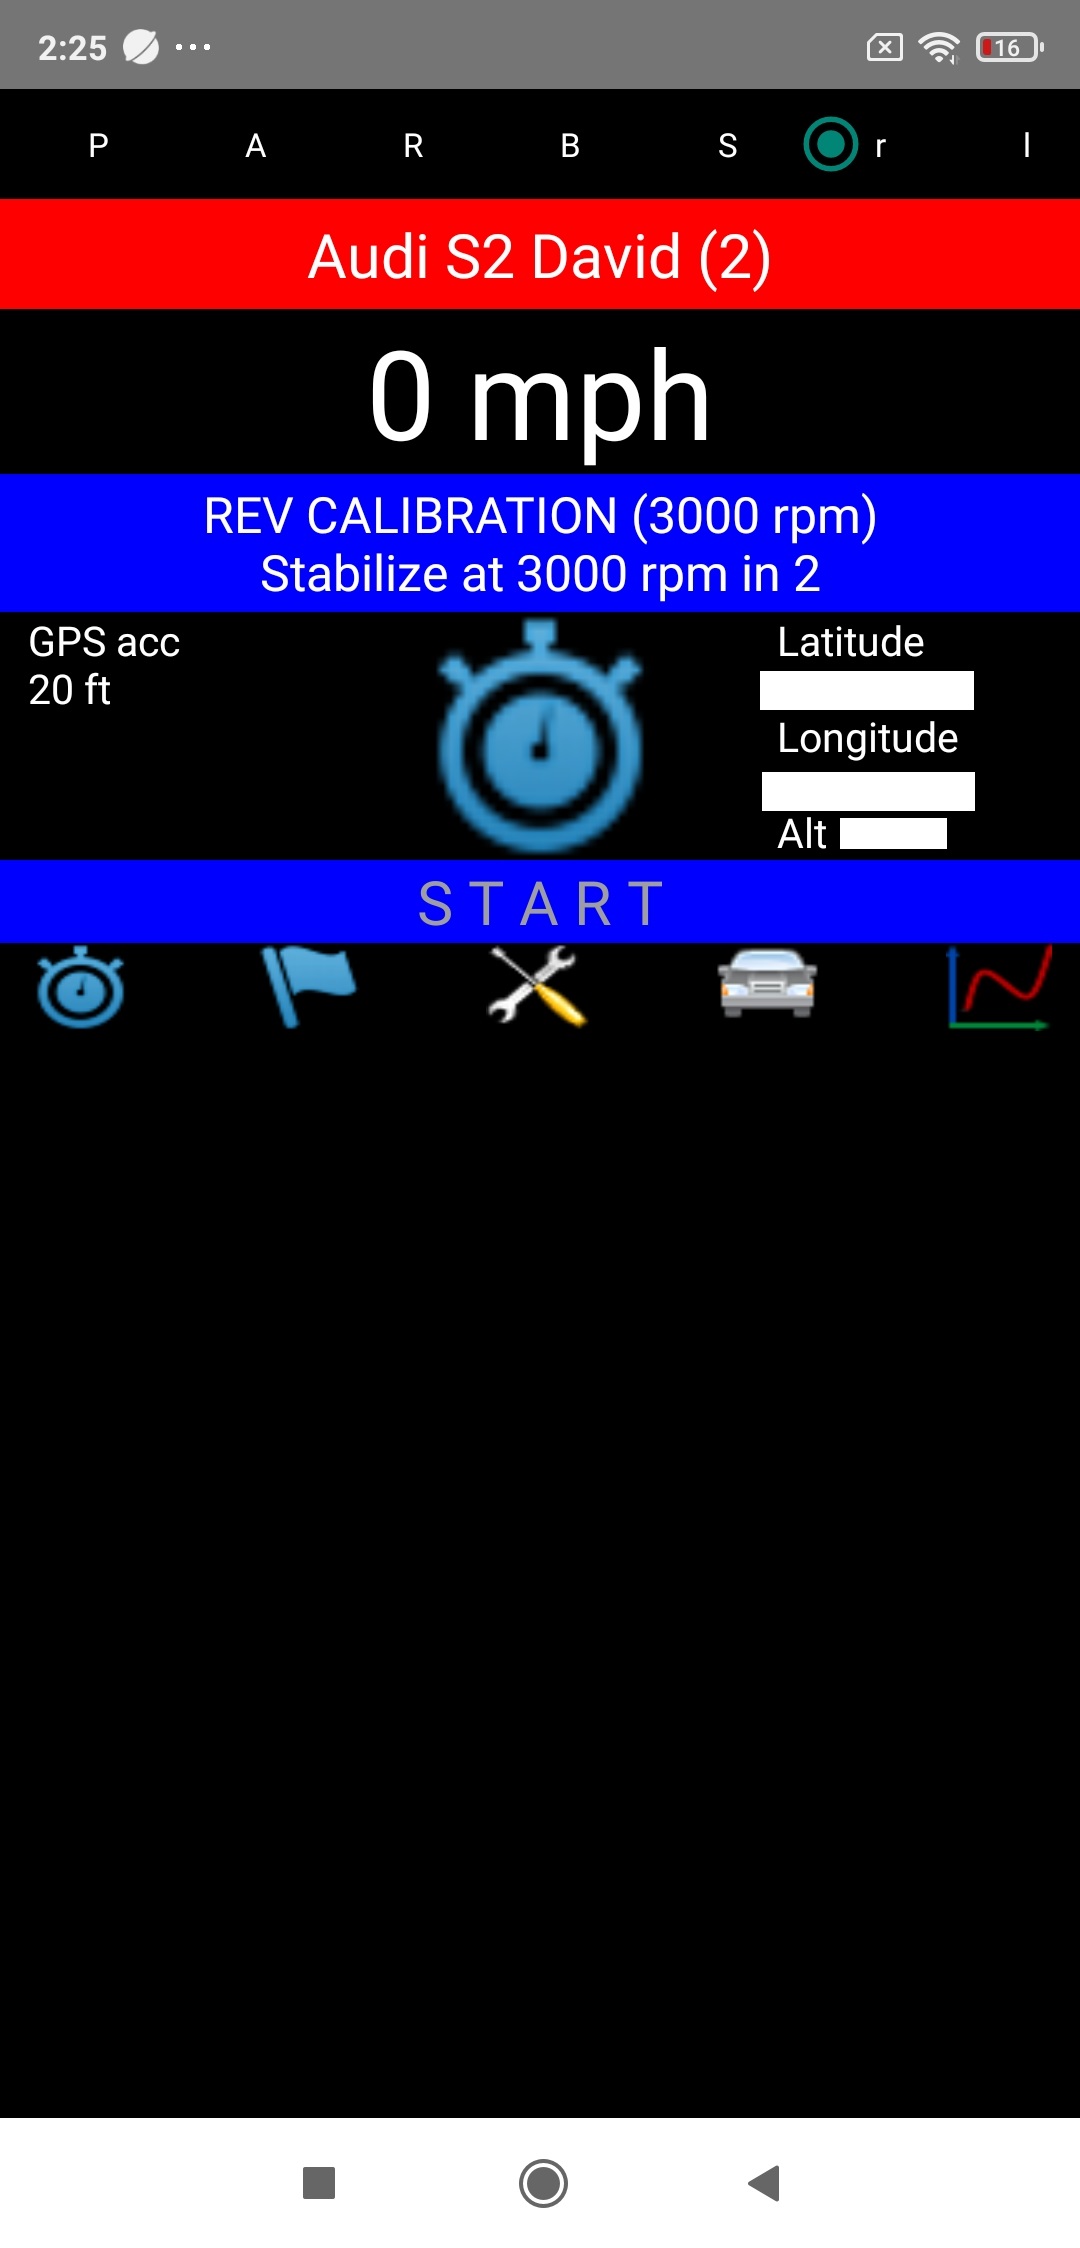
Stabilize at the calibration rev entered in Setup & Rev calibration (3000 rpm by default) in the gear entered in the Car sheet for the power measurements (the 2nd or the 3rd), then press the chrono located on the middle of the screen.
The bar below the chrono initially blue ("Start") then turns white ("Running..."), indicating the start of the measurement!
You must then remain stabilized at the desired rev in the appropriate gear for 3 seconds, time after which the measurement will end, the bar then turning blue again ("Ended").
A measurement report is then displayed in the lower part of the screen, which will give you a series of information calculated over the 3 seconds of measurement, including of course the calculated gearbox ratio.
If you are satisfied with your rev calibration, then press the chrono (the bar remains blue but returns to "Start" state) then select the "P" tab (for Power): you are then ready to perform your power measurements!
On the other hand, if you are not (poor stabilization of the speed during the 3 seconds of measurement), simply press the chrono (the bar remains blue but returns to "Start" state) then redo another one in stride, making sure you stabilize the speed better.
WARNING: The gearbox ratio calculated following a rev calibration is systematically saved in memory, and it therefore "overwrites" the old value that was there: you will therefore have to think carefully if you are not satisfied with your rev calibration or to redo another one immediately, or to put back in the Car sheet the old value that was there!
7) Losses measurement
Go to the Perfs screen (the main screen), and at the very top of the screen, select:
- the l tab (= Losses measurement), the 7th
- the car you want to use (short click to scroll through them, long click to select the one you want)
Note: Selecting the car results in the color of its action bar changing from blue to red.

Stabilize at a real speed (GPS speed displayed at the top of the Perfs screen) 2 mph higher than the losses measurement start speed you entered in Setup & Losses measurement, then press the chrono located in the middle of the screen.
The bar below the chrono initially blue ("Start") then turns green ("Go!"): immediately put yourself in freewheel by disengaging the clutch, the application will identify the precise moment of crossing the losses measurement start speed entered in Setup & Losses measurement, and the chrono will start immediately (white bar "Running...").
Then remain in freewheel for the whole losses measurement duration entered in the Setup & Losses measurement (minimum 5 s and maximum 15 s), which will be achieved when the bar turns blue again ("Ended").
A measurement report is then displayed in the lower part of the screen, which will give you the information of your measurement. Once read, press the chrono, the application will re-initialize for another measurement (blue bar "Start").
WARNING: This kind of measurement is not saved in memory: it will therefore be necessary to think as soon as the measurement is finished or to memorize the results (you can for example write them down on a sheet), or to take a screenshot.
Annex) The measure report / Warnings Codes
At the end of each measurement (regardless of its type), PerfectPower provides you with a measure report in the lower part of the screen that you can scroll by sliding your finger over it. This report will reveal the essential results of your measurement according to its type, and for power and accelerations measurements, the number of warnings on a series of 10 points summarizing:
- the quality of your compliance with the complete stop during the specific calibration (w1)
- the quality of the mounting of your phone (rigidity -w1-, vibrations -w2-, position -w345-)
- the stability of your phone during the measurement (angular displacements -w678-, depending both on the quality of the mounting of your phone -rigidity- and that of your measurement road -profile and condition-)
- the proper working of your GPS receiver (w9)
- the accuracy of GPS reception (w10)
You must take into account the indications given in this measure report to check or improve the quality of your measurements if necessary. If the number of warnings is regularly between 0 and 2, then the measurements are of good quality. That said, don't worry if the number of warnings exceeds 2, because the extreme efficiency of PerfectPower's correction algorithms means that very often, 2, 3, 4, or even 5 warnings may have no consequencies: it all depends on the type of warning and the level at which the critical threshold is exceeded.
It should be noted that each warning has a degree reflecting the level of overrun of the critical threshold, from 0 (= below the critical threshold ==> no warning) to 3 (= extreme overrun of the critical threshold), even if in reality the majority of the warnings have only two levels (0 and 1): only warnings 1 and 10 have more.
Here is the list of the 10 warnings with their different degrees:
Warning 1: Mounting of the phone (no movement) and complete stop during the specific calibration (0 = OK - 1 = slight movement - 2 = net movement ==> switch to Error 1)
Warning 2: Vibration level (0 = OK - 1 = imperfect)
Warning 3: Position of the phone around the car X axis (0 = OK - 1 = imperfect)
Warning 4: Position of the phone around the car Y axis (0 = OK - 1 = imperfect)
Warning 5: Position of the phone around the car Z axis (0 = OK - 1 = imperfect)
Warning 6: Stability of the phone around its X axis (0 = OK - 1 = imperfect)
Warning 7: Stability of the phone around its Y axis (0 = OK - 1 = imperfect)
Warning 8: Stability of the phone around its Z axis (0 = OK - 1 = imperfect)
Warning 9: GPS receiver working (0 = OK - 1 = not working)
Warning 10: Accuracy of GPS reception (0 = good - 1 = average - 2 = bad - 3 = no GPS reception following warning 9)
In addition, PerfectPower saves in memory the warnings of each measurement with their degree, and restores them in the results sheet in the form of a line of codes in a paragraph named "Warnings": these codes from 0 to 3 correspond to the degree of each of the 10 warnings, listed in ascending order: warning 1, warning 2, warning 3, etc...
The interest of this line is to allow each user to re-view after measurement the eventual warnings obtained during the measurement with their degree, and then consult the guide to know in detail the type of error(s) made with its level of intensity, exactly like reading DTC (Data Trouble Codes) in an ECU (Engine Control Unit)!
Note 1: Be careful, because PerfectPower can reject the measurement if one of the following 3 rules is not respected:
- Error 1: Faulty mounting of the phone (too much movement), and/or failure to respect the complete stop during the specific calibration (WAIT state)
- Error 2: Measurement duration < 3 seconds
- Error 3: Measurement start rev on selected gear not reached (power only)
In this case, it is not a measure report that is delivered to you, but a failure report that will give you the reason for this failure.
Note 2: However, for strictly pedagogical purposes, PerfectPower will NEVER reject a measurement actually launched, i.e. in "Running..." state and having started for at least 3 seconds: in other words, if it happens a real incident during the measurement (such as the phone falling from its support), PerfectPower will still validate the measurement, even though the results will be aberrant, the principle of measurements based on accelerometers requiring a maximum stability of the phone during the measurements... On the other hand, the measure report will notify you of the disaster, with a disastrous phone stability on the 3 axes (warnings 6, 7, and 8): it's up to you to understand that the measurement is aberrant and to reject it!
As you can see, PerfectPower is really interactive and formative!
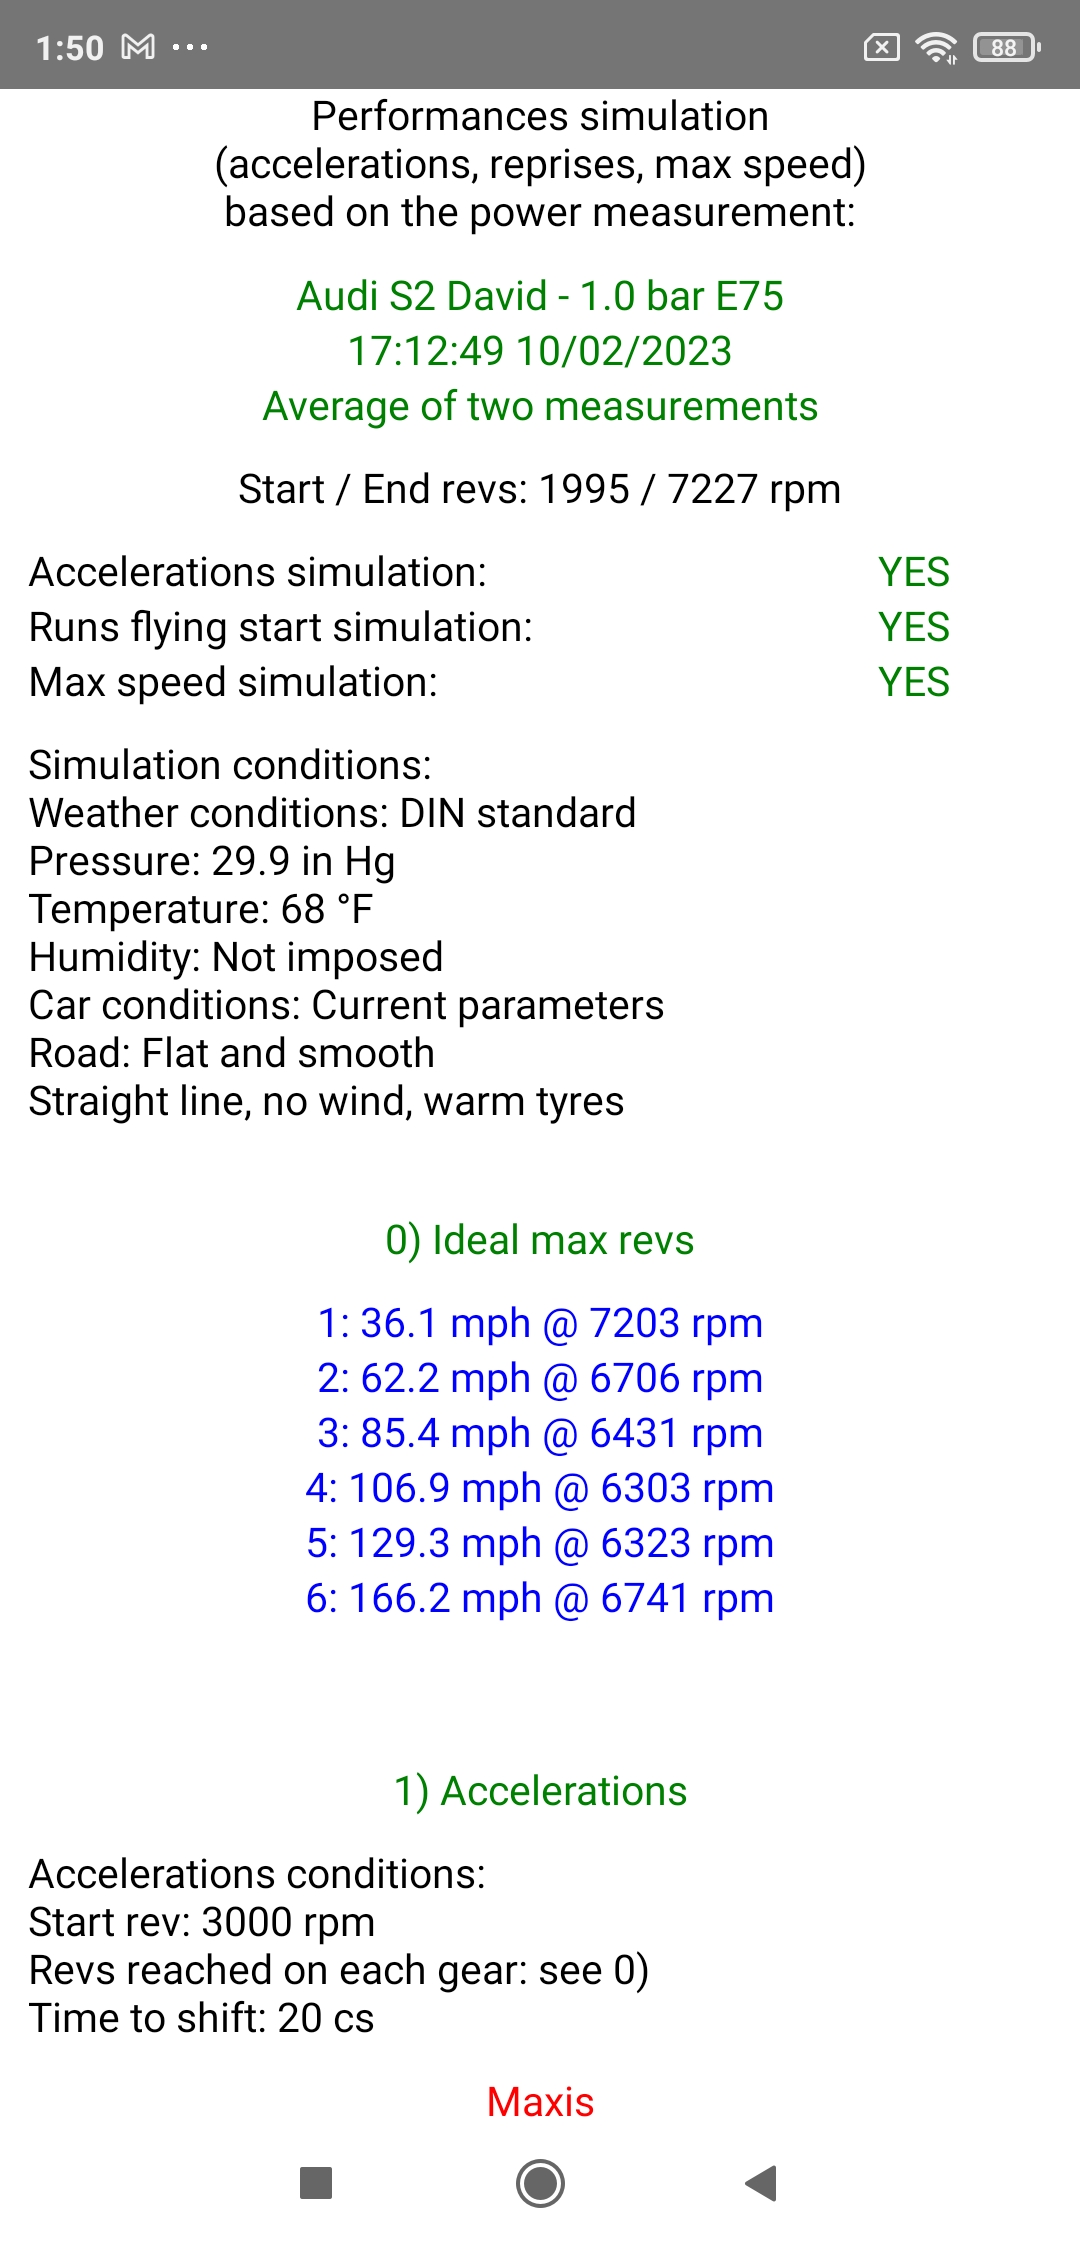
V) Performances Simulator
PerfectPower has an extremely sophisticated performances simulator, allowing you to simulate with maximum reliability all possible and imaginable performances of your car! It is based on the results of any power measurement that you indicate to it, and it will then recalculate, using the power / torque curves obtained and all the parameters that you have entered in the Car sheet, all the performances of your car, which fall into four types:
0) Ideal max revs to reach on each gear
1) Accelerations
2) Runs flying start
3) Max speed
This simulator is accessible from any Power results sheet by pressing the "Perfs simulation" button located at the bottom of the sheet, and it will calculate and display all its results. A few remarks however:
A) The simulator indicates to you at the beginning of its report the simulations that it was able to carry out (accelerations, runs flying start, max speed) according to the revs at the start and end of the power measurement. Indeed, it cannot necessarily simulate all the measurements: for example, if your power measurement starts at 3000 rpm and stops at 3500 rpm, the simulator will not be able to simulate an acceleration since it will not know the power during any change of gear since the engine speed will drop below 3000 rpm at this time... but it will also not be able to simulate any run flying start that would take place over an engine speed range not completely included in the 3000-3500 rpm range for the same reason...
==> You must therefore think about this when you perform your power measurements, and therefore choose a range of revs wide enough to allow all the simulations, this range OBLIGATORILY having to include the rev of 3000 rpm, because PerfectPower simulates for the accelerations a clutch control at this rev when starting. Please note, however, that if you follow to the letter the guide for the configuration of the Car sheet and the power measurements, all this is obligatorily guaranteed!
B) The simulator then indicates the measurement atmospheric conditions (those of the DIN standard) as well as those of the car (those of its current sheet) used for its calculations. This has a very interesting consequence: it allows you to test the effects on performances of any car parameter change and to simulate any run flying start at will just by going back and forth in the Car sheet (for the change of car parameters) or in the Setup (for the runs flying start): the new simulation is performed INSTANTLY when returning to the simulator!
C) The simulator takes place in the measurement scheme of measurements performed on a flat, smooth, dry road, in a straight line, without wind, and with the tires warm and well inflated (manufacturer's pressure), i.e. an ideal scheme. However, it can simulate EVERYTHING: measurements on a wet road, uphill or downhill, in bend, with wind, with over-inflated or under-inflated tires, etc... Also, if users are interested in the addition of such features in the future, it will be done!
D) And finally, here are the essentials to remember about the simulation of the four types of performances:
0) Ideal max revs to reach on each gear
They represent the revs that must be "pulled" on each gear to obtain the best performances.
As you will be able to see when using the simulator, and contrary to certain preconceived ideas widespread even in the sporting automotive environment (it's a shame!), the ideal max rev is often 500 to 1000 rpm higher than the max power rev according to the gear (especially in gasoline), and in any case always at least equal to the max power rev, and this is completely normal! The role of engine torque is surprisingly often very overrated in the notion of the ideal max rev to reach on each gear or even of acceleration capacities in general (if this was true, Diesels would be the absolute champions of accelerations, and we are obviously very far from the account...), so a future article will be published on this subject to clarify all this and restore power to its former glory!
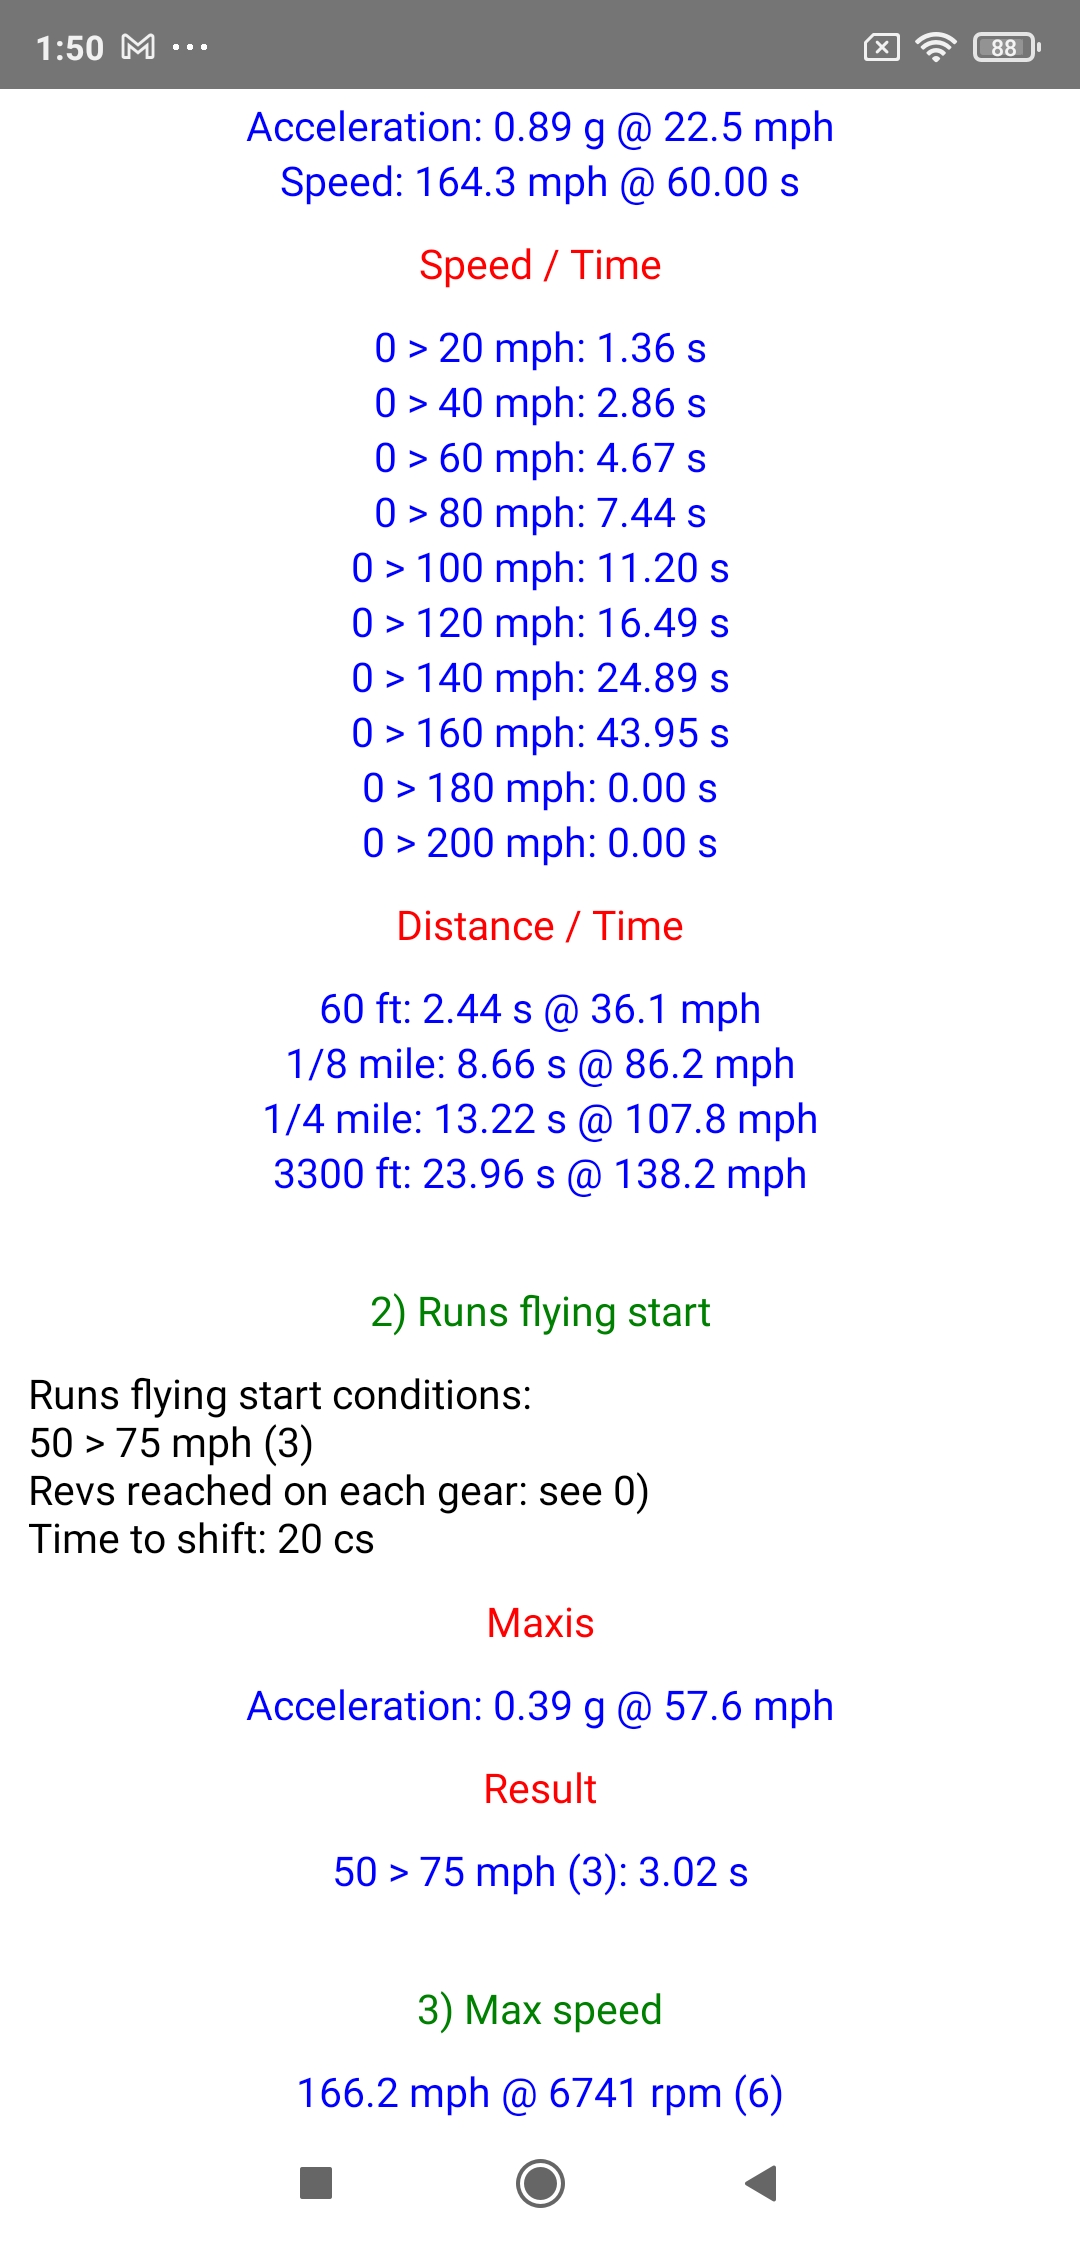
1) Accelerations
The simulator achieves a maximum acceleration lasting 60 seconds performed by a PERFECT driver, capable of making a perfect start while remaining at the grip limit on starting in clutch control at 3000 rpm (and also after the start if the car is violent!), to push all its gears to the ideal max revs, and to change them in just 0.20s, which is ultra fast with a manual gearbox. On the other hand, the grip coefficients used are those of old tires (90s), and they will be reviewed in a future update. But all in all, the best times you will do in your acceleration measurements should be very close to those calculated by the simulator, which represents, to summarize, optimal reference times but achieved with non-optimal tires!
2) Runs flying start
The simulator carries out a run flying start from a speed x to a speed y starting on a gear z, with x, y, and z mentioned in the Setup. Of course, if the speed y is unreachable, it will tell you!
3) Max speed
The simulator gives you the max speed you can reach, with the gear engaged and the corresponding engine speed.
Reminder: All these performances are achieved within the ideal measurement scheme defined in note C.
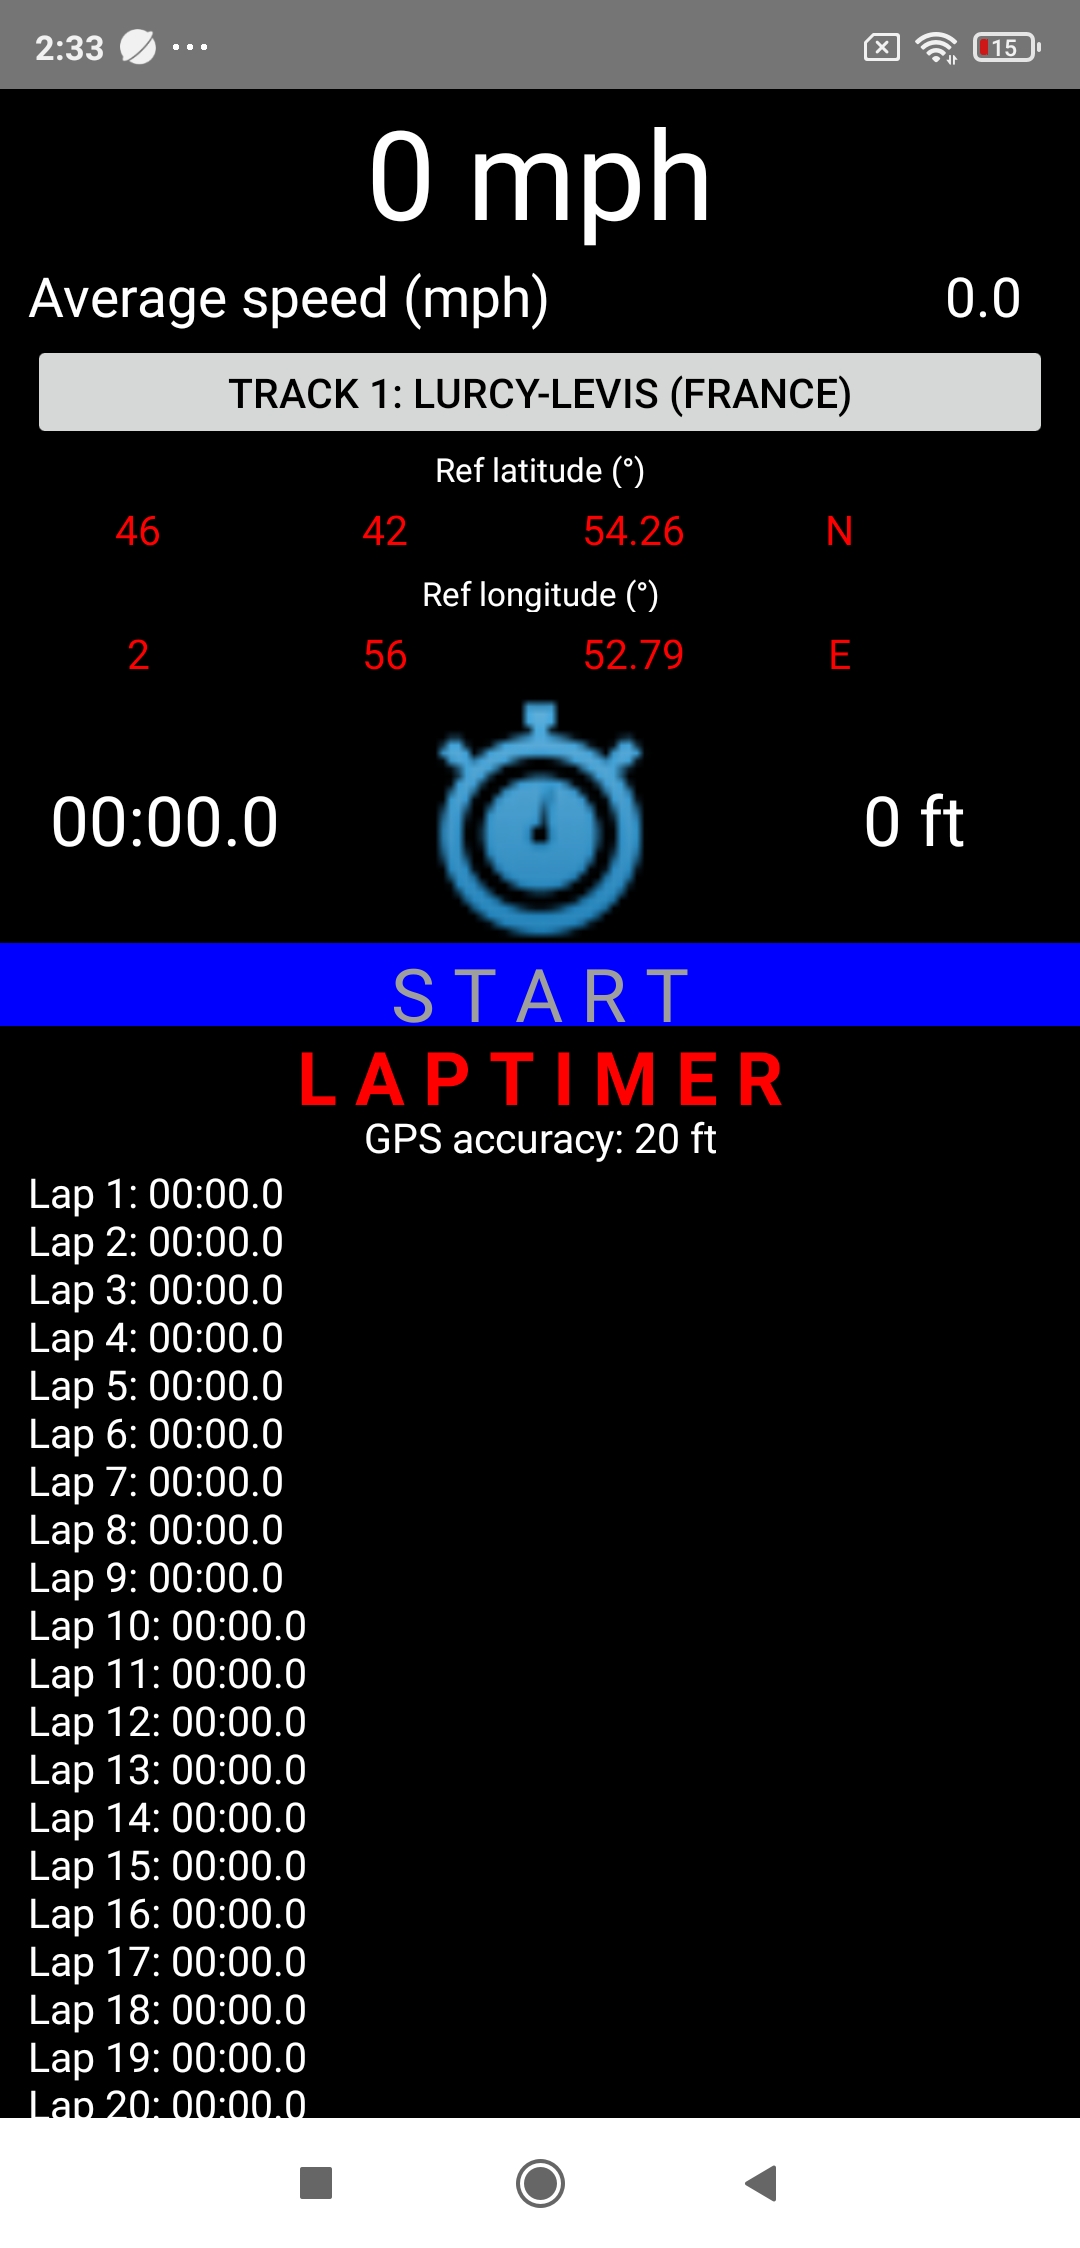
VI) Lap Timer
Go to the Track screen (accessible by pressing the Track icon -the 2nd, in the middle-left-).
Prior definition: A Lap Timer is an automatic timing system for laps on track. This function allows all those who run on track to:
- know the performance of their car on track during a session
- check their regularity (driver AND car) during these sessions
- quantify the progression of these performances over time
It is of course the GPS receiver which is used in base to perform this function.
To properly use the Lap Timer, you must perform the following 4 operations, and always in this order:
1) Track selection (list or free choice of GPS coordinates)
The gray bar at the top of the screen displays the name of the selected track. Press it to scroll through the list of available tracks (only two in August 2023: Lurcy-Levis and Le Castellet, both in France), or to select the "Free choice" mode which allows you to freely choose the GPS coordinates of a reference point of the track on which you are going (ideally the middle of the finish line). In the second case, you will have to search these GPS coordinates on Google Earth or in a "Lap Timer" specialized application (Harry's Lap Timer, RaceChrono), then enter them in the application in the fields "Ref latitude (°)" and "Ref longitude (°)" in the DMS system (degrees, minutes, seconds). In this system, enter for the latitude and the longitude and from left to right the degrees (integer number), the minutes (integer number), the seconds (decimal number with a precision of 2 digits after the decimal point), and finally the quarter globe (latitude: N for North / S for South, longitude: E for East / W for West).
At this point, the Lap Timer is already ready to work!
2) Mount the phone ONLY on a good windshield mount for optimal GPS reception
Indeed, for an optimal GPS reception and therefore an optimal timing accuracy, it is essential that the phone is positioned under the windshield, and therefore on a good windshield mount. Since this is already the mounting to use for the PerfectPower basic measurements, use of course the same mount for all your measurements with PerfectPower.
3) Know that the Lap Timer only works if the speed at the reference point entered in the application is greater than or equal to 50 km/h (31 mph)
There are two reasons for this:
- the Lap Timer being used for track times, crossing the reference point at less than 50 km/h (31 mph) means that we have stopped the timed laps and there is no point in continuing to time
- the accuracy of the Lap Timer is PROPORTIONAL to the speed for a very simple physical reason: the time being equal to the quotient of the distance by the speed, the higher this one is, the lower the time lag due to the not perfect accuracy of the GPS receiver, and therefore the better the accuracy of the Lap Timer!
4) Get to the track, and run the Lap Timer!
When you leave to do your session, go to the Track screen, then do the following operations:
Press the chrono located in the middle of the screen. The bar below the chrono initially blue ("Start") then turns white ("Running..."): the chrono then starts immediately, and you can start whenever you want to perform your timed session! Take care of absolutely nothing, PerfectPower manages everything! A few clarifications though:
- The Lap Timer obviously only begins to time the track laps from the first crossing of the track reference point! Which obviously doesn't pose any problem, quite the contrary, since the initial phase from the start from the track parking is only a phase intended to launch, and the real timing MUST only begin once perfectly launched!
- All timed laps are memorized by PerfectPower and displayed in the lower part of the screen. Thus, once your session is over, you can analyze them quietly.
- The maximum number of recorded laps is 30, and the maximum timing duration is 1 hour.
- In all cases, the timer will stop either manually by pressing the chrono on the screen, or automatically after the first of the following two conditions is met: 30 laps completed, or 1 hour of session. The bar below the chrono then becomes blue again ("Ended"), and you can quietly analyze all your timed laps displayed in the lower part of the screen.
- Once the session has been analyzed, pressing again the chrono on the screen allows you to return to the "Start" state (bar below the chrono still blue) which will reset all the data, and you can start again whenever you want to perform a new timed session.
VII) Results
Go to the Results screen (accessible by pressing the Results icon -the 5th, on the right-).
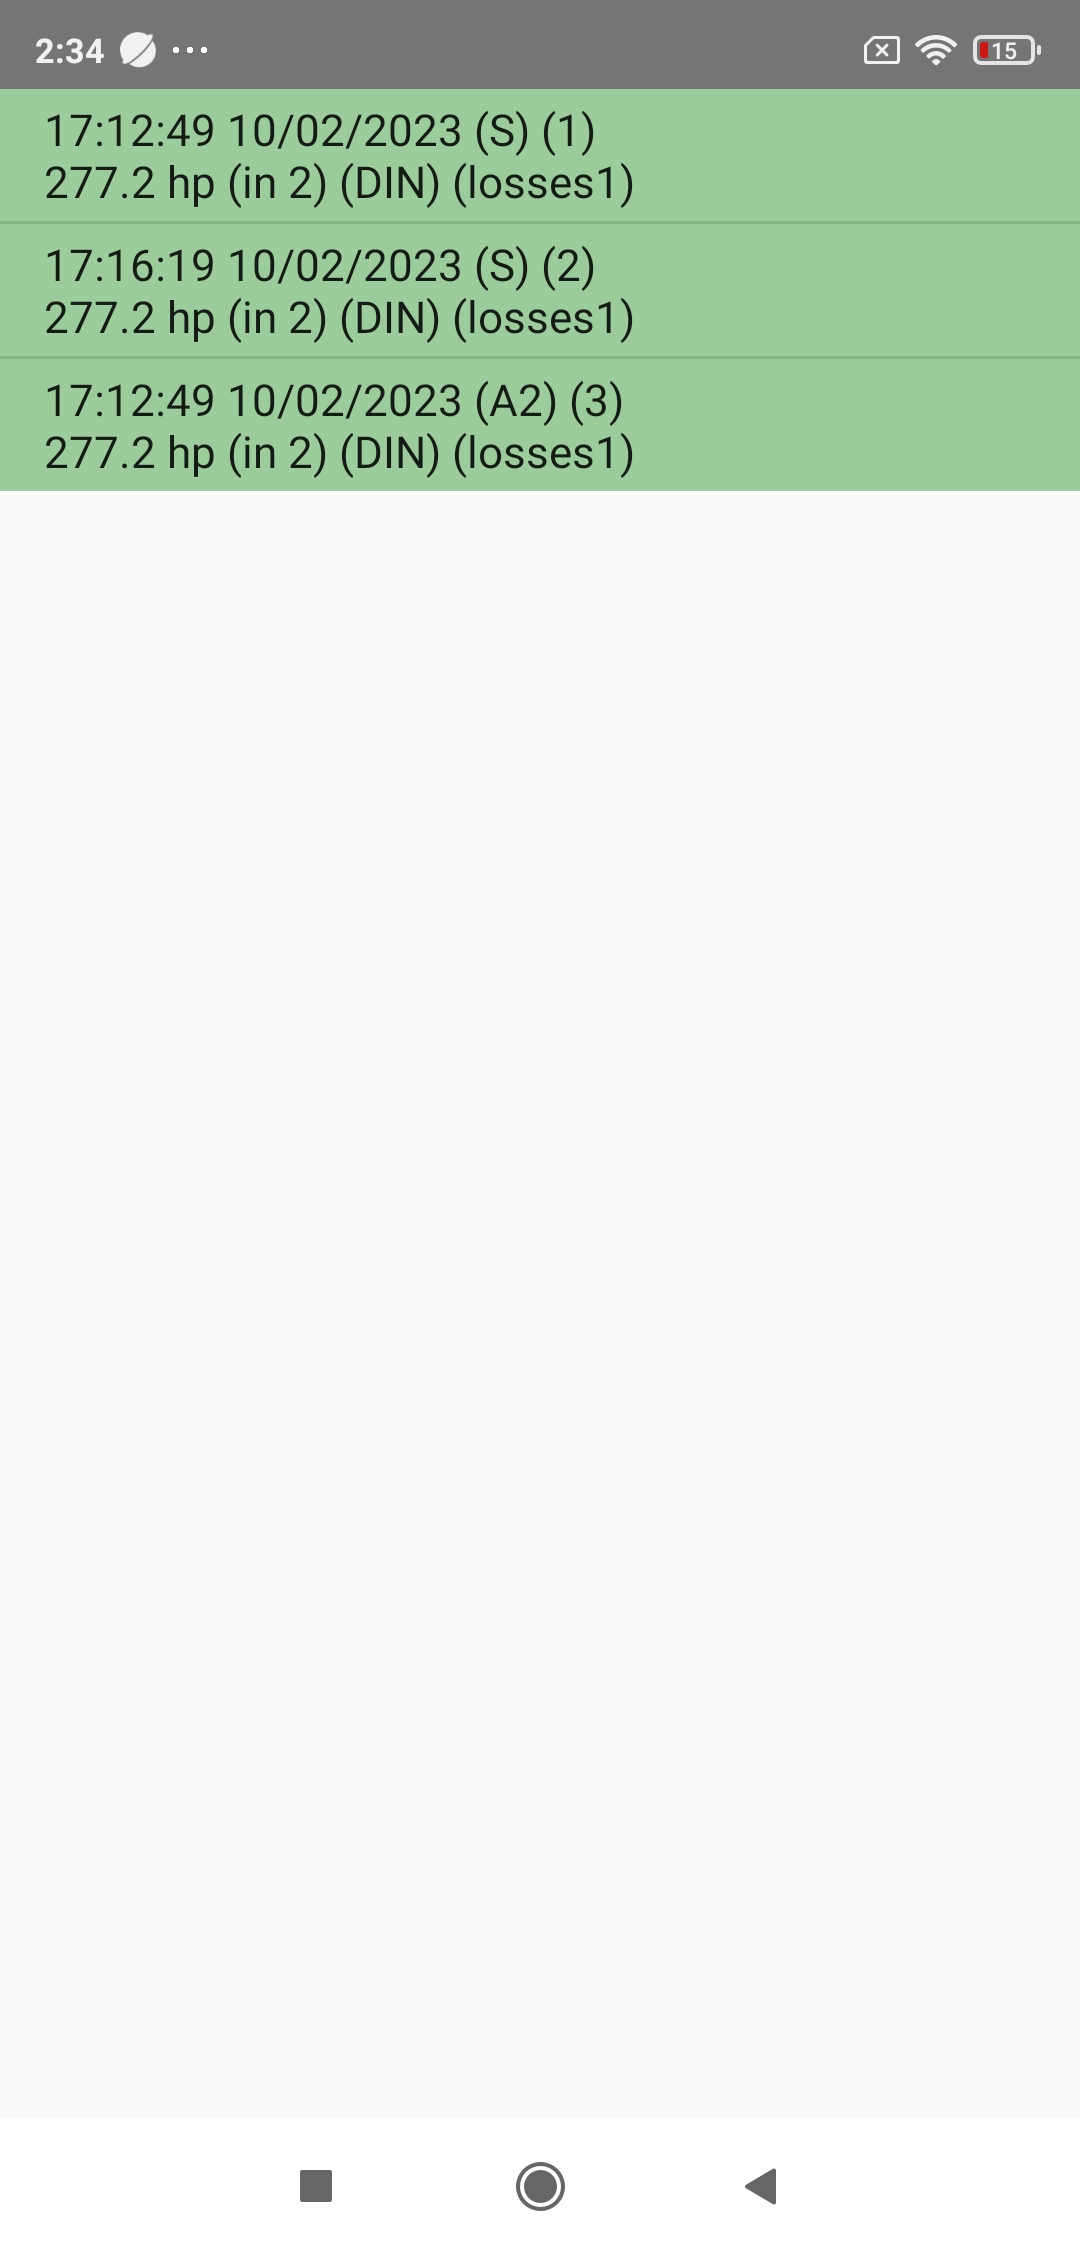
The list of the 4 main types of measurements (and stored in memory) is then displayed: Power, Accelerations, Runs flying start, and Braking. Click on the desired type of measurement among these 4, and the list of the results for the selected car - the one displayed in the Perfs screen - is then displayed. Each of the results in this list is identified by the date of the associated measurement, and several pieces of information (global or specific to the measurement type) are also displayed:
Line 1 (global): Date of the measurement, nature of the measurement (S = single measurement, Ax = average of x measurements, x = 2, 3, or 4), recording number (from 1 to 50, maximum number of results admissible)
Line 2 (measurement type specific):
- Power: the max power, the measurement gear, the correction norm, and the losses calculation mode (losses1 = calculation of losses on parameters, losses2 = calculation of losses by measure in coastdown)
- Accelerations: the time at 400 m (= 1/4 mile) SS
- Runs flying start: the type of run (start speed, end speed, gear engaged) and the time achieved
- Braking: the type of braking (start speed) and the stopping distance achieved
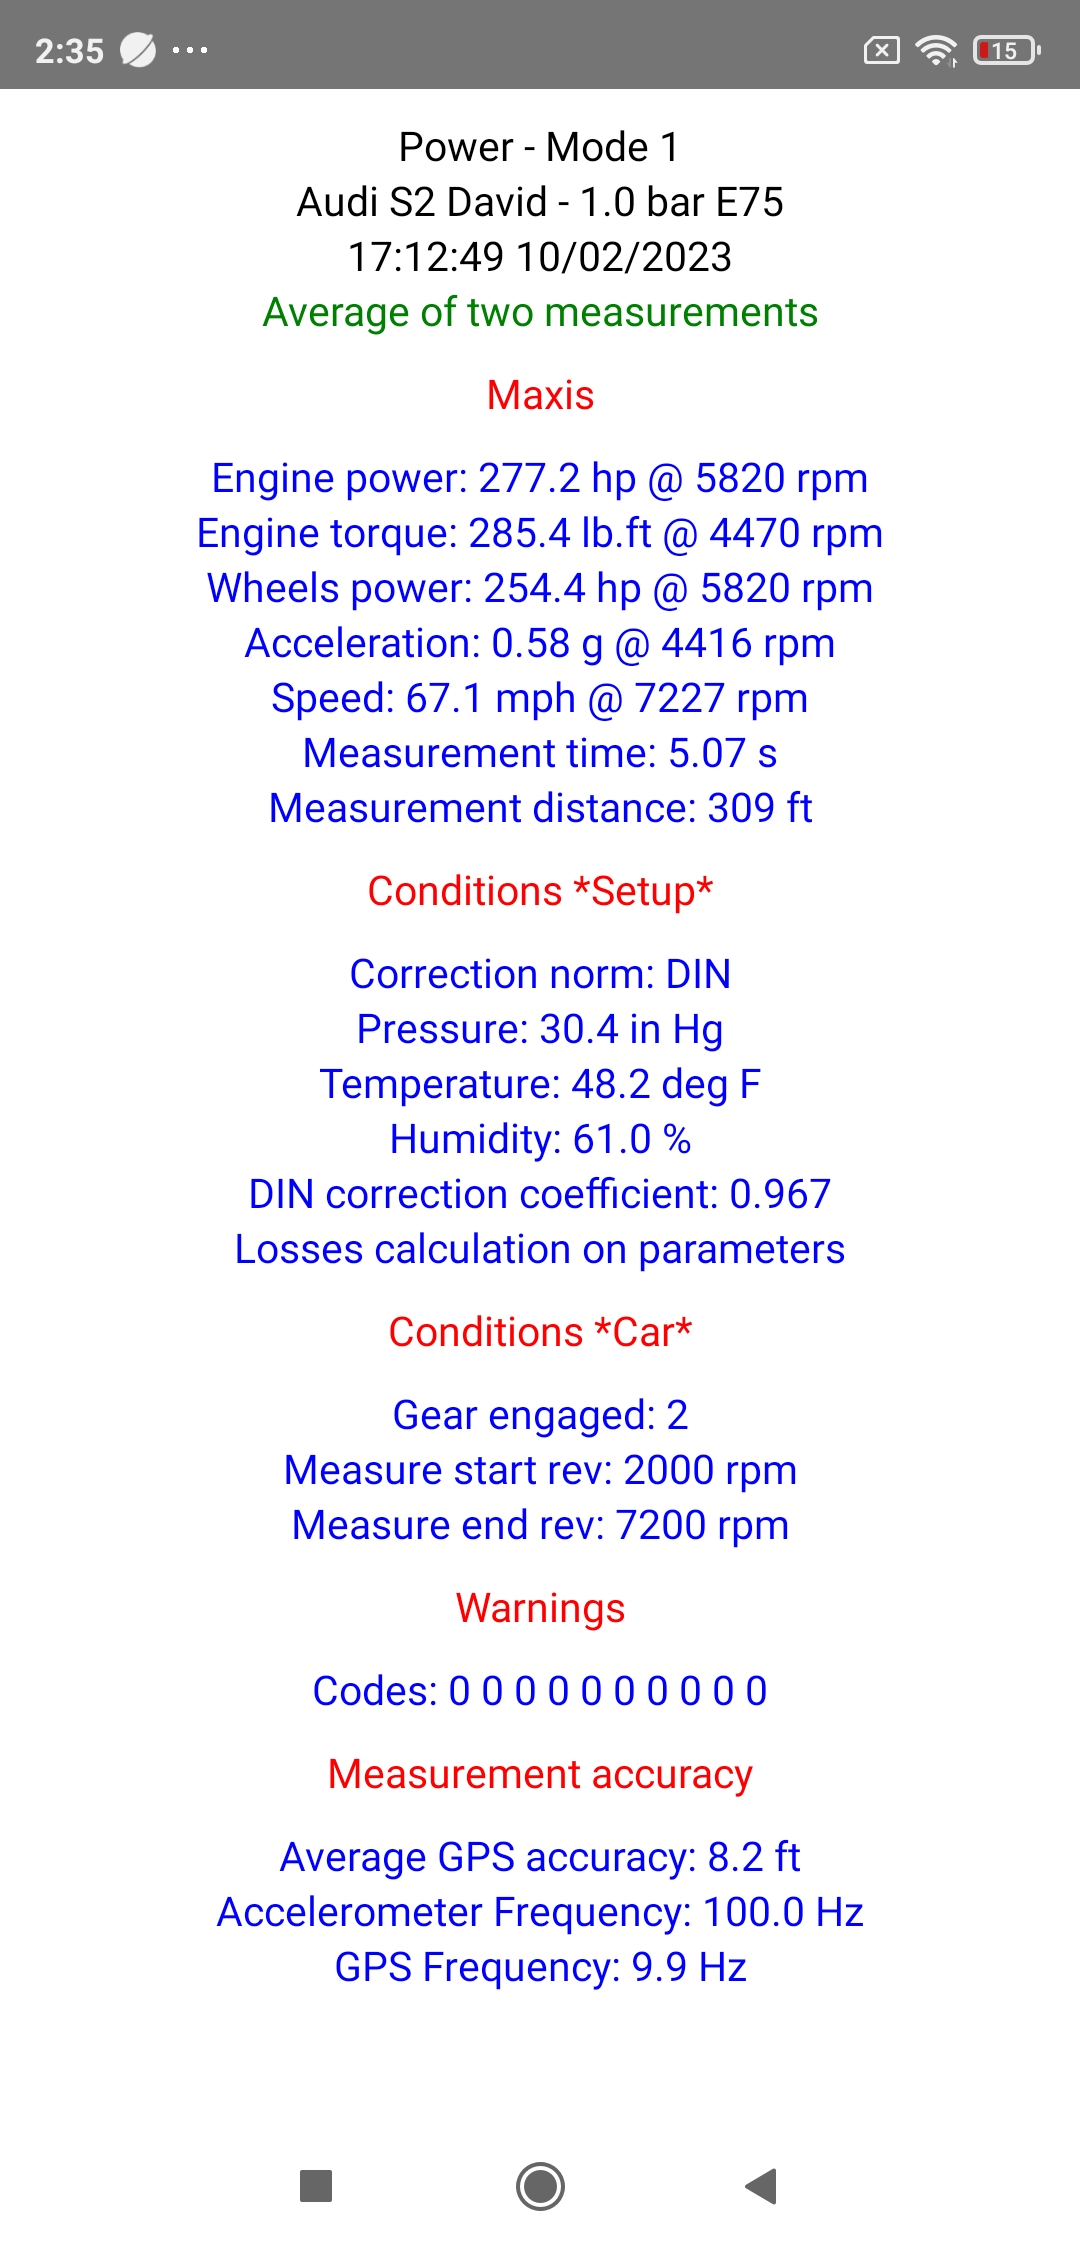
1) Reading the results (sheet, graph)
Click on the row corresponding to the desired result, and you then access its sheet.
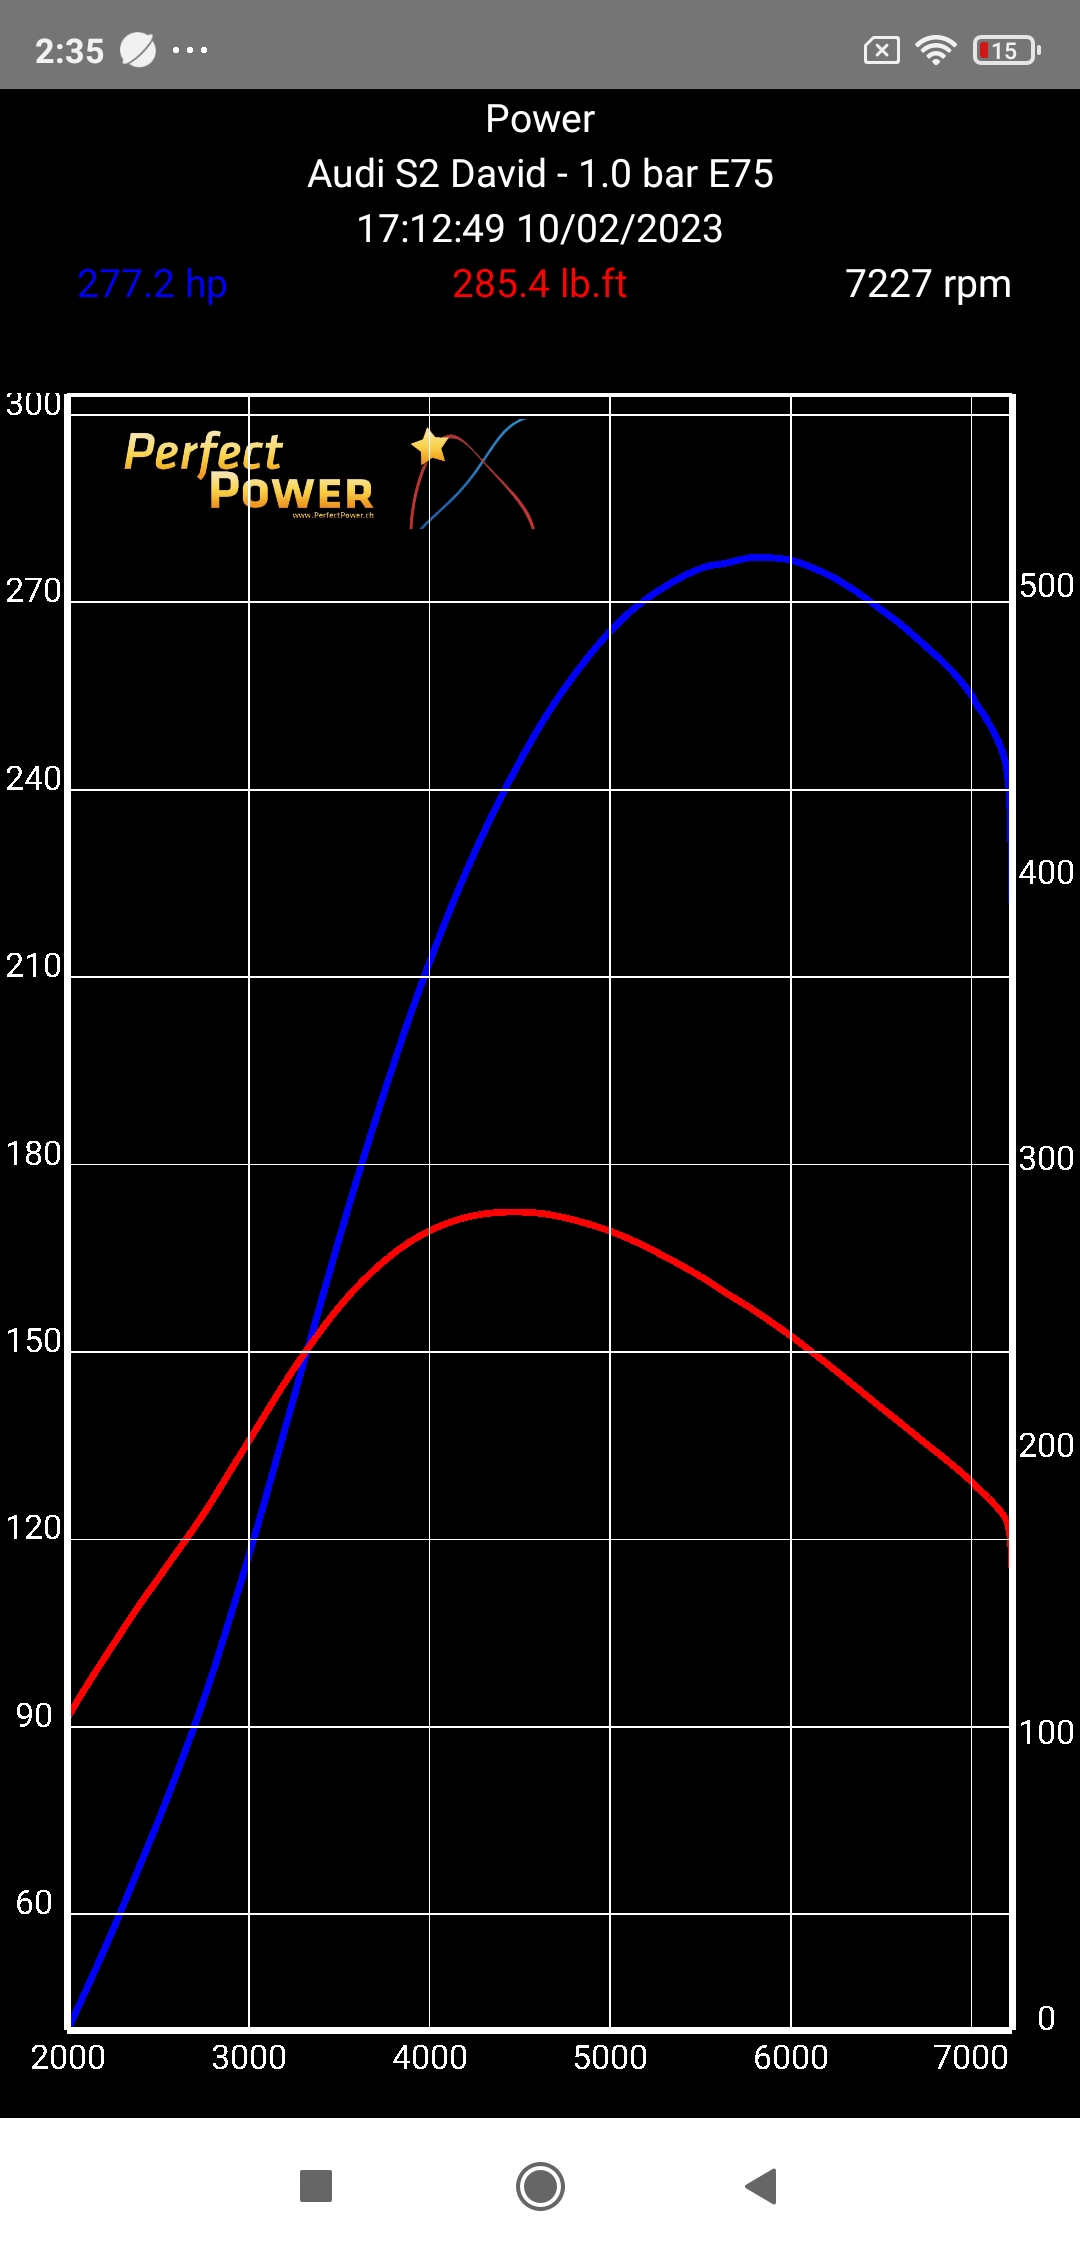
This sheet is in a specific format for each type of measurement (power, accelerations, runs flying start, braking). The power and acceleration results have a graph accessible by pressing the Graphic button located at the bottom of the sheet.
This graph includes 2 curves representing:
- the engine power and the engine torque as a function of rev for the power
- the acceleration and the speed as a function of time for accelerations
At the top of this graph are summarized the maximum values.
This graph is also interactive: you just have to slide your finger over it to see a small green bar appearing moving with your finger, and the exact values of the selected measurement point are displayed in the reserved area at the top of the screen. To return to the Results screen, press the BACK button.
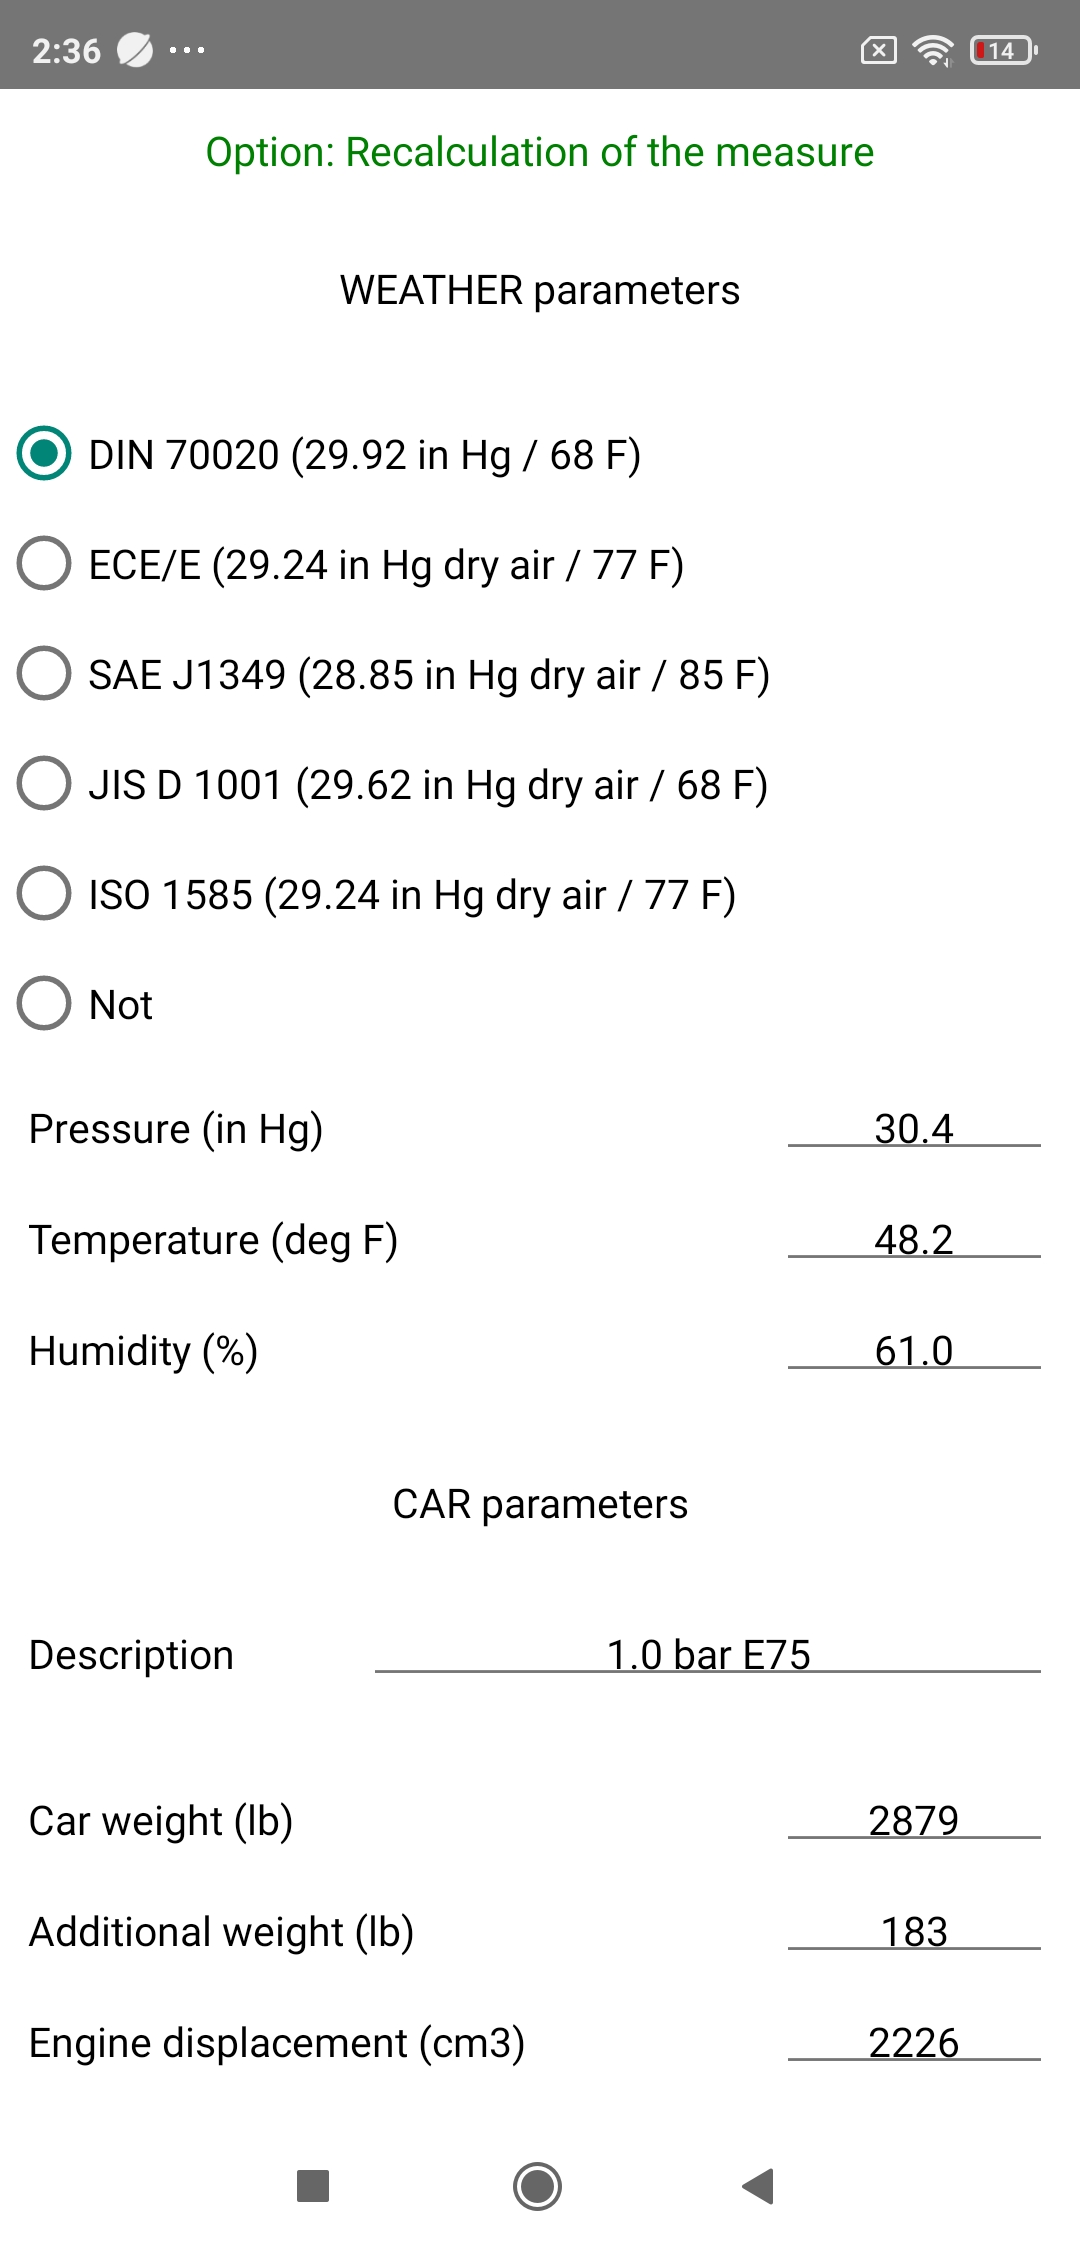
2) Re-calculation of power and accelerations measurements
PerfectPower offers an extremely interesting function for re-calculating power and accelerations measurements, which allows you to have these measurements re-calculated by the application AFTER they have been carried out, by modifying the parameters!
These parameters are available and modifiable directly in the power and accelerations measurements results sheets in the "Option: Re-calculation of the measure" section located below the results of the measurement. Simply:
- modify the desired parameters
- press the "Re-calculation of the measurement" button located at the bottom of this option
==> PerfectPower then recalculates the measurement with the new parameters (without saving them) and displays the new results in the sheet.
If after analyzing the new results, you consider that this new setting is indeed the correct one, then you can save these new parameters by pressing the "Register the new parameters" button located at the very bottom of this option. Otherwise, you can re-modify the desired parameters and re-calculate the measurement as many times as you want until you obtain the correct parameters, and finally save the final parameters.
Note 1: If you are certain of the validity of your new parameters, you can also directly press the "Register the new parameters" button after having modified them without pressing the "Re-calculation of the measurement" button! Indeed, pressing this button performs the two actions "Re-calculation of the measurement" and "Register the new parameters" in succession!
Note 2: A special mention for the "Max speed correction" function (the only measurement re-calculation function available for accelerations measurements, these do not require any specific configuration), very interesting but also very dangerous!
Indeed, this function was created ONLY to correct a possible weakness in GPS reception, and it should therefore ONLY be used in this scenario! Refer to the Tips & Tricks section of the power measurements to find out if and how you should use it.
It is needless to say that if you use this function when your GPS reception is good, you will only degrade and not improve the accuracy of your results, thank you for your attention!
3) Compare and/or average results from a same car
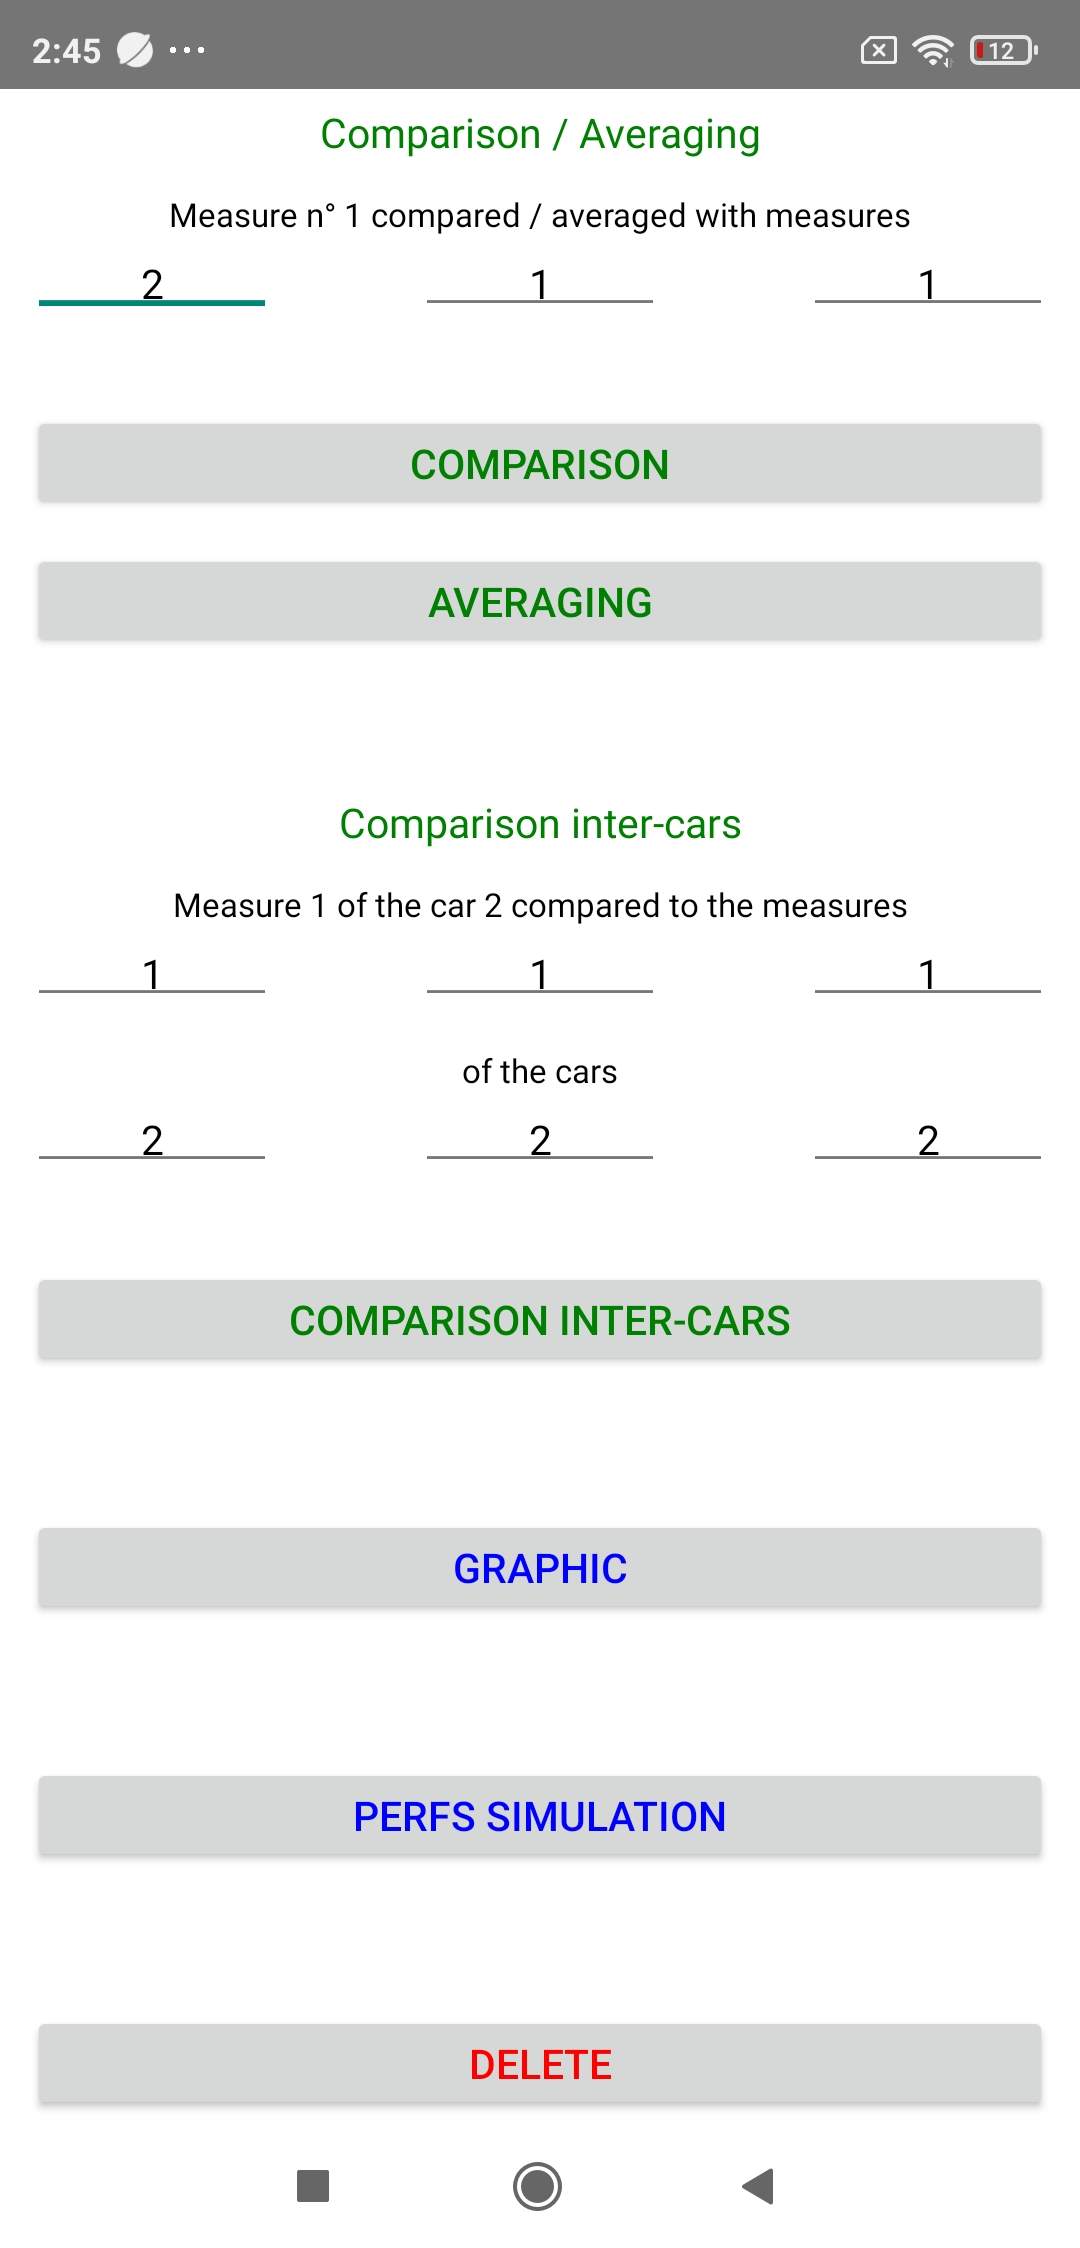
It is possible with PerfectPower to compare and/or average the results of two to four measurements of the same type for a same car. All you have to do is access the results sheet of one of the measurements to be compared and/or averaged (this measurement will constitute the reference measurement), then select in the "Comparison / Averaging" section located at the bottom of the sheet the number of the other measurements to be compared and/or averaged, and finally press the appropriate "Compare" or "Average" button: you then access the comparison or averaging sheet of the chosen measurements. You then return to the reference measurement results sheet by pressing the BACK button.
Note 1: As for the configuration of the Car sheet, this is the press on the blue button Done of the keyboard that validates the recording of the numbers of the measurements to be compared and/or averaged.
Note 2: You must ensure the compatibility of the measurements to be compared and/or averaged:
- For power measurements: They must have been performed with the same correction norm, in the same gear, and have the same measurement start rev
- For acceleration measurements: No incompatibility
- For runs flying start measurements: They must be EXACTLY of the same type (same start speed, same end speed, same gear)
- For braking measurements: They must be EXACTLY of the same type (same start speed)
However, you don't really have to worry about this since if you select measurements that are incompatible with each other, PerfectPower will detect it and won't select them.
Note 3: When you average measurements, be aware that it is possible to generate a new official result built on the basis of the averaged result! All you have to do is press the "GENERATE A NEW RESULT" button located at the very bottom of the averaged result sheet, and a new official result constituting the average of the source measurements used is created with a new number and the date of the result of the reference measurement!
This new averaged official result is added to the list of the classic results, and it has all the characteristics of them. The only visible difference with classic results is the mention Ax (= average of x measurements, with x = 2, 3, or 4) instead of S (= single measurement) in the results list, and the reminder of its averaged and not single nature in its own sheet with the mention "Average of x measurements" instead of "Single measurement" in the header.
The generation of a new official result constituting the average of several measurements is extraordinarily interesting, because it allows:
- to officialize your measurement results with a single sheet & graph, as if a single measurement had been performed!
- to then delete all the source measurements used to generate this new official result, which allows you to free up memory space!
4) Compare results from different cars
It is also possible with PerfectPower to compare the results of two to four measurements of the same type but with different cars. All you have to do is access the results sheet of one of the measurements to be compared (this measurement will constitute the reference measurement), then select in the "Comparison inter-cars" section located at the bottom of the sheet the number of the other measurements to be compared with, for each, the number of the associated car, and finally press the "Comparison inter-cars" button: you then access the comparison sheet of the chosen measurements for the different cars. You then return to the reference measurement results sheet by pressing the BACK button.
Note: The same comparison rules apply for classic comparisons (rules defined a little above in notes 1 and 2 of chapter 3) and inter-cars comparisons.

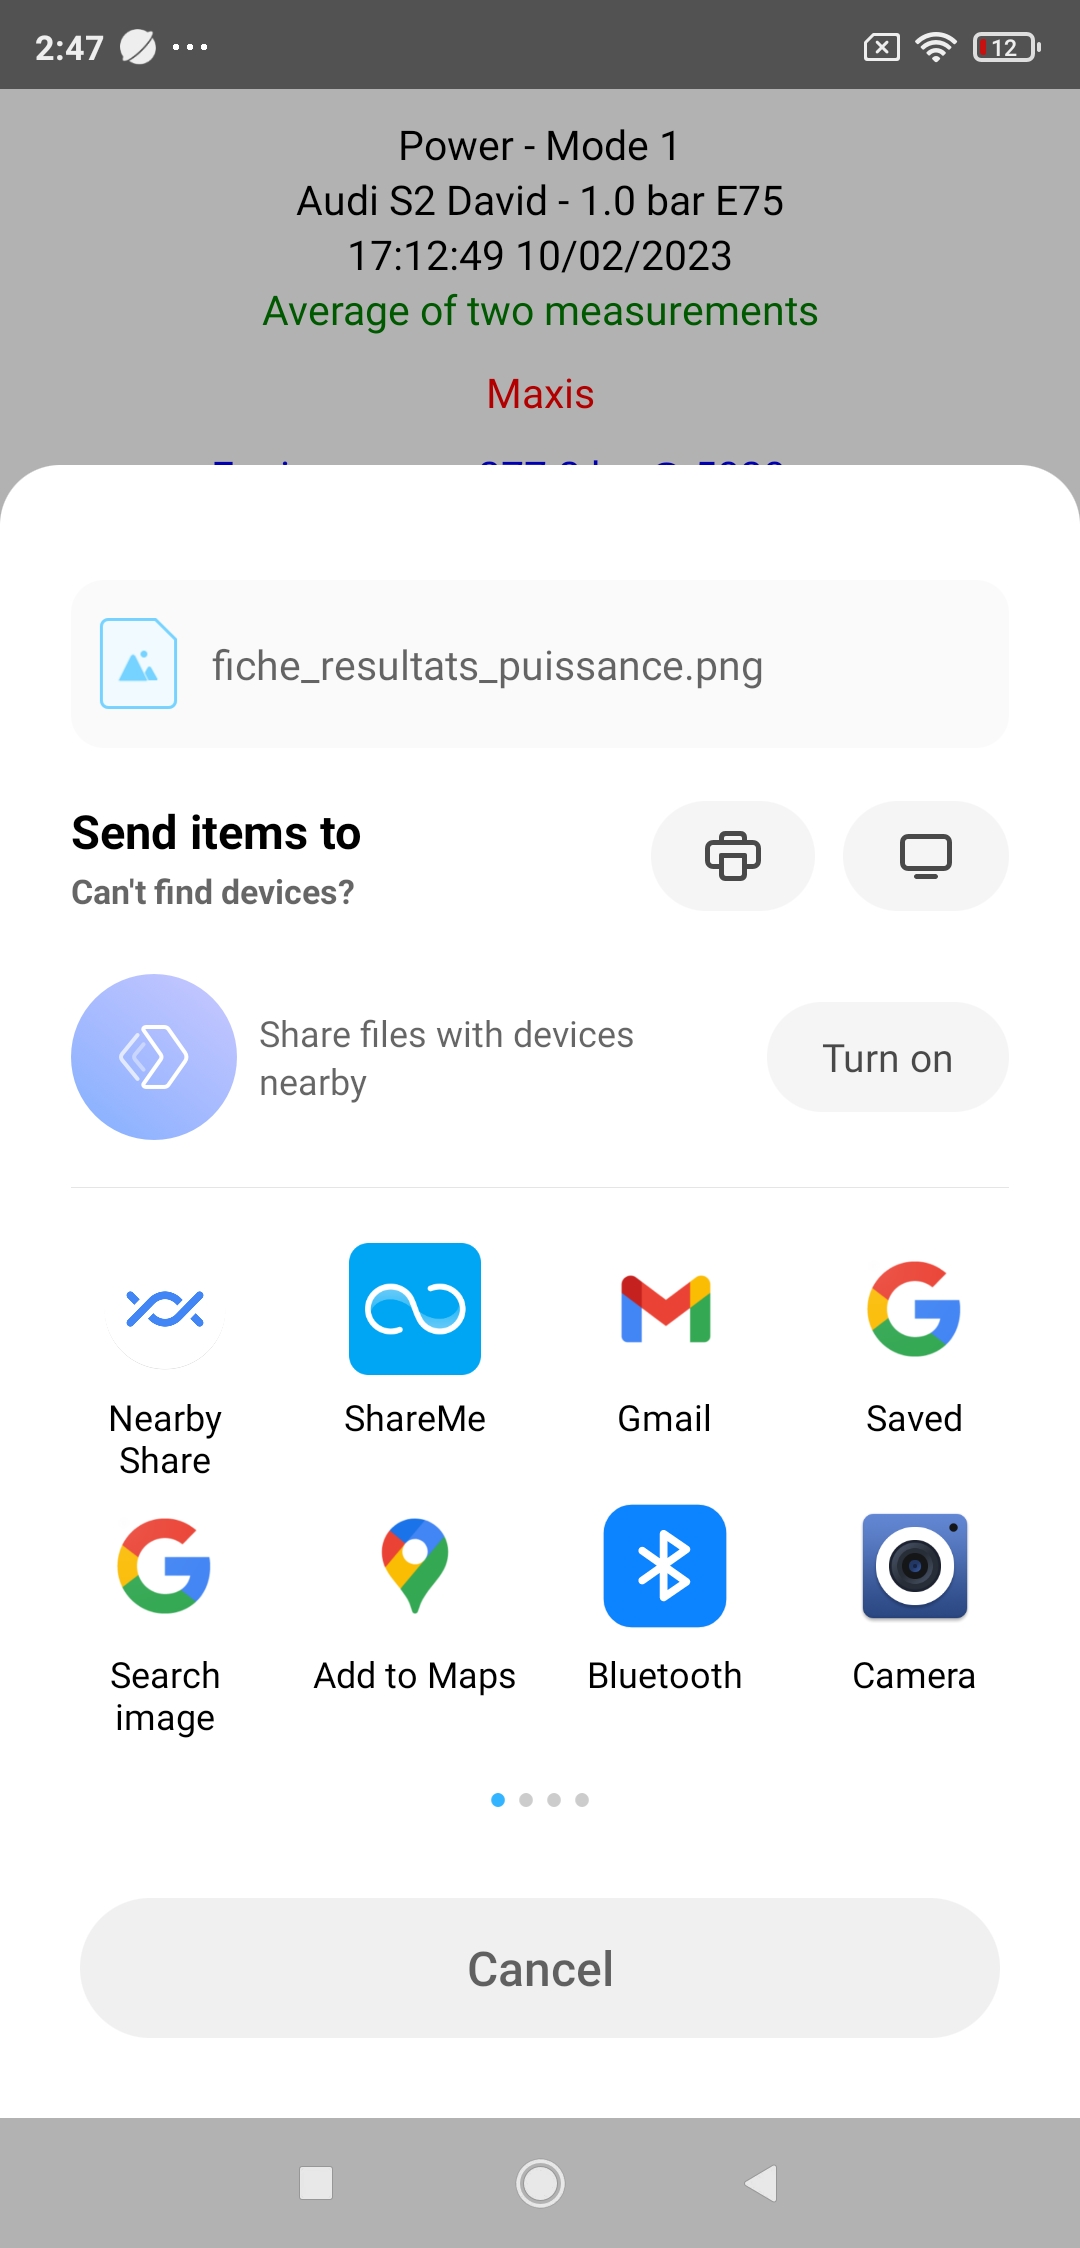
5) Export power results (sheet, graph) by email
It is possible with PerfectPower to export result sheets and graphs of power measurements by email, both for classic results and for comparisons and averaging of results.
To do this, you just have to do a long click at the very top of the screen on the first line of text of the results sheet or the graph that you want to export, and PerfectPower will offer you a selection of mail applications allowing this export.
Select the one that suits you best (gMail for example), enter your email address, then click on "Send": the sheet or the graph will be immediately sent to your mailbox in the form of a PNG image file.
6) Delete a result
As for the cars, you can also delete a result at any time: from the sheet of the result to be deleted, make a long click on the "DELETE" button located at the very bottom. You can then delete other results by repeating the same operation.
Warning: This deletion operation is irreversible!
VIII-A) Using the RaceBox Mini
Starting from version 6.1, PerfectPower is able to drive the RaceBox Mini, the best 3 in 1 "all-public" on-board measurement equipment, including a GPS of speed (25 Hz!) and accuracy (around 1 ft) completely unprecedented, as well as an accelerometer and a gyroscope both 3-axis. The RaceBox Mini is a "Bluetooth Low-Energy" type device, able to send and receive information with any type of device supporting this type of communication, such as any modern smartphone.
PerfectPower's communication process with the RaceBox Mini was designed to be as simple and comfortable as possible so that you can focus on the quality of your measurements and absolutely do not have to worry about the RaceBox Mini once it is installed in the car, and is based on a cycle of 3 long-clicks on the chrono, located in the center of the main screen:
- The 1st launches a SCAN of 15 s during which PerfectPower searches for all the devices available nearby in "Bluetooth Low-Energy". If it finds your RaceBox Mini within the time limit, it stops the SCAN and is then ready to connect. If it doesn't find it, you can run a new SCAN until it finds it.
- The second allows PerfectPower to CONNECT to the RaceBox Mini, which signals this connection by emitting a blue light
- And the third allows to DISCONNECT from it, the blue light then ceases to be emitted
Concerning the installation of the RaceBox Mini in the car, I let you refer to the documentation provided by RaceBox.
Concerning its use, as said, everything has been thought out so that it is completely forgotten, and once it is connected to PerfectPower (blue light on), the measurements are performed EXACTLY as usual! The only visible difference on the phone compared to conventional measurements using the phone's internal GPS at 1 Hz: the speed display is in red (instead of white), with an accuracy of 0.1 mph (instead of 1 mph), and... at the frequency of the RaceBox Mini, so 25 Hz (instead of 1 Hz) and therefore 25 displays per second!
Note 1: All SCAN & CONNECT & DISCONNECT actions are always reported by PerfectPower via pop-ups, whether success or failure, so that you always know exactly where you are with your RaceBox Mini.
Note 2: Everything has been thought out to limit energy consumption as much as possible (Bluetooth being very energy-intensive as you can imagine), however the only action that remains YOUR FACT to limit energy consumption is to think about disconnect from your RaceBox Mini as soon as you are no longer using it. Needless to say, however, that the connection is automatically cut as soon as you leave PerfectPower.
Note 3: It is of course necessary that Bluetooth is enabled on your phone when you use the RaceBox Mini! However, here again, everything has been thought out to make things easier for you, and if your Bluetooth was disabled during the first long-click (this of the SCAN), PerfectPower will allow you to enable it WITHOUT EVEN EXITING THE APPLICATION!
VIII-B) Use of an external GPS in Bluetooth
In order for PerfectPower to be able to communicate via Bluetooth with your external GPS, you must follow the 3-step plan presented below:
1) Turn on your external GPS
2) Pair your external GPS with your phone (to be done once)
3) Use the Bluetooth GNSS application (intermediary between your external GPS and your phone)
1) Turn on your external GPS
Press the Power button on your external GPS.
Note: Often, it requires a long press of 1 to 3 seconds, in order to avoid unwanted ignitions (and therefore battery dumps)...
2) Pair your external GPS with your phone (to be done once)
The pairing process is the process that allows two devices to communicate via Bluetooth (in this case, your external GPS and your Android phone). It only needs to be done once: once paired, the two devices are respectively "registered" for each other.
Note 1: This process may vary slightly depending on the Android OS installed on your phone, in particular on the name of the menus, but the instructions given remain the same.
Note 2: If your phone asks for a code during the pairing process, use "0000" or "1234".
On your phone:
- Go to "Settings / Additional settings / Developer options", and check "Allow mock locations"
- Go to "Settings / Bluetooth", and activate Bluetooth
- In this same menu, press "Available devices"
After a few seconds, the name (or the identifier) of your external GPS will appear in the list of available devices: click on it, and in a few seconds your external GPS will appear in the list of paired devices: it's done, your external GPS is now paired with your phone, ie it is recognized by your phone as a device with which it can communicate via Bluetooth.
On the other hand, it is not yet really connected to your phone: for this, you must use a Bluetooth GPS third-party application (called a "GPS Provider") which will act as an intermediary between your external GPS and your phone, or more exactly between your external GPS and your phone's OS: indeed, this application will retrieve the information from your external GPS AND send it immediately to your phone's OS, replacing the information from the internal GPS of your phone.
Thus, PerfectPower, like all other applications on your smartphone that use GPS and retrieve GPS information from your smartphone's OS, will receive information from your external GPS!
There are several "GPS providers", the most recommended is the Bluetooth GNSS application available for free on Google Play at this link: Bluetooth GNSS. You must therefore download and install this application, then follow the instructions given in the 3rd point below to make it work properly.
3) Use the Bluetooth GNSS application (intermediary between your external GPS and your phone)
Two steps are necessary:
- Correctly configure Bluetooth GNSS
- Connect to the desired external GPS (yours of course)
In fact, the default settings of this application are already satisfactory, it is really only necessary to connect to the desired external GPS to make it work correctly. Nevertheless, the best setting is given to you in the plan below which achieves these two steps.
- Launch Bluetooth GNSS. You then access the main screen.
- Select your external GPS from the list of external GPS paired with your phone (top left, "Select paired GPS device and connect" menu)
- Check "Enable Mock GPS Provider" just below (important)
- Open the "Settings" menu (top right), and select the two options "Reconnect" and "Use Insecure Connection"
- Return to the main screen, and press the "CONNECT" button (to the right of the name of your external GPS)
After a few seconds, the connection is made, and all the fields of the main screen are filled with "new" GPS information from your external GPS! From this moment, PerfectPower, like all other applications on your smartphone that use GPS, will receive information from your external GPS (and only it!), and this until you choose to disconnect from it by clicking on the "STOP" button in Bluetooth GNSS (to the right of the name of your external GPS).
You can then exit Bluetooth GNSS with no worries, it will continue to run in the background and provide PerfectPower and all your GPS applications with information from your external GPS!